When we speak of the quality of light, we’re not talking about whether it’s good or bad; rather, we are referring to whether the light is hard or soft. Softness is one of the aspects of light that many people learn about early on in their exploration of photography, and it is perhaps the element of light that beginning photographers most readily fixate on.
Controlling the quality of light is, in theory, not difficult, as it depends on a single variable: the relative size of the light source. Put another way, if you desire a softer light, make your light source larger, and if you want a harder light, make your light source smaller.
There is, of course, a universe of nuance between these two precepts.
What are Soft and Hard Light?
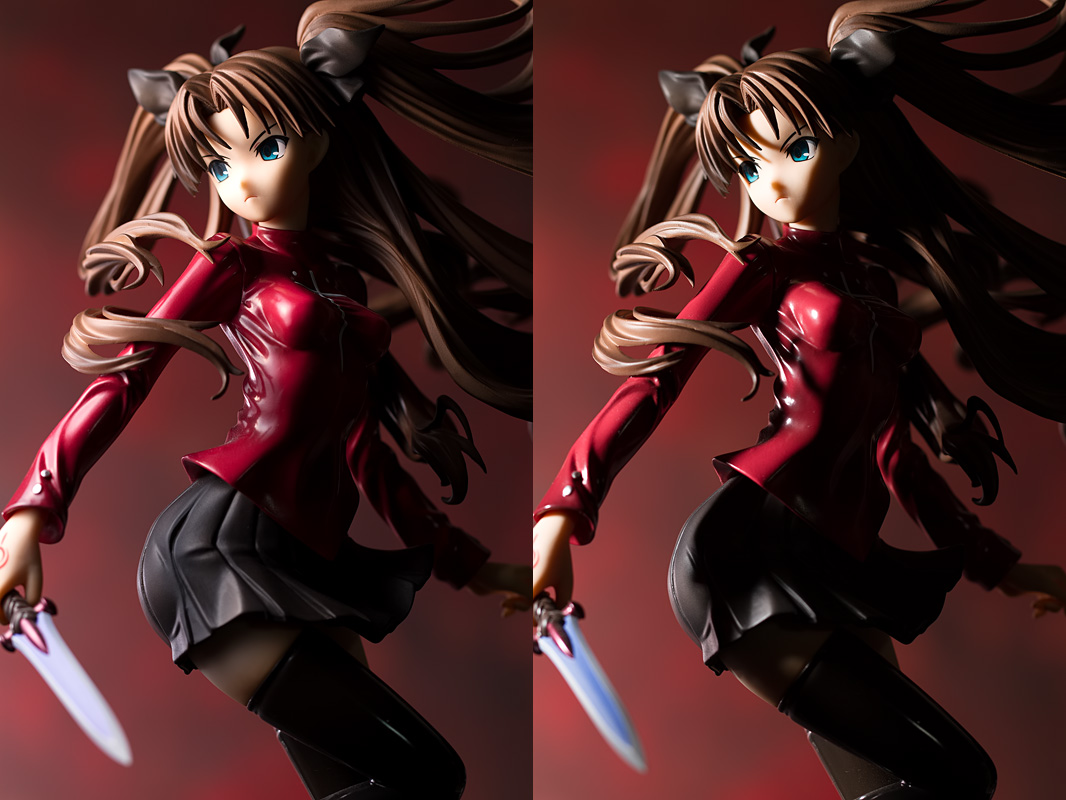
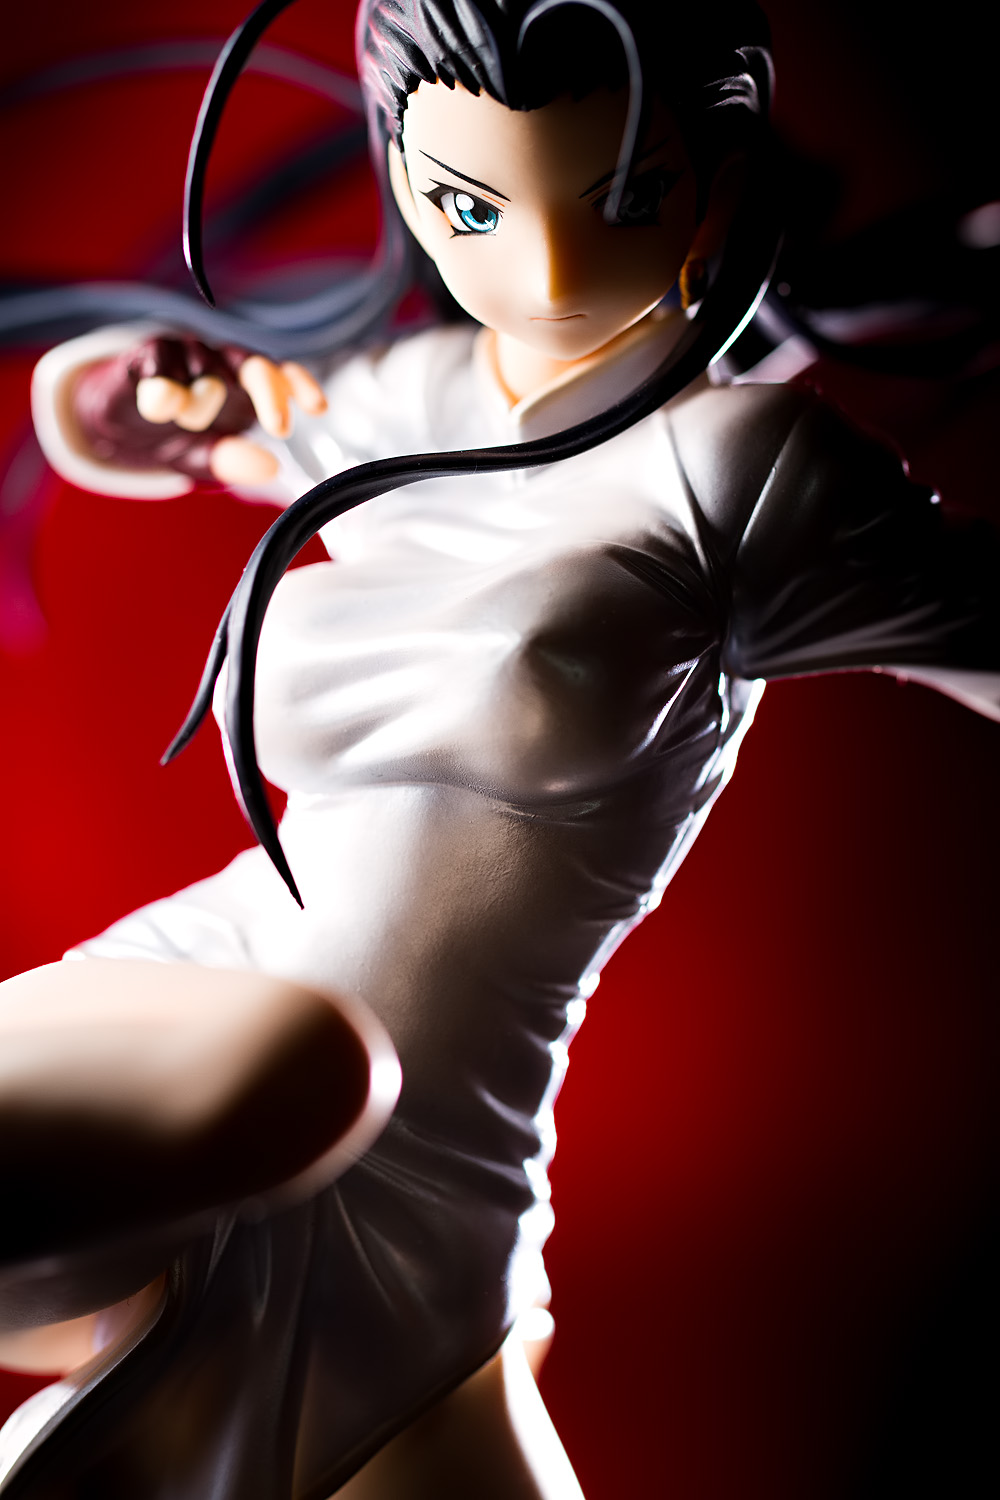
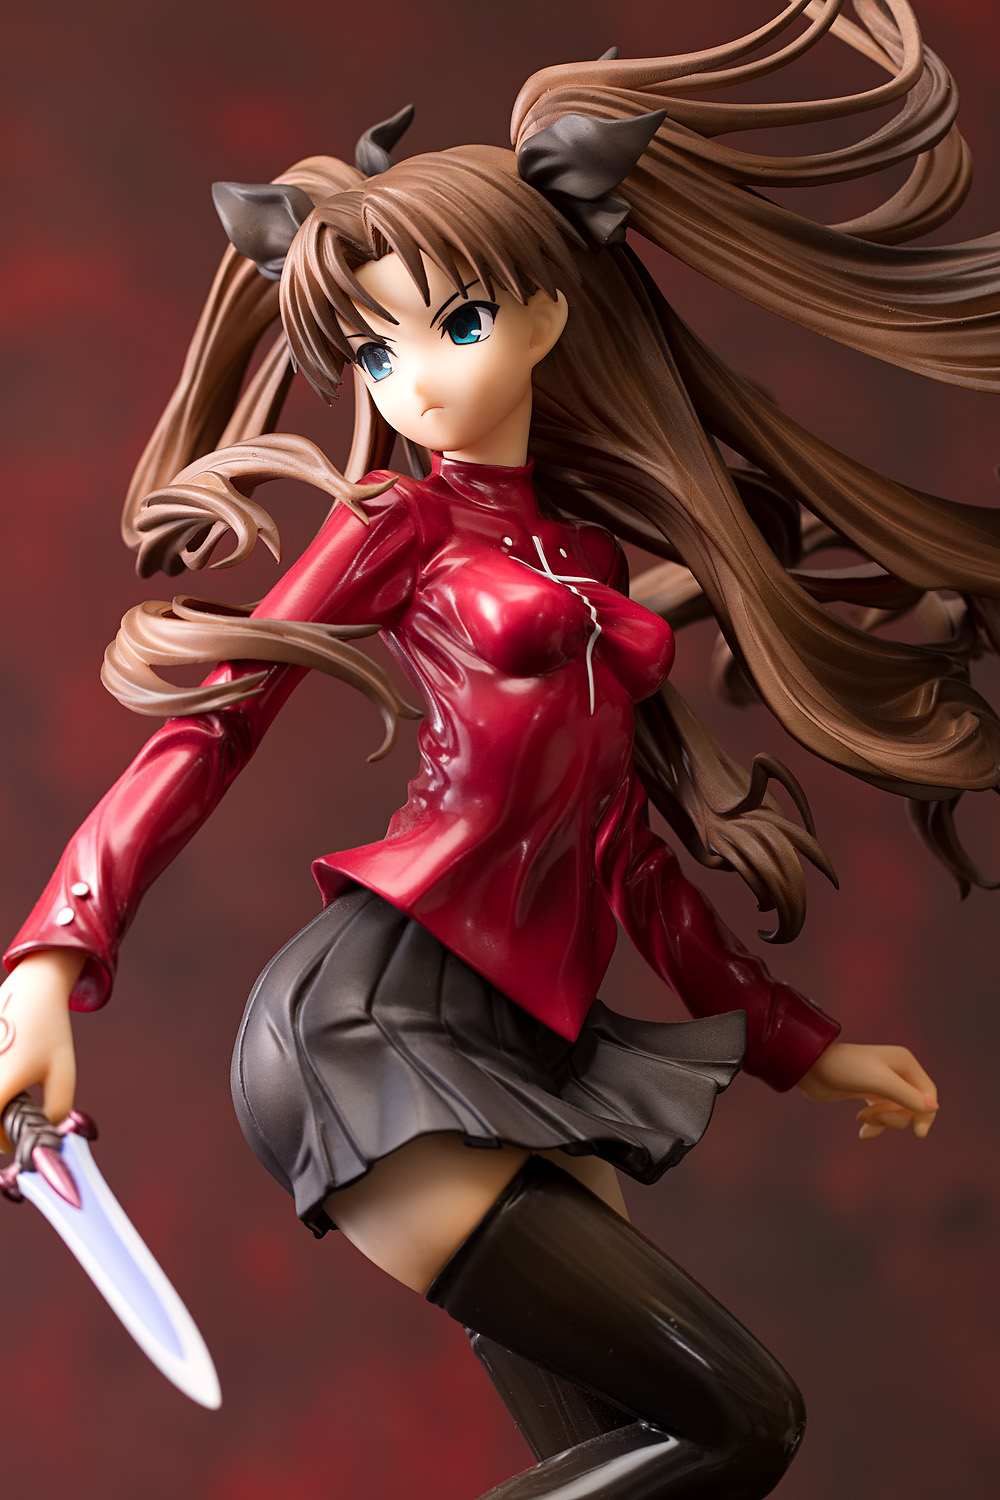
Hard light | Soft light
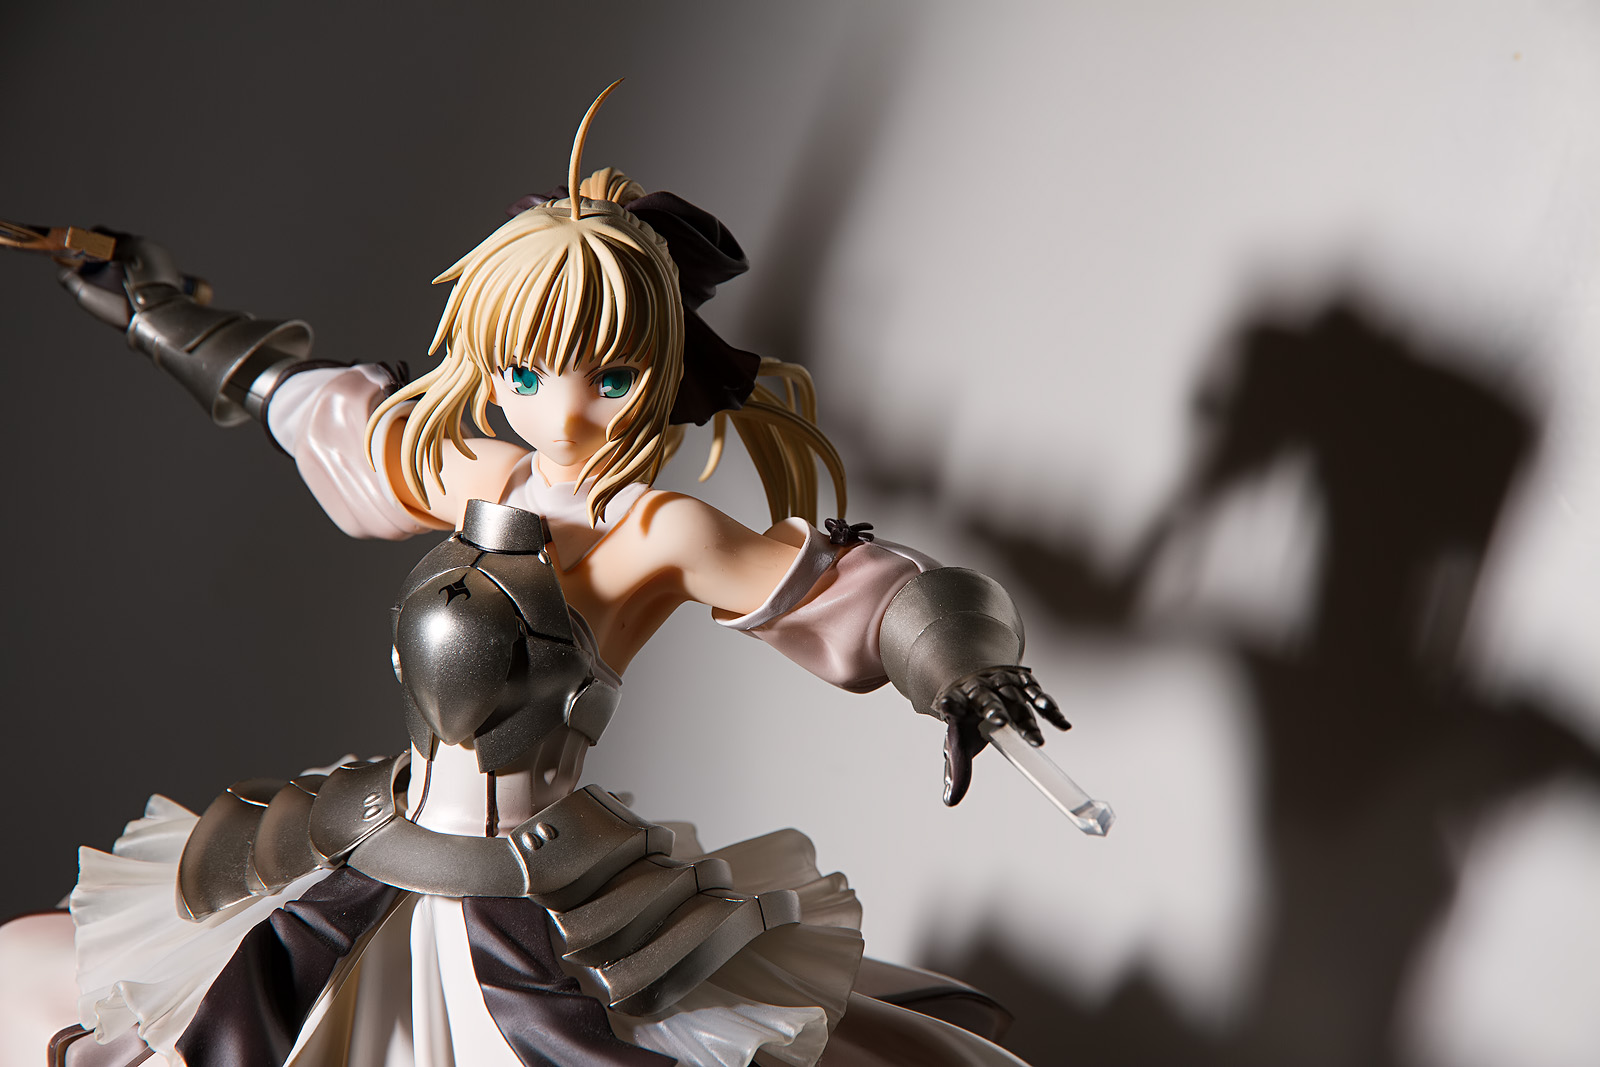
The terms hard and soft light do not actually refer to the bright, highlighted areas of the subject; rather, they describe the transition areas between highlights and shadows. Soft light creates a more gradual transition, whereas hard light results in sharper-edged shadows. In the images above, the hard light source results in a recognizable shadow on the background (though not one that is tremendously hard-edged), whereas the soft light source generates a very diffuse shadow with a nebulous edge.
Generating Soft and Hard Light
Using a relatively large light source will create softer light. Note that the term “relative” is significant; if you light a 1/6 scale figure and then you use that same light to light up a Figma, the shadows on the Figma will look softer because the Figma is a much smaller subject. The key idea is that, to the smaller subject, the light is relatively larger, which thus results in softer light. Conversely, if you used that same light to light up a 1/3 scale doll, or a human, it would appear to be a harder light source than it would with the figure.
Distance also plays an important role; a light source that is placed further away becomes a smaller light source, thus causing it to generate harder shadows. The classic example that everyone cites is the sun; the sun is nearly 1.4 million kilometers in diameter, a good deal larger than any light bulb found on Earth. However, it is also over 149 million kilometers in distance from Earth, making the sun a very small, incredibly hard-edged light source despite its actual physical size.
If you want to soften light, you should keep your light source close to the figure; I typically keep it as close as I can get it without it being visible in the frame. Note that by “light source,” we are really referring to the modifier that you’re using; for example, if you’re using a softbox, its front facing is the light source, regardless of how far away your lamp or flash is placed.
In photography, soft light can be generated in three ways:
- Diffusing it through a surface: One of the most common ways to soften light is to place a diffusive material between it and the subject. This material causes the light to spread out, enlarging its size and thus causing the light to become softer. Typical devices in this category include softboxes, some umbrellas, and scrims; we’ll take a closer look at light modifiers in a future post.
- Bouncing it off a surface: Another common way to soften light is to direct it at a larger surface; again, the light spreads out, causing it to become softer, and is then reflected back towards the subject. In human portrait photography, bouncing light off of a wall or the ceiling is a simple and common way of softening light, particularly when circumstances force the photographer to improvise quickly. In figure photography, I tend to not use this method very much to generate the key light, but when I use fill, I almost always use a fill card to bounce light back at the subject rather than adding another lamp or flash. A bounce card can also be handy when shooting outdoors; a fill card placed to the side of the figure while the sun is behind the subject can add contrast and direction to the lighting pattern.
- Using a physically larger light: The small size of most figures makes it possible to simply use a bigger light. Alternatively, one could gang two or more lights together; placed close together, they can approximate a single larger light source. (Frankly, I generally only use this method when I need more lighting power; I think it’s usually easier to just use a softbox or other modifier.)
If you’re using a diffuser like a softbox to soften your light, how big does it need to be? There’s no fixed answer, but one rule of thumb I’ve heard is that at a minimum, it ought to approximate the size of the subject you’re lighting. For example, if you’re shooting a 20-centimeter tall figure from the waist up, your diffuser ought to measure at least 10 centimeters or so on its long edge (ideally, it would be larger). In my experience I’ve found that this guideline is reasonably accurate.
Generating hard light is easier; just use a smaller light source. This will typically mean placing it further away (note: this has some additional implications, as we’ll see in the next post), or obscuring a part of it so that it emits less light. With a desk lamp, you can just cover up the front (with tape, construction paper, cardboard, etc.) and cut a hole in the center to make it a smaller light source.
Characteristics of Soft Light
Generally speaking, soft light is very pretty, attractive, and flattering light, particularly when used with female subjects. It’s almost always a good choice; unless I have a reason to want to use a hard key light, I will usually roll with a soft light.
Something to keep in mind is that while soft light usually looks good, it may not be the optimal choice for what you are trying to achieve. It is typically a very safe type of lighting style, which may work against your intentions if you desire a more forceful look.
Another thing to keep in mind is that it’s possible to make light that is too soft. For example, we mentioned that the sun is a very hard light source; however, on a completely overcast day, sunlight is diffused through a layer of clouds many square kilometers in area, which softens it to the point that shadows are almost eliminated. The result is somewhat drab, flat light. (Note: a skilled photographer can take good advantage of this.) Similarly, an overly large light source can make your figure look very flat and boring; this is one reason why I don’t use very large light modifiers (like umbrellas) nor do I usually bounce lights off of the walls or ceiling (unless I want to simulate ambient light).
I think it’s best to start with soft light. It’s the easiest type of light to work with and even if it’s not a universally optimal choice, soft light works with just about every anime figure that you can think of.
Characteristics of Hard Light
Hard light is typically dramatic and conspicuous. While soft light can be subtle and innocuous, hard light is by definition a high-contrast light and thus will call attention to the lighting scheme. That means that if one chooses to use hard light, one needs to apply it with care, as bad-looking hard light tends to look very bad, sometimes overwhelming every other aspect of the image.
Hard light tends to emphasize texture, surface details, and shape, which is less of an issue with figures, which tend to lack things like skin or fabric texture, wrinkles, pockmarks, scars, and muscular definition. However, things like dust and manufacturing flaws will typically become more evident if hard light is used, and you should be prepared to deal with them.
I find that hard light often works well if one wants to convey a strong sense of drama and excitement. If I want someone to look pretty, I’d use a soft light; if I want someone to look like a rock star, I’d at least try out a hard key light to see if it works.
Note that it is possible to combine soft and hard light in a single image. Indeed, I do this very often; my standard setup is to use a soft key light with hard rim and/or overhead lights; this gives the lighting scheme the best of both worlds.
A Couple of Common Misconceptions
There are two misconceptions I sometimes see. The first is that hard light means blown-out highlights. Remember that we’re talking about the transition areas of the shadows, not the nature of the highlight areas. Hard light used in an underexposed image is still hard light, and blown highlights can be found in images where very soft lighting was used.
The second misconception is that soft light automatically implies even light. You can certainly have a soft light while much of the subject is cloaked in shadow; this often occurs with a short-lit or side-lit style. Honestly, I often find even light to be boring light:
However, your opinion may vary and I encourage you to experiment with as many lighting styles as you can; that’s the best way to discover what style of lighting you like best.
We’ve looked at how the direction and size of the light source affect its output; next time, we’ll look at what distance does to light.


Yet another wonderfully explained guide. Very simple to follow, with suitable visuals to show exactly what you are speaking of. You know, if you do enough of these, you could compile a book about shooting figures/models, and sell it. I’d buy it. And I’d plug it to many others.
I still haven’t unpacked my lights and done any experiments. Been a busy week, but I’ll get to it. Eventually.
Thanks XD I think that writing an instructional book is probably not in my future, though I still do want to put together a photobook sometime. It’s been slow going; despite the number of pictures I’ve taken, I’ve only found 22 photos that I feel good though about to publish.
I still do have several other photographic posts in mind; I’ve even picked out a title for one (” ‘My Photos Suck and I Don’t Know Why;’ or, Some Solutions to Some Common Problems ” – I’ve been keeping a list of things to include in this post). Then there’s the camera post I want to write, too.
Both good titles, I’ll read them both. 😀
As for an instructional book… these guides are instructional. Save them to a PDF type format, compile them together and make it an ebook. Doesn’t have to be “published”.
Oh, and camera post… I hope you tread carefully there. I know you don’t generally talk about gear here much and I’m sure you know the dramas that people make over different brands and all the rest. But it still could be very useful to have some simple info for those who need it (as brand neutral as possible). Hopefully your readership is mature enough to understand that you don’t need your exact camera model or brand to get similar shots. But I have too little faith in humanity (and the internet) to hold my breath on that.
I might do something like that. At least it might make for nice reading on a tablet or something. (I’m still a bit surprised at how handy a tablet is, even though it doesn’t really bring any new functionality that I don’t have with other devices.)
The camera post is going to be more about my own observations and experiences and not so much a what-camera-should-I-buy post (and if anyone ever asks me that, I have a pretty simply answer, though one that I think you would not like XD ). I’ll probably touch a bit on what appeals to me in a camera, but I’m not going to make any broad recommendations.
It’s been at least a year since I’ve kept up with camera gear forums and I’ve found that I’m a lot happier for it now.
I wonder if figure makers would get more sales if they went away from the overly flat, even lighting they tend to use in their promo shots. I get that they can never really dispense with those shots entirely, but they could at least throw in a couple of more dramatic looking pictures.
One thing I’ve taken away from these posts (that I didn’t expect to) is the theme of beauty vs. drama. I was mostly anticipating the technical info you’re providing, but I like that much of it is framed in this theme. Obviously a good photo can provide both, but they seem to be qualities you can dial back or mix in as needed. It’s definitely something I’m going to think about and play with from here on out.
I wonder that as well, though I would kinda think that it might look odd. I remember FREEing’s photos for their bunnysuit Ikaros figure came out really dark and kinda ominous-looking, which was a little weird to look at. One of the things about product photograph is that you really need a consistent look, so trying to stand out might actually be detrimental. Though as you say, a couple of dramatic shots would be neat to see, I think; in fact, I’ve noticed Amiami does this from time to time, when they do their own in-house shots. They usually toss them in right at the end and I’ve kinda wondered about their thought process about that.
I wonder if that’s just because of the way I approach figure shoots; I’d be interested to learn how other people come up with their ideas for how they want to shoot. Unless their idea involves cats, or taking their figure outside, sticking it in front of some flowers – expecting that that will automatically make for a beautiful picture – and shooting away without considering that: 1) Every beginner does it, so pictures taken in this manner automatically look like pictures taken by a beginner, and 2) There’s nothing about flowers that inherently improves a picture, unless you’re taking a picture of hummingbirds or bees. (…. God am I snarky at 5AM.) There’s that old comparison of lighting to cooking, and I think that kinda holds here as well. It’s kinda like, you can approach cooking by looking in your refrigerator and finding that you have half a pound of ground meat, an onion, and some stale tortillas, and start from there in making a meal. Or, you can think to yourself, “I want some spicy Thai or I want to make something with seafood or I want something light and fresh-tasting” and use that as the basis for what you make. I’ve done both and I think I enjoy my cooking better when I’m working off of a concept. This is actually going to be the subject of the seventh (and last) post in this series (the idea about working off of a concept, not cooking – I enjoy cooking but I’m definitely not the right person to write anything about food).
My approach usually depends on how much work I’m willing to do on that particular day, though I’m sure it’s like that for a lot of people. I do tend to try to get stuff done all in one day.
Starting with a concept leads to great results, but being creatively bankrupt as often as I am, it can be tough to come up with something interesting XD
Oh well, just have to keep at it…
I usually break up a post into two days; I shoot one day and then post-process/write the next day. I think it’d be better if I did the Lightroom/Photoshop work on its own day so that I could sleep on the final images; there have been numerous times where I looked at the pictures the next day and felt that the post-processing looked off (mainly due to underexposure).
Haha, yeah; I know I’ve had a lot of times where I’ve looked at a figure and just couldn’t figure out what I wanted to do with it. That’s why I’ve made up those mottled gray/red backdrops; they work reasonably well for almost anything. I should probably make more.
Can’t agree more with this idea ‘working off of a concept’. however in reality most people begin with some ground meat and just want to make himself a meal, and then maybe start to enjoy it and try to think about concepts. At least that’s how I began taking pictures. Also I shoot birds and yes flowers do make hummer pictures look much better, supposing you are doing it the pro’s way not the beginner’s easy snapshot way. I believe the difference between serious photography and just taking pictures is whether or not the shooter has realized that something beautiful does not automatically make a good picture. The shooter has to do composition – the general concept which includes lighting and everything, and I believe is the nature of photography itself.
Indeed! I know my own first forays into cooking started that way. I definitely agree with that, and also that spending the time actually seeing is one thing that separates the completely clueless beginner from, at least, a more committed beginner (I still consider myself a beginner, to be honest, but I don’t consider myself to be clueless). I have the impression that a lot of people snap pictures away without looking at what they’ve shot and thus they never get better, even if they actually have a serious interest in photography.
and I’m surprised you plan to do 7 posts for this guide. I thought it was just some random thoughts when the first post came out, but looks like you really thought and organized it carefully. Can’t wait to read the other posts. Have you considered publish this guide as a real book?
Yeah, I’ve been thinking about writing this guide for at least a year; in retrospect it’s better that I waited, since I don’t think I was prepared to write these posts last year. I’m not sure if I plan to make a book, but I certainly could look into it; I’ve done a couple of photobooks through Adorama and I know that people have published instructional books through them, Blurb, and other self-publishing services. Now that I think a little more about it, it could make for an interesting little project.