
It’s been a while since I’ve done one of these. That’s partly due to me not being satisfied with a lot of my photos, and it’s also because I’ve used a lot of the same techniques over and over and I didn’t think the shoots were interesting enough to write about. However, I used a new set for Tomo Asama and I figure that even a basic setup can be interesting to talk about. Here’s how I shot Tomo.
The Concept
I had two ideas for photographing Tomo. The first idea basically involved the same set and lighting scheme that I’ve used for figures like Yagyu Gisen; it looks classy and is reminiscent of traditional Japanese interior styling, which seems appropriate for a character like Tomo. However, I’ve used this set a lot in the past and I’m sure I’m going to use it a lot in the future, and I don’t really like re-using the same exact set, particularly for shoots that take place within a few weeks of each other. Furthermore, the understated mood evoked by that background doesn’t really seem to fit the figure, being that Tomo looks sort of like she’s screaming in anguish.
The second idea was similar in pattern though much different in the mood it conveys. One of the things I liked about Horizon in the Middle of Nowhere is the way that its style synthesizes that traditional Japanese look with sci-fi aspects. I’m a big fan of styles and settings that combine intergenerational elements. I’m also a big fan of ruined, dirty, and decrepit settings; I much prefer to shoot a figure in a rubbled, darkened streetscape than in front of a flower bed. In that vein, my second idea was to construct a backdrop with the same shoji-style pattern, but painted in a way to make it look like rusted metal. I thought that the juxtaposition between the Japanese theme and the industrial look would make for an appealing contrast.
The Set
The background is a big sheet of particle board with a bunch of wooden sticks glued to it. I’ve seen shoji screens use different proportions in their arrangement, and I’m not sure if the shape of the rectangles carries any particular significance. I figured I’d go with a typical 1:2 height to width arrangement, since it looked reasonable and simplified the length calculations.
Once I assembled the backdrop, I painted it with two shades of metallic spray paint. I wasn’t sure how to simulate rust; there are a ton of tutorials online regarding painting rust, but most of them apply to miniature-building, and I wasn’t too successful in trying to adapt those techniques. I even thought about ordering some rust powder, which some diorama builders have used with success, but in the end I simply dry-brushed some brown and orange paint in what I thought was a realistic manner, and I’m pretty happy with the way it turned out.
The floor presented a larger problem, though I didn’t think much about it at first. Originally I planned on using the concrete-colored floor that I’ve used for several other shoots, but after taking a few shots, it became apparent that it wasn’t going to work.
A big part of the problem is that Tomo is crouching down. I hate shooting figures that are crouching or sitting or lying down, in large part because that makes it nearly impossible to obscure the floor. My favorite mode of composition is the cowboy shot, where the subject is shot from mid-thigh on up. Most of the header images on this site – which are generally my favorite images from each shoot – use this type of framing, since it shows the important details of the figure while hiding the floor. That’s obviously impossible to do with Tomo; therefore, the floor has to look good.
I have this big piece of foamboard that I’ve painted in a mottled black and gray pattern. I’ve used it a whole bunch (most recently with Kuroko), but I’ve never used it as a floor. However, I was quite pleased with the way it turned out, and I wonder why I haven’t used it as a floor more often.
Lighting
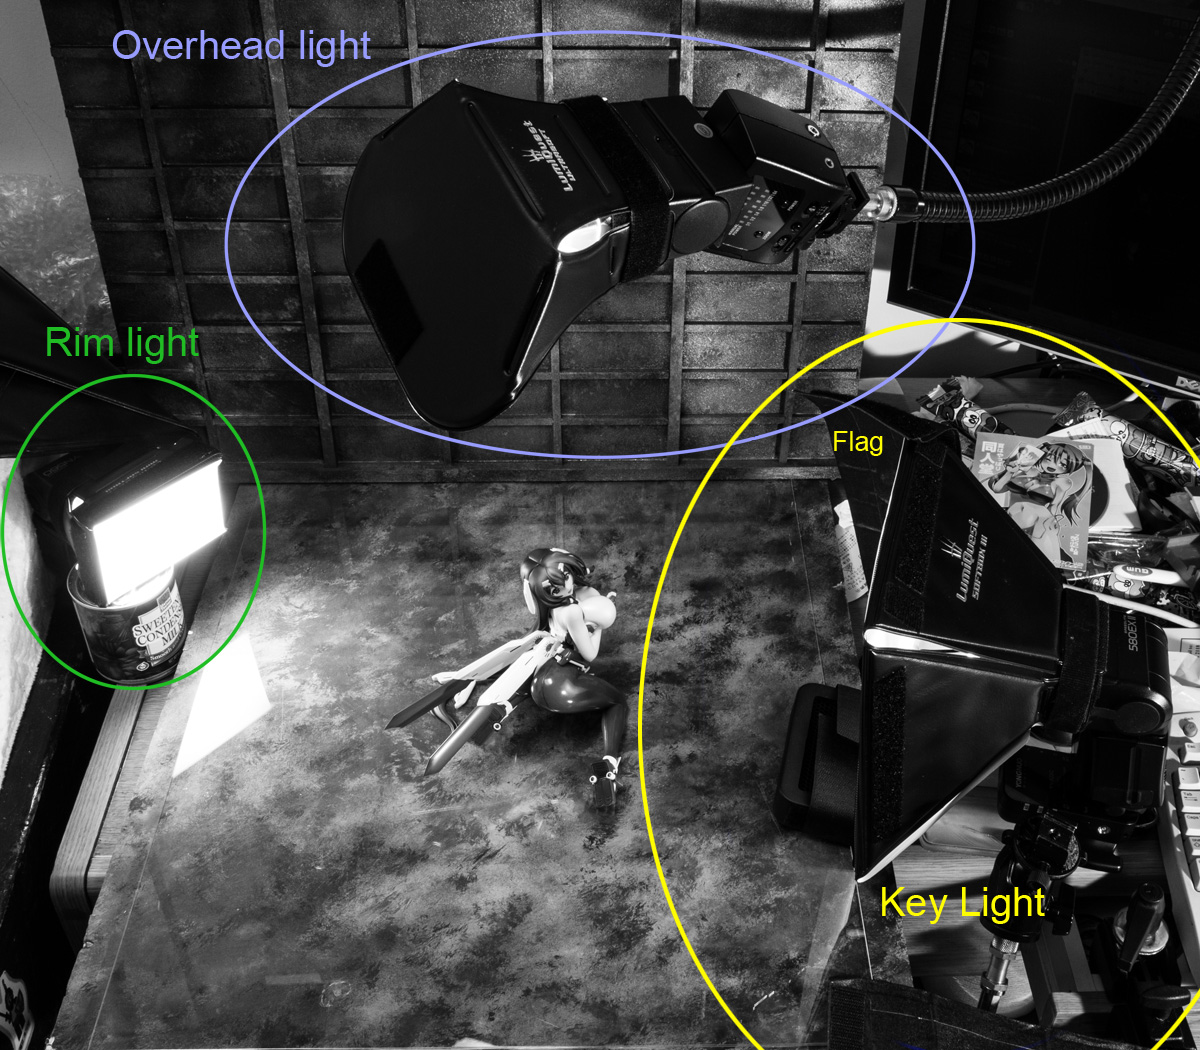
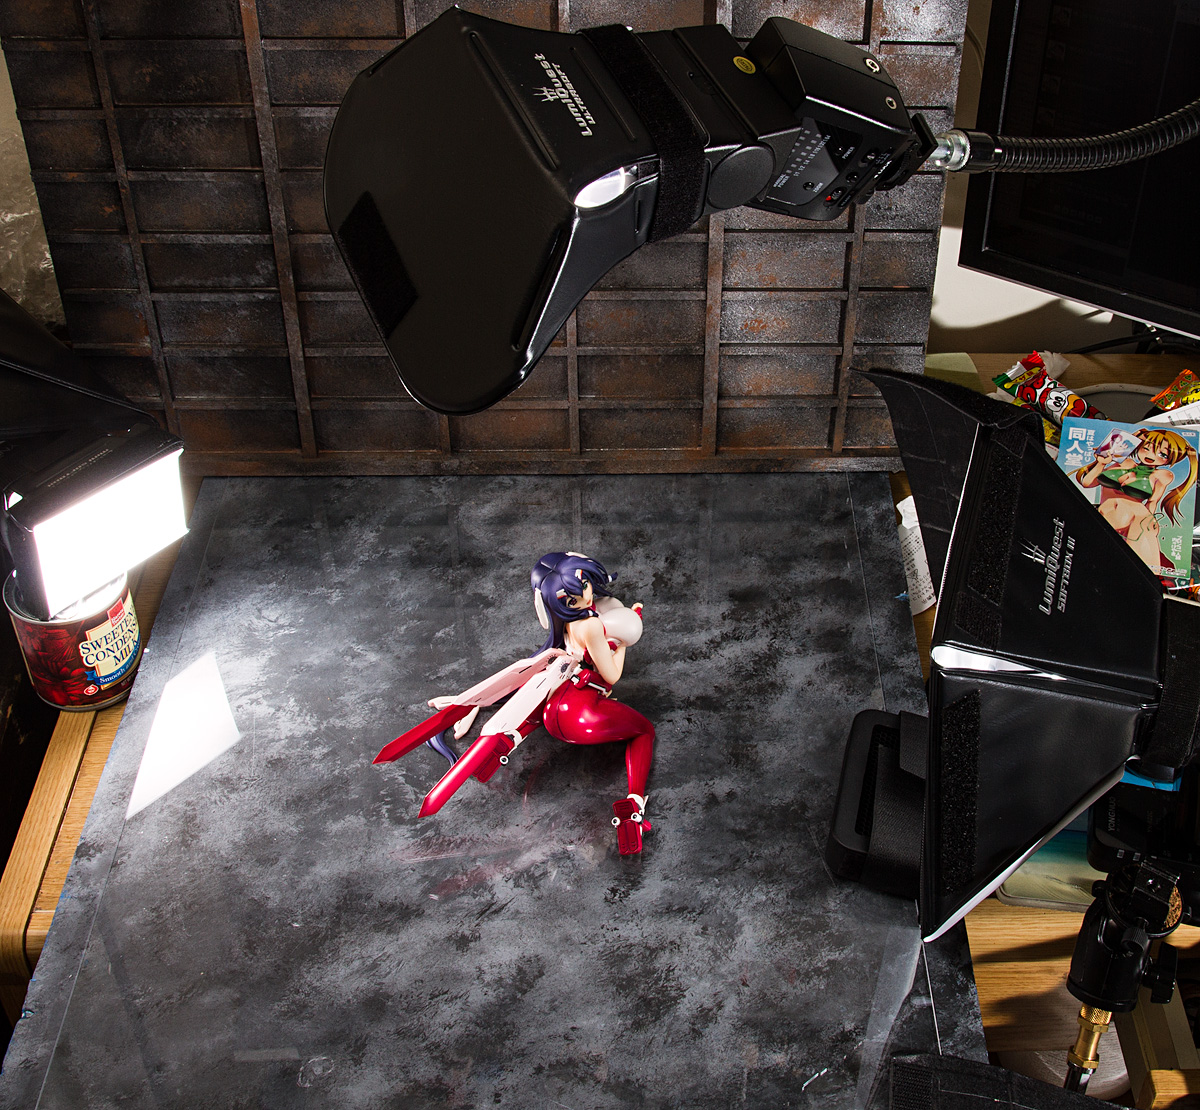
The lighting is provided by three lights set up in a fairly conventional configuration. There’s a key light, which is flagged to reduce spill on the background; an overhead light; and a rim light. First, the key light:
The key light is shooting through a LumiQuest Softbox III, pretty much my go-to modifier for photographing figures. It makes for a big, soft light, at least when the subject is figure-sized. It also helps a lot in getting some light into the face when a figure has big, overhanging hair like Tomo does. Note how little light spills onto the background; that’s due to the small flag (the fancy photographic term for an object that blocks light) attached to the softbox.
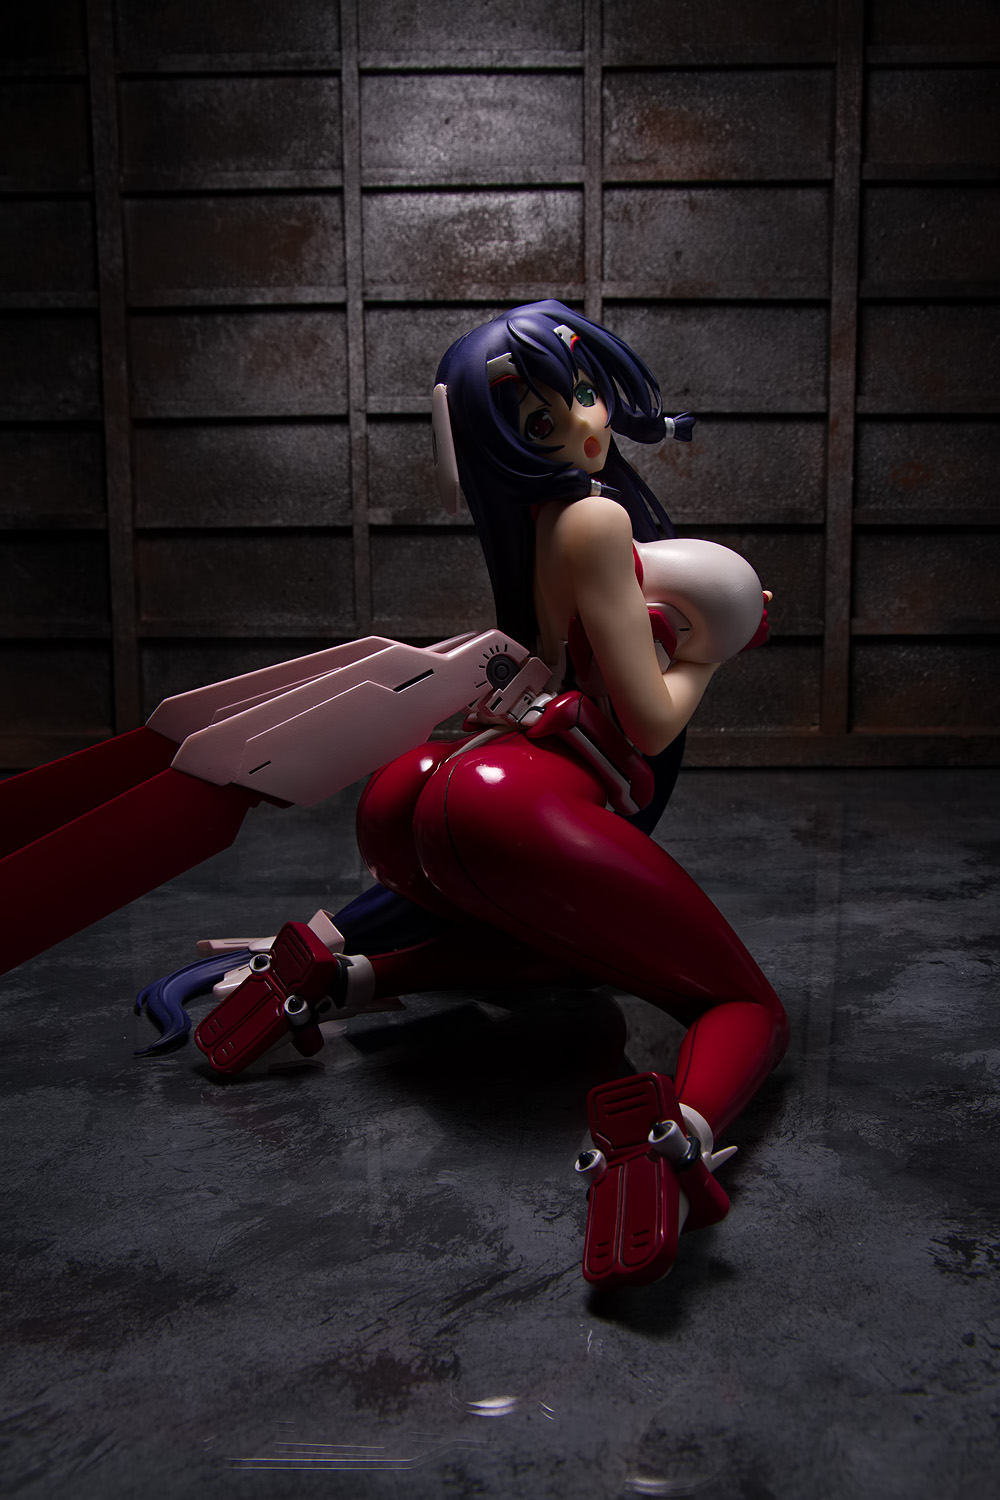
I don’t always use an overhead light, and there have been a lot of times where I did use an overhead light and really regretted it later (Alter’s summer holiday Nanoha figure is one such instance). Here, though, I knew I wanted to have a light above Tomo, to simulate the sort of noticeable overhead light you’d see in a factory or warehouse. I did tone down what I originally planned to do; I intended to go with something hard and harsh, the way I imagine industrial lighting looks, but I went with a softer light instead. This light is going through a LumiQuest Ultrasoft modifier, also one of my favorite modifiers. It functions as a hair light, separating the top of Tomo’s head from the dark background, and it also puts a highlight on each side of her butt, which is important for a figure like this. Besides that, it also places an appealing triangle of light on the background, revealing form and depth by casting shadows under the horizontal bars in the shoji-style pattern.
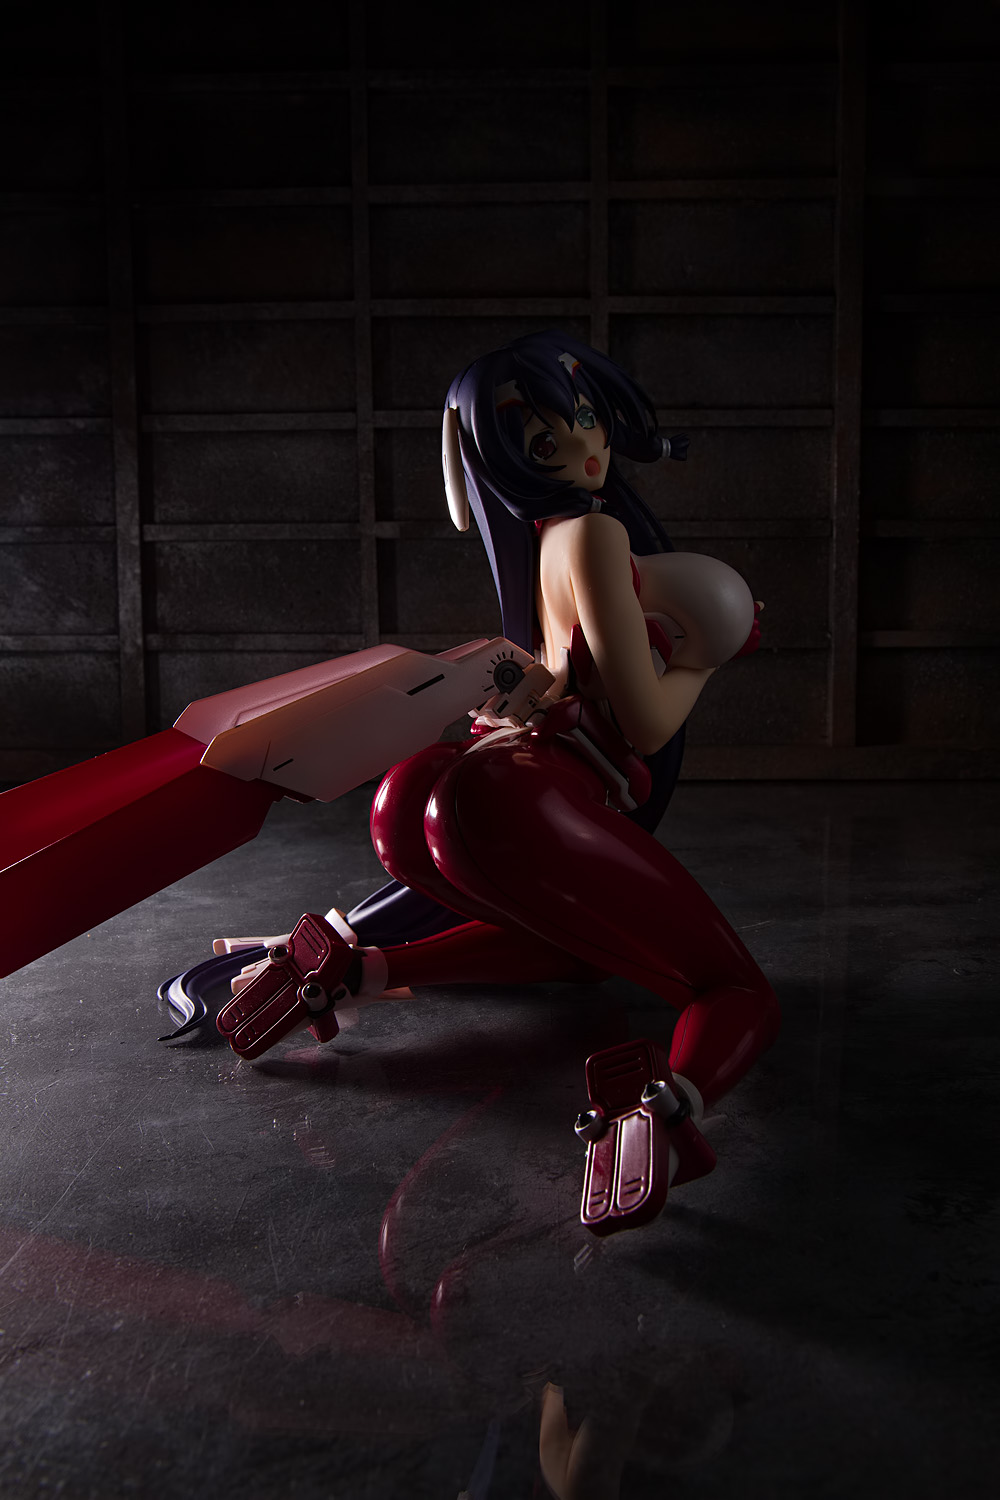
With a figure like this, a rim light seems appropriate, for at least three reasons. One, Tomo is posed (sort of) dynamically, and a hard rim light increases drama and contrast. Two, rim lights provide a sculptural look by outlining the form of what it hits – namely, in this case, Tomo’s ass. If I need to call attention to a figure’s rear, I’ll often use a rim light to highlight each side of the buttocks. The third reason is that Tomo’s wings need to be lit, and a rim light placed to light up her rear is also well-placed to light up the wings. The rim light also reveals her back leg, which is otherwise lost in the shadows. Most of the time, I use a grid or a snoot to constrain rim lights, but here I used a LumiQuest Mini Softbox. It was, if I remember right, the first light modifier that I purchased, and while I don’t use it much anymore, it does come in handy sometimes when I need a slightly softer light than a bare flash. Besides lighting up Tomo, it also puts a highlight on the floor, which I like; it gives a gradient effect on the floor, where the left side is brighter than the right side, and that offers a nice contrast to Tomo, who is lit from right to left.
The Camera Stuff
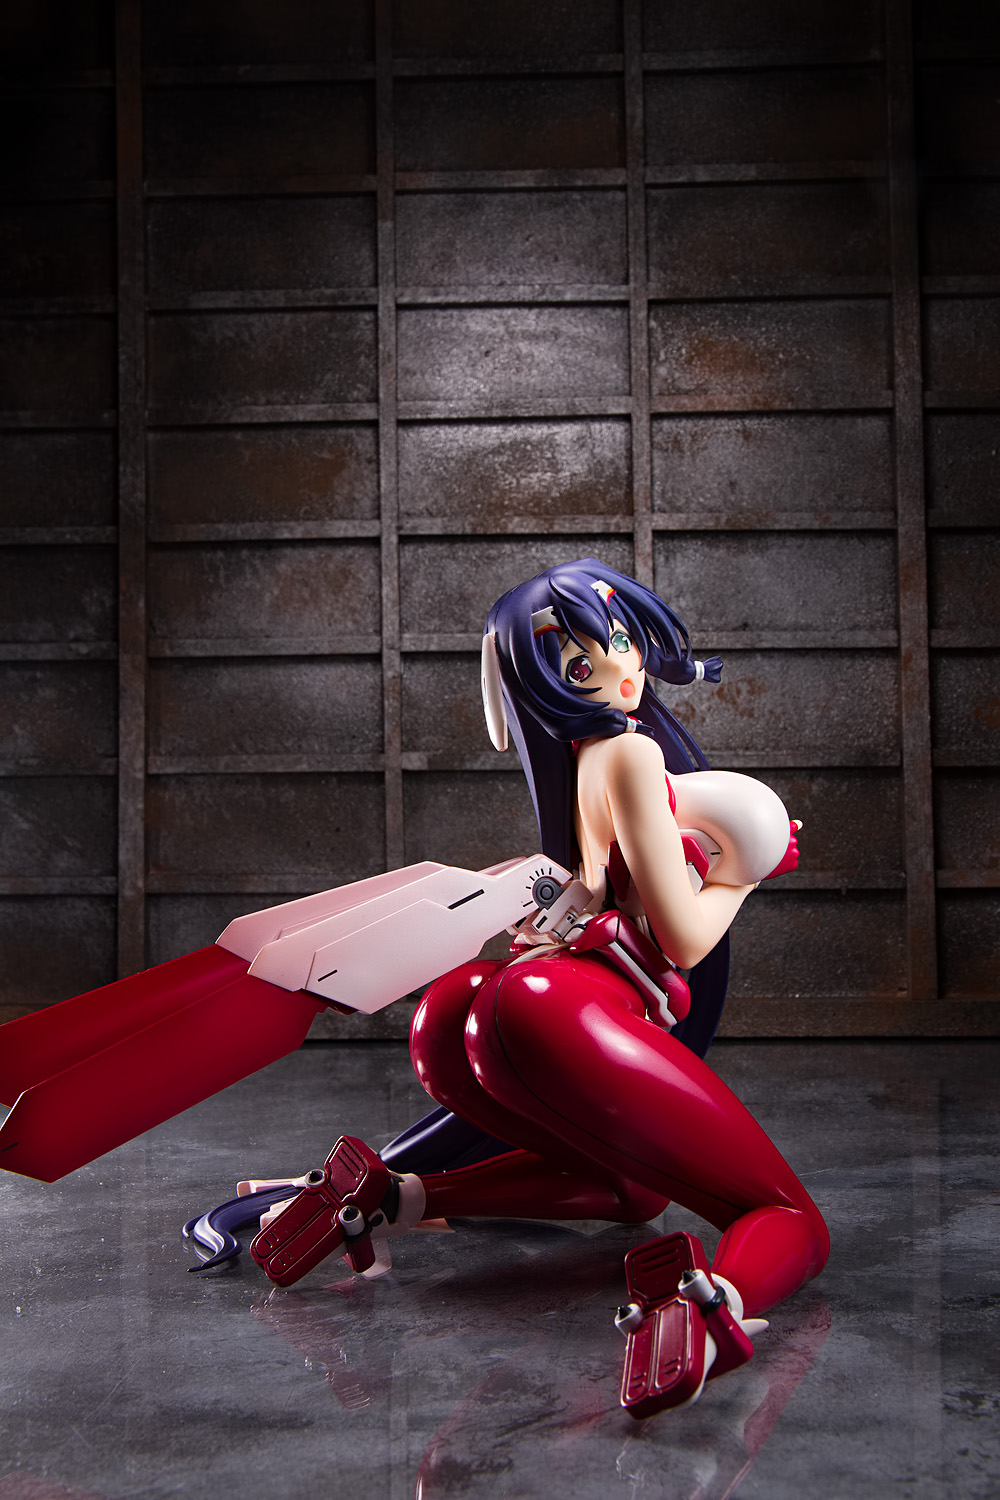
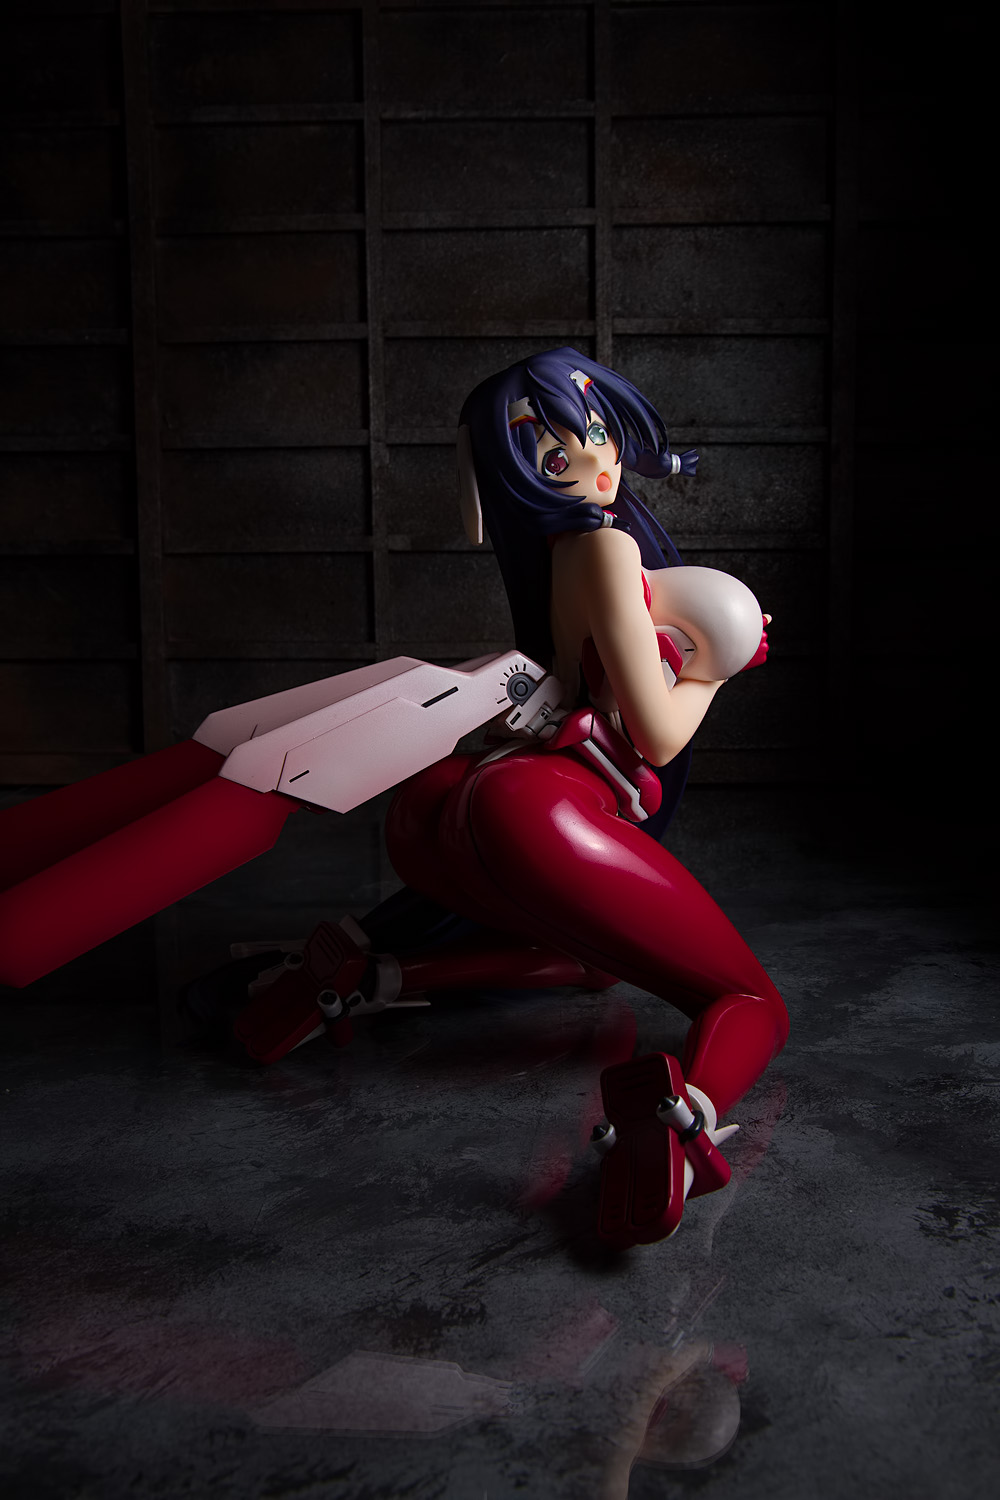
The photograph above was shot at a focal length of 29mm on an APS-C camera (46mm 35mm equivalent) at f/14. I wanted everything to be in focus, particularly the background, since I put a lot of work into painting it and I wanted the rust effect to be seen. The image that I actually used as the header for the review was shot wider, at 21mm (33mm 35mm equivalent). I like that picture better but I didn’t take setup shots for that specific photo, which is why I used a different one for this post. The focal length lets the background loom large without distorting Tomo’s body (though I did go for that effect in some of the other shots I took).
Framing
I placed Tomo low in the frame, which gives the background a more imposing presence. I placed the camera on the floor, shooting upwards towards Tomo’s face; this emphasizes the arch of her back and the tilt of her head. I like the framing, but it does have the drawback in that in its intended presentation format – which is to say, a web browser – she might not be completely visible and upon loading this website, the viewer might wonder why I took a big picture of a wall with a figure’s head poking up into the bottom of the frame. (This seems like a minor thing but I’ve ditched header photos before that I thought had too much space above the figure’s head for this very reason.)
Assessment
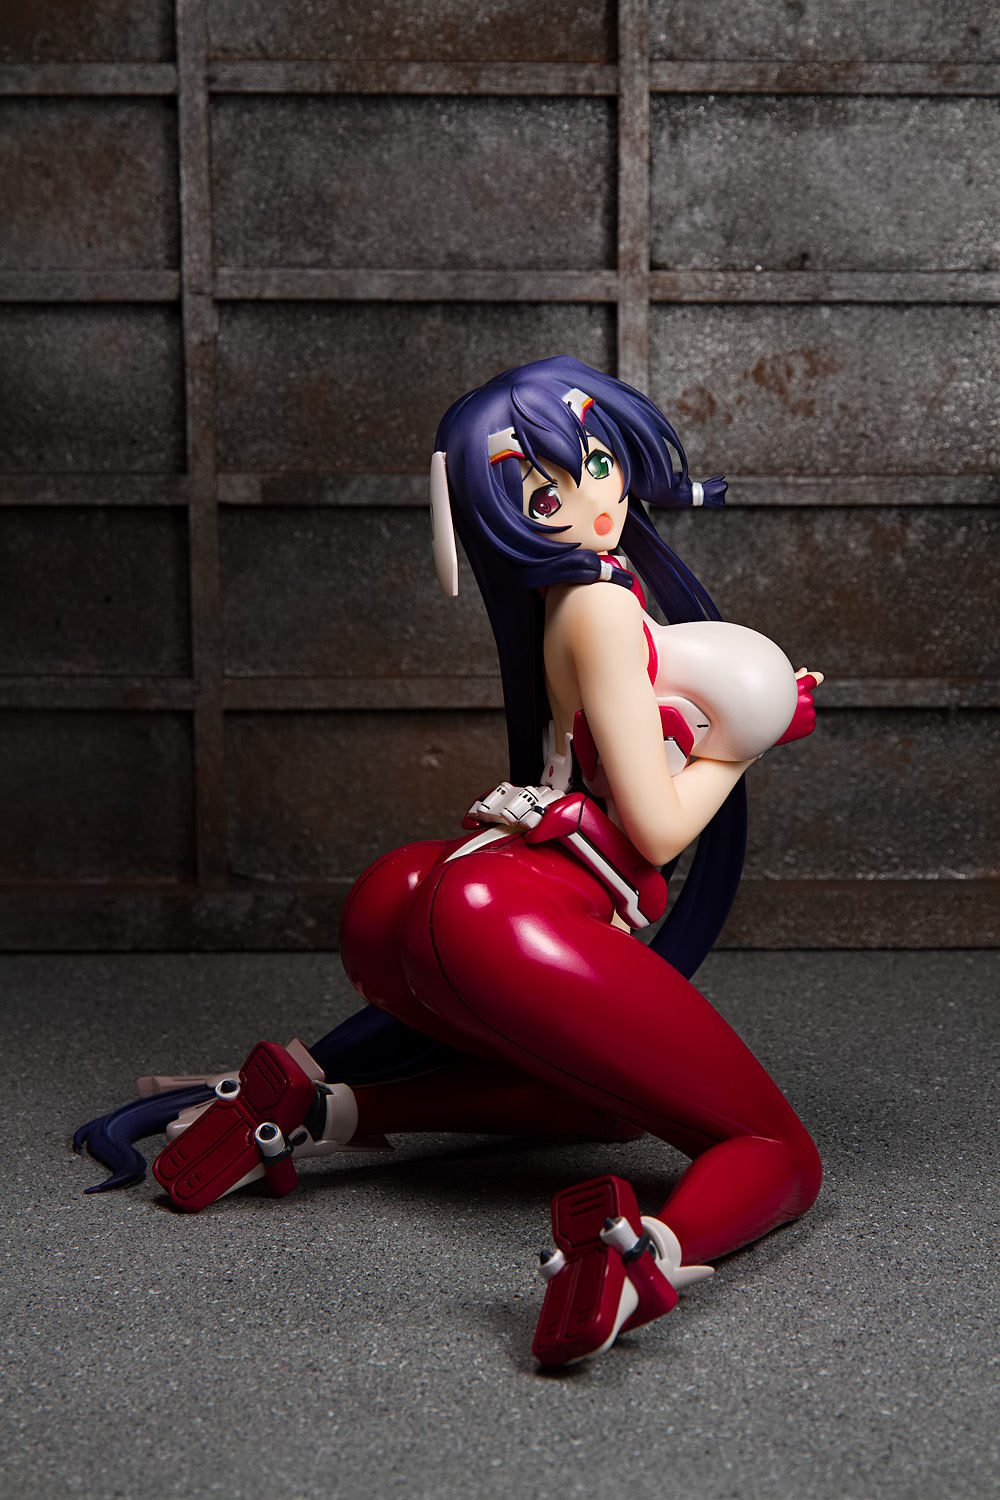
I’m pretty pleased with the way the photo turned out. I think the dingy, angular gray and brown background contrasts well with Tomo’s bright colors and feminine shape. The main thing I’m not happy with is that it’s not obvious that the background was patterned after Japanese shoji screens; that was the main theme of the concept and it doesn’t show all that well. One thing I could have done differently was to select a different floor; perhaps a more traditionally-styled floor (such as the straw placemats I’ve used before) might have provided context while still preserving the industrial look I was going for. Ideas to store away for another time, perhaps.


Hello!
I’ve been a big fan of your work for a long time, but have just never gotten to commenting.
Your reviews give an in-depth look at the figure without being systematic and boring like some reviews can be. And I really enjoy reading these shot breakdowns because they give us a peek into your thought process and what makes these pictures special–for instance, I didn’t make the connection between the background and a shoji screen, but once you pointed it out, it brought more significance to the image. It’s especially refreshing to read since your style of photography is entirely different than what I’m used to(flowerbed + figure is my favorite combo!).
I’ve had an SLR for a few months and would like to learn more about artificial lighting, but have not been able to figure anything out by myself. Would it be ok if I ask some beginner questions?… I’ve noticed that in the pictures showing the light setup, the lights are always on. Are these flashes or continuous lights and if they are flashes, do you do something to make the flash stay on or does it only light up when you take the picture? The only flash I own is a Canon Speedlite 430 EX II, are there any good setups that can be done with only one flash(it can only act as a slave with the camera as the master)? Whenever I try flash photography, the results aren’t good at all. It’s very obvious that the photo was taken with artificial light, and I love what wonderful results can be achieved, so I’d really love to improve!
Thanks for visiting! Yeah, I’m thinking that aside from swapping the floor out, I could’ve also used paper instead of keeping the background all metal-looking; as it is, the background looks like a pretty normal factory or warehouse wall, but it’s hard to mistake the rectangles-atop-paper pattern for being anything other than East Asian-themed.
Feel free to ask any questions, I’m happy to answer anything (well, I’m somewhat less happy when people ask me what camera I use, which is the most common photographic question I get). All my lights are flashes; I don’t use continuous light too often anymore. The flashes light up since they fire when the shutter is triggered (you can easily demonstrate this for yourself by taking a picture of yourself in a mirror while using the pop-up flash). In this particular case, one of my flashes is controlled by a radio receiver and the others are controlled by optical slave sensors, but the principle is basically the same.
You certainly can get great results with one flash and I’d always encourage anyone starting out with lighting to begin with only one light. It’s much easier to see what the light is doing and it’s harder to screw up with one light (whereas if you have multiple lights, sometimes one light will be doing something you don’t want it to do and it can be maddening trying to figure out which light is causing the problem). It’s hard for me to give specific advice without knowing more about what you’re struggling with (or seeing it in photos), but the two main things you want to do with flash (or any form of lighting, really) is to get the light off of the camera and to make sure you control it so that it’s doing what you want it to do. Much of the time, that means a soft lighting style, and you need to enlarge the light source to do that, either by diffusing it through something or reflecting it off something.
I hope this helps a little bit; please feel free to ask more questions if you need any more help.
Thank you so much for answering! Even if you didn’t get the intended effect from the background, it still looks pretty darn cool(I especially love the rust) and I’m sure you can use it again in another shoot!
To demonstrate what I’m getting out of my flash now, I took a few pictures. http://neveroutgrewtoys.files.wordpress.com/2013/07/momo.jpg http://neveroutgrewtoys.files.wordpress.com/2013/07/kirito.jpg The last time I tried they were horrible, so I was surprised these even came out decent. Turned out I was putting the flash behind the subject…
For these, I used a Canon Speedlite 430 EX II and set up the flash on a stand in front of the figure and a few feet above it. It’s firing through a shoot through umbrella and there is a 42 inch silver reflector to the right. The room was pretty much dark.
I think the Momohime one is ok, the Kirito one not so much. I’d really like to be able to make my pictures more artsy, or is this the most that can be done with a single flash?
You do not actually need to darken the room as long as you are shooting at your camera’s maximum sync speed (which is probably something like 1/200 sec). You can test this for yourself; turn on your room lights as you normally would, set your camera to a shutter speed of 1/200 sec and take a picture at f/5.6 or whatever aperture you might shoot at. If your picture is completely black, then ambient light will not affect your picture. (In fact, even though I use flash, I almost always have a desk lamp shining on my figures while I shoot, to help with autofocusing; otherwise, sometimes my lens starts cycling back and forth as it tries to find focus).
Ah, you’re using an umbrella; I don’t know if I can offer helpful advice regarding using an umbrella, because I’ve never used one. I like smaller modifiers and reflectors, partly because they offer more control over the light (it’s easier for me to prevent light from spilling onto the background, for example) but also because they aren’t overly soft. Soft light is usually pretty good light, but overly soft light can appear very flat. Think of what a cloudy, overcast day looks like; what happens is that sunlight is being diffused through the cloud layer, which acts as a softbox that is many square kilometers in size. The result is very flat light (though I wouldn’t say that this is always bad light; I’ve seen people make some interesting pictures on cloudy days). Using a very large modifier with a small subject like a figure is sort of similar. It’s why I almost never bounce flash off of a wall or the ceiling while shooting figure pictures.
I’m not sure what sort of pictures you have in mind, but I’m guessing you’re looking for something with a little more contrast. What I might do in your position is to just play around with shooting with the bare flash, with no umbrella or modifier. Try to get it as close to your figure as you can without it appearing in the frame and see what results you get. You’ll probably need to cut down on your flash’s power to get the exposure looking okay (I use neutral density gels to do this, but I’ve also taped Kleenex and toilet paper over the flash head to cut down power). If you’re looking for a more dramatic look – and Momohime and Kirito are two figures that I think can be lit in a dramatic style – you might try a split light style. This is where you aim the light at the side of the head, so that the light is hitting the figure perpendicular to where the subject is looking. This is one of my favorite lighting techniques; with a modifier like the Softbox III (which is about 72 square inches in area), I get a nice, wrapping light, whereas with a bare flash, I get a very dramatic, half-lit, half-shadowed look which works nicely for figures in action poses.
One other thing I should mention, you don’t really need to set ISO to 800. With cameras being as good as they are these days, ISO 800 isn’t really a big deal, but since you’re using a flash, you can just bump up the flash power by three stops and shoot at your camera’s base ISO of 100 and thus minimize digital noise in your images.
How much space do you reserve for these photography setups, and how much time do you take to position and test the lighting angles?
The thing that gets at me about setting up a studio is the infinite permutations of light placements to experiment with..
Not very much at all. I generally use a space that’s about two feet by two feet for shooting. I wish I had more space – principally depth, since that would allow me to construct more realistic and more complex backgrounds – but I shoot on a computer desk and my desk is about as deep as any other desk. I’m also constrained by the size of the materials I use – most of my floors are made of either two-feet square particle board or 20×30 foamboard, which are both very unwieldy to set up.
The light testing can take a significant amount of time; in Tomo’s case it took me about 40 minutes from the first shot to the point I was satisfied with the lighting arrangement. This is probably more time than it would take other people, since that includes the time needed to change out the floor as well as to rig and adjust my flashguns and then shoot test shots. If I were using desk lamps, I could just eyeball the changes.
Do you have any books or materials to recommend for learning more about lighting? Not just the science of light but also the emotional aspects that light conveys on subjects. For sure one can trial and error but it is always good to understand the experience of others. thanks
You bet! The #1 book I’d recommend is “The Hot Shoe Diaries” by Joe McNally. It’s an entirely flash-based book (as the title suggests), and while he does talk a lot about technical stuff, McNally is mostly a portrait photographer, and an environmental portrait photographer at that (he tends to shoot photos of people in settings, rather than the head-and-shoulders shots that most people associate with portrait-style photography). He spends a lot of time discussing why he chose the lighting style that he did and what effect he was looking for. I first read this book a few years ago, when I was just learning how to use flashes, and it was hugely, hugely influential on me. Much of what I do now is patterned on what I learned from this book. He’s also written a larger sequel titled “Sketching Light” which is also very good. While it might be a bit intimidating because he does use flashes, I think his lessons are readily adaptable to desk lights (for tabletop figure shooting, anyway; he shoots mostly on location where dragging big continuous lights probably wouldn’t be practical).
Actually have that book but haven’t read it! 🙂
Oh gosh I’m so entrenched in computing technical materials, I need to explore other arts of life soon.
Yay, finally another breakdown. All too rare.
I rather like this set. The grungy industrial look is good for certain types of figures, and should be a standard set (in various configurations). I think even I could manage to make some boards look neat like this, though I’d have to buy a bunch of materials, which would require sacrificing a figure or two to afford them. Woe unto my budget.
I like how you shoot closed down to actually show the backdrop, too. I don’t shoot beyond about f/11 anymore because my sensor has ugly dust that gets too hard to heal out in post. I should just clean the sensor, but it’s easier just sticking to f4-8 where I do 97% of my shooting anyway.
Still, your breakdowns give me insight in to how you shoot, which sometimes inspires me to put some effort in to my shots. Though I’ve yet to actually do so, because of my general feline personality believing effort is for other people.
Yay! Whenever I get around to doing Cryska – which might be sooner rather than later, unless I decide to get lazy and do a preorder post instead – I guess I’ll write one up for her, too. Assuming the shots don’t suck, which is never an assumption I would make.
I’m kinda appalled at the cost of strip wood; at the local arts and crafts store, little balsa sticks tend to run $0.80 or more for even tiny sticks. I got all these materials at Lowe’s, where it’s a little more economical (I dunno if you guys have any big home hardware stores in Australia, but I assume you do). All together, I’d guess that the cost of all the wood I used was around $20.
One of the drawbacks to using manual flashes like I do is that every time I change the aperture setting, I have to change flash power as well, and the more lights I use, the more annoying that gets. These days, I tend to just pick one aperture and stick with it, which is a terrible practice. Further, if I close down the aperture, sometimes I’ll just bump up ISO instead of increasing flash power, which is also terrible (but then, I paid all this money for a camera, I might as well make use of its technical capabilities).
hmm good read. So you’re liking the Lumiquest softbox? I found it to be too fussy, and ended up liking the quality of light from my DIY softbox more. I made it with a paper front, which seems to make the light extra diffuse. I’ve also been shooting through white foam board as kind of a lazy softbox. In fact I’m pretty sure my preference in lighting modifiers is based solely on how lazy they allow me to be.
Yeah, I use the Softbox III for the vast majority of my pictures. I’ve also got a Softbox LTP is I want to go bigger and an 18×24″ (or something like that) scrim if I want to go even bigger. The Softbox III is convenient for me to use (I put a crapload of velcro on it so that I can easily attach flags), but the DIY route is definitely a good choice, too, particularly for something like a tabletop softbox, where you don’t need anything particularly huge.
I don’t remember a shot break down post from you since Apend Miku. I will go back through you posts and re-read them. I am getting into photography more, and so the posts will now be more interesting and pertinent.
Speaking of the Miku shoot, when are you going to have fun playing with water or some kind of external real-world effect again?? Or do you find those kind of setups not all that enjoyable??
I hope they are useful. And I’m still planning on writing more general tutorial posts … one of these days … you know, I’d be a lot more productive if I could mentally transmit words to a computer instead of having to sit down and type. For some reason, all of my best writing occurs when I’m trying to fall asleep, and never when I’m at the keyboard.
About the water effects, I think the bothersome aspect does play a big factor; it’s really annoying to set up and clean up and shoot, particularly since it requires a lot of room and a tripod, which I don’t like to use (before I switched to flashes, I always used a tripod and now, I can’t remember how I tolerated that). But I think the main reason I don’t use it is risk of overuse; anything that’s overused runs a strong risk of becoming cliched, and I would like to avoid that. I think the Miku shot was pretty novel, at least in the context of what I’ve personally done, but I also used it with Haruka Morishima and that was purely because I had no other ideas.
I understand the overuse concern – I didn’t mean to limit the conversation to just the water. I also meant smoke (incense) or other crazy practical (to a lesser extent post) effect you had in mind.
I almost feel like you’ve wanted to have more ambitious shoots every once in a while, but have not for whatever reason.
The odd thing is, I want both more and less ambitious shoots. I want to be less ambitious because I’ve got a bunch of figures here that I want to photograph but haven’t yet done so, and I probably won’t shoot them unless I compromise on some of my ideas. I have some figures here that I’ve been sitting on for literally years; I think gangsta lean Saber’s shoot has been three years in the making now. Being out of school, I don’t really have anything to mark the passage of time (other than paychecks and the start of football season, I guess), so it’s scary to look back and think that that much time has passed, and then I think that it’s time to think up something more realistic.
I do also want to do more ambitious shoots for certain figures, though. Some of those figures are ones that I like a lot and feel deserve something better than the usual mottled-paint backdrop I use a lot nowadays, and some of them are ones where I have a picture set so powerfully in my mind that I do not want to compromise. (Some of those figures in that category might be a little surprising. Tsuneko and Aya Kagura are in that category.)
It’s funny that you mention smoke; in fact just the other day I did some experimenting with that. I’ve really wanted to make a picture that includes strong light shafts. I found a product called Haze in a Can, which produces a smoke-like effect out of an aerosol can without the incense smoke and smell (or without the hassle of trying to find a supermarket that stocks dry ice). So I was pretty hopeful that this would be the solution to my problem. When I tried it out, instead of those strong rays of light I had imagined, the picture just came out sorta foggy … hazy, I guess, just like it says on the can. I guess maybe if I ever do a sequel to that Ideas That Didn’t Work post, that could go on there.
I’m a frequent visitor of your website and doesn’t comment much. I like your style in figure photography and I always wonder how you do the lighting set up – or even the background. I don’t have much scale figures but I want to learn how to properly photograph them in such a way. I always take note of your tips whenever I do figure photography even its for a nendoroid shoot. Thank you for another inspiring Shot Breakdown post. ^^
Thanks for visiting! Hopefully this was helpful and hopefully some future posts I plan to write will be helpful, whenever they actually get written (which will hopefully be soon … I’m putting an end-of-the-month deadline on myself, since if I declare a deadline, that might motivate me to actually write them). I have no idea how big a nendoroid is, but I’m assuming they’re about as tall as a Figma and if they are, they might be easier to light since you wouldn’t need as large a light source to generate soft light.
Pingback: The hiatus after the hiatus | Makigumo
Looks interesting, I lov your rust texture ^^
These posts always give me hints of how to place the light sources, but still I think that my lighting relies too much on luck or coincidence. I think I have to read a book to polish my lack of knowledge in the technical corner.
Where is the arm behind the overhead light attached to?
I still have that happen to me; using flashes makes it harder for me since I can’t see what happens until it actually happens. It’s kind of a crappy feeling, sitting there and feeling like you’re fighting with the light. It’s even worse when you feel like you’re losing. I’ve got some pictures of GSC’s Lacia that will never see the light of day because the lighting looks so horrendous.
The arm is attached to a shelf I have over my computer desk; the Flex Arm is just rigid enough that it can stay in place while hanging down from it.