
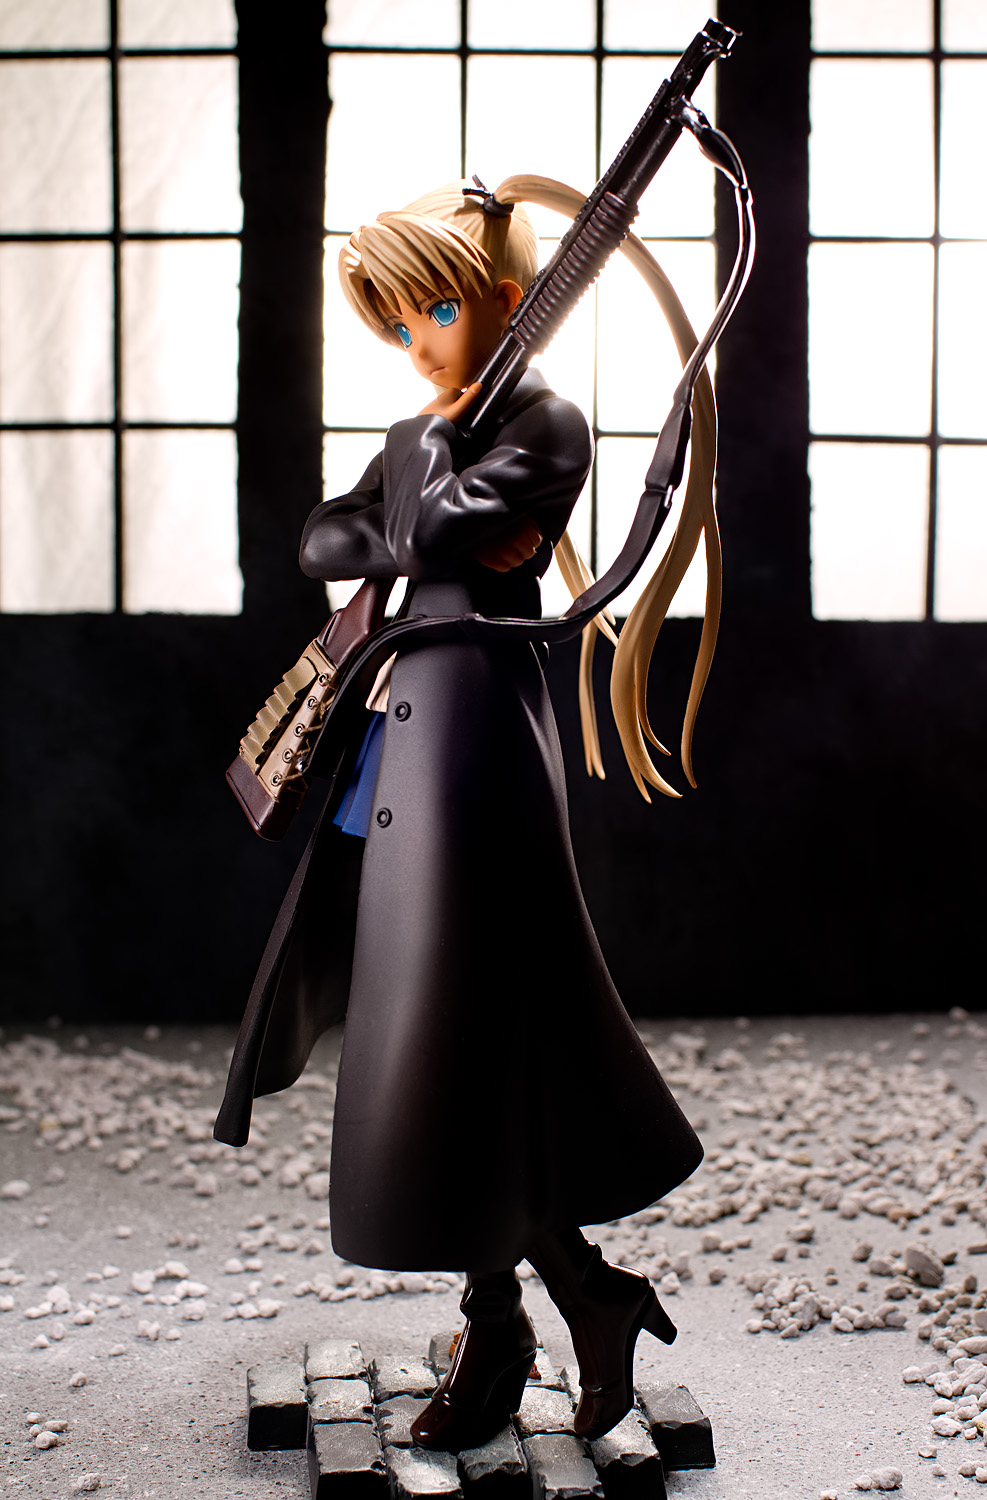
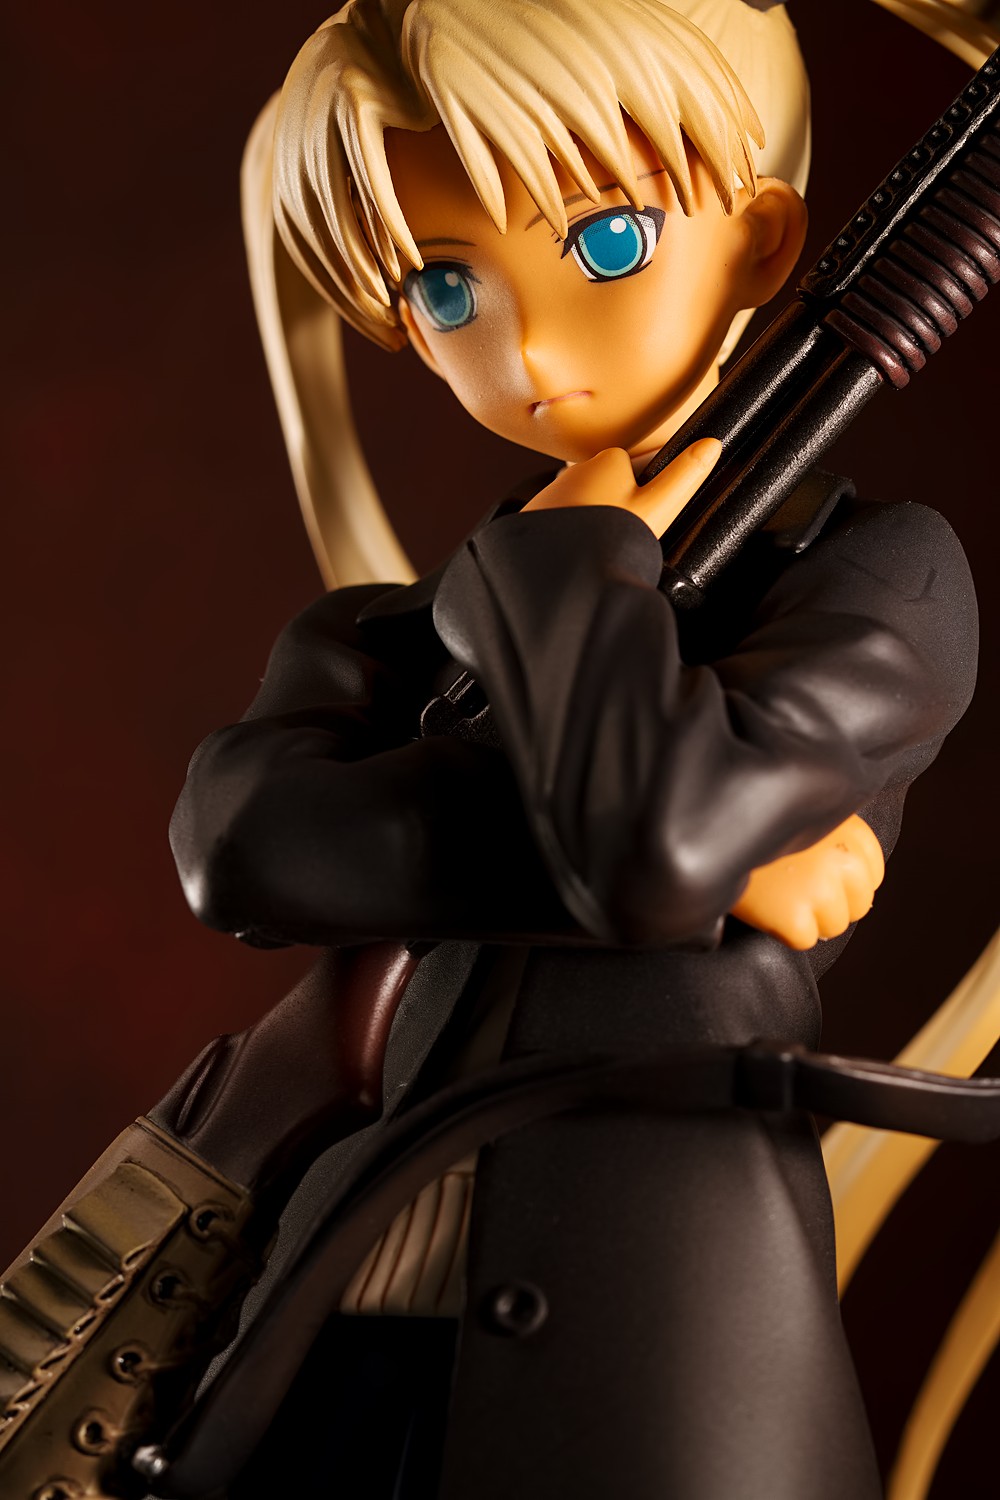
I always like it when a figure reveals some aspect of its personality in its sculpt. Not many of them do; for example, Junko Hattori sports sort of a generic angry anime girl expression, Kiriko Hattori has a satisfied, happy look, Dizzy has kind of a neutral, unemotional expression, and Heat Blade looks like a robot. If I didn’t know a thing about those characters, I couldn’t tell you much about them – I probably couldn’t even make a first guess as to what they are like. Triela, however, conveys a strong sense of detachment and loneliness. It’s easy to guess that she hasn’t had an easy life, and unlike Cryska, the way she hugs her gun suggests it’s more than just a prop to her. The mood that her look invokes informs the way I want to photograph her, unlike Junko, Kiriko, Dizzy, and Heat Blade, where it was much more difficult for me to figure out how to shoot them. All this is to say that I am lazy as hell and I really like it when a figure gives me ideas right off the bat, rather than being forced to actually think about how I want to shoot a figure.
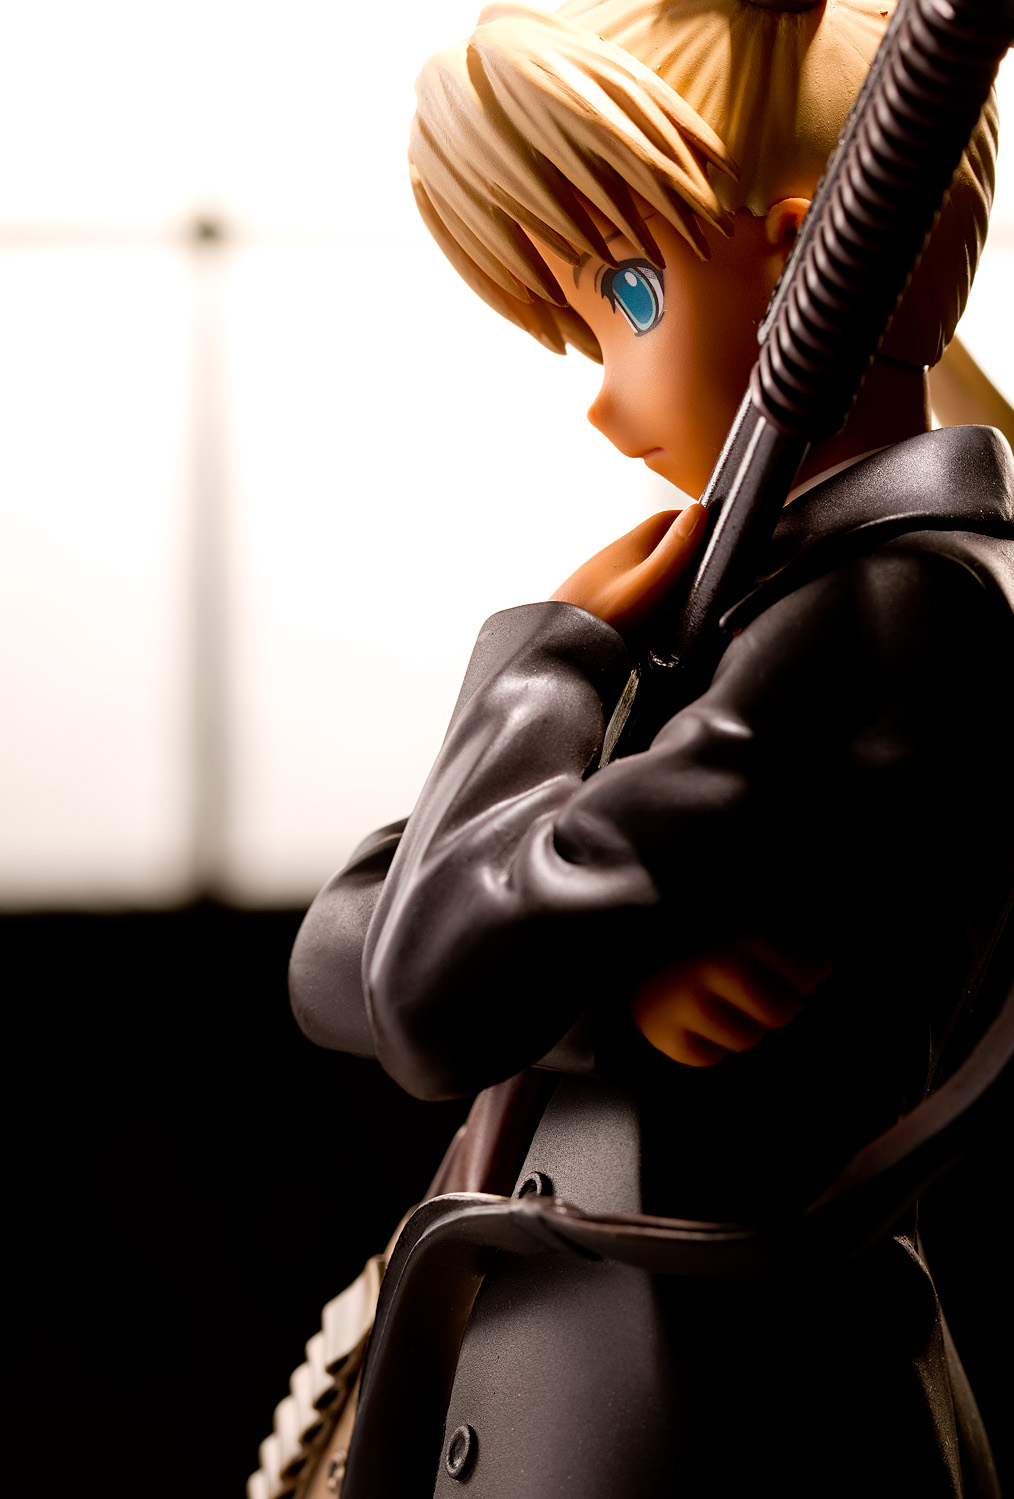
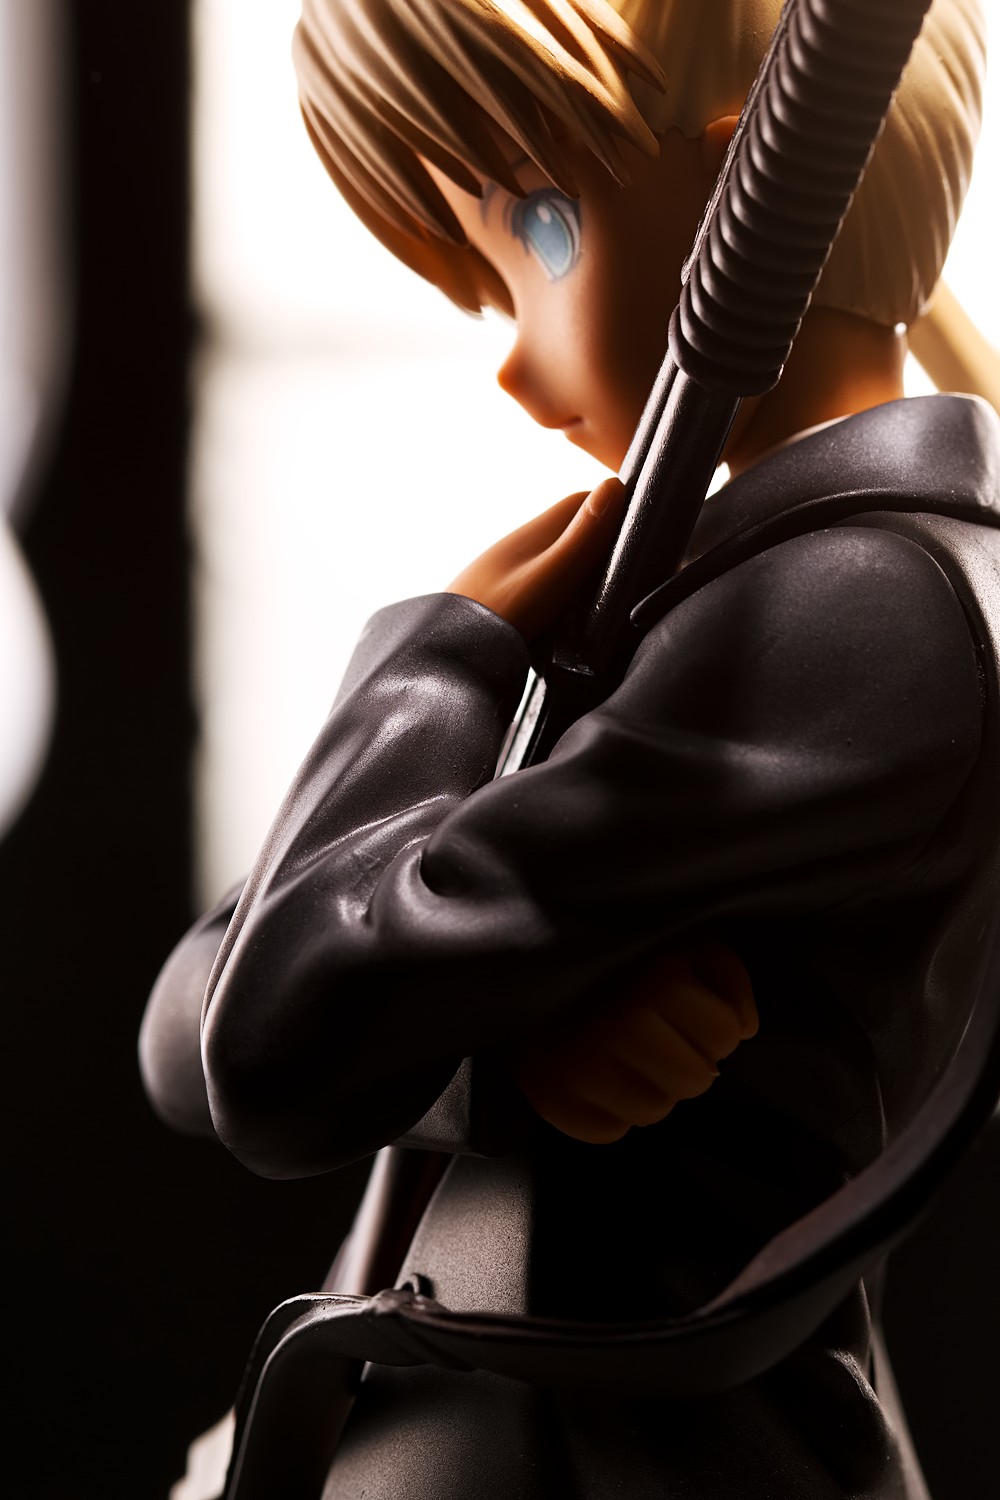
This is one of my favorite images that I’ve ever shot, though it’s not technically all that impressive nor did it require a complicated setup. However, I think it shows some important features about this figure – Triela’s sad look, her impressive shotgun and the way she hugs it, and her diffident posture and body language. One thing I’ve been trying to do – that is, trying to remember to do – is to position figures off-center. It’s not something I’ve done much of in the past; for a figure review, one typically expects the figure to be centered in the photo frame, and that’s what I’ve usually done. However, the center is often not the most interesting place to position the subject, and that’s particularly true for a profile shot. By placing Triela up against the side of the frame, I think her blank gaze becomes more evocative; now it looks more like an empty thousand-yard stare. The right side of the frame also acts as a metaphor as she leans against it, emphasizing her solitude by suggesting that her back is against a wall.
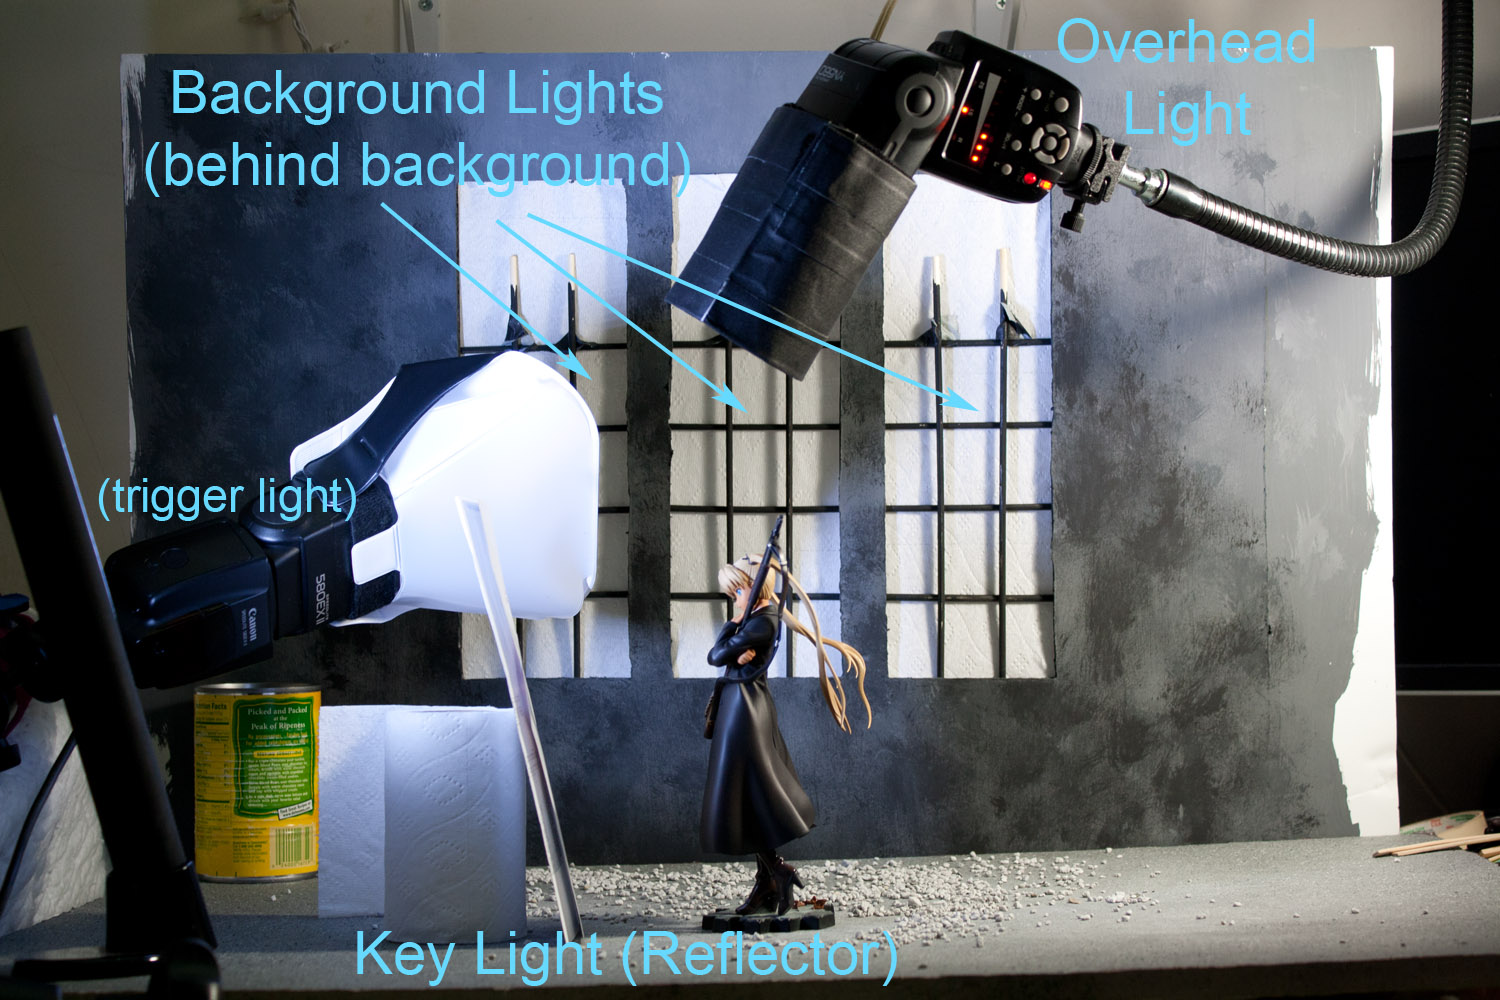
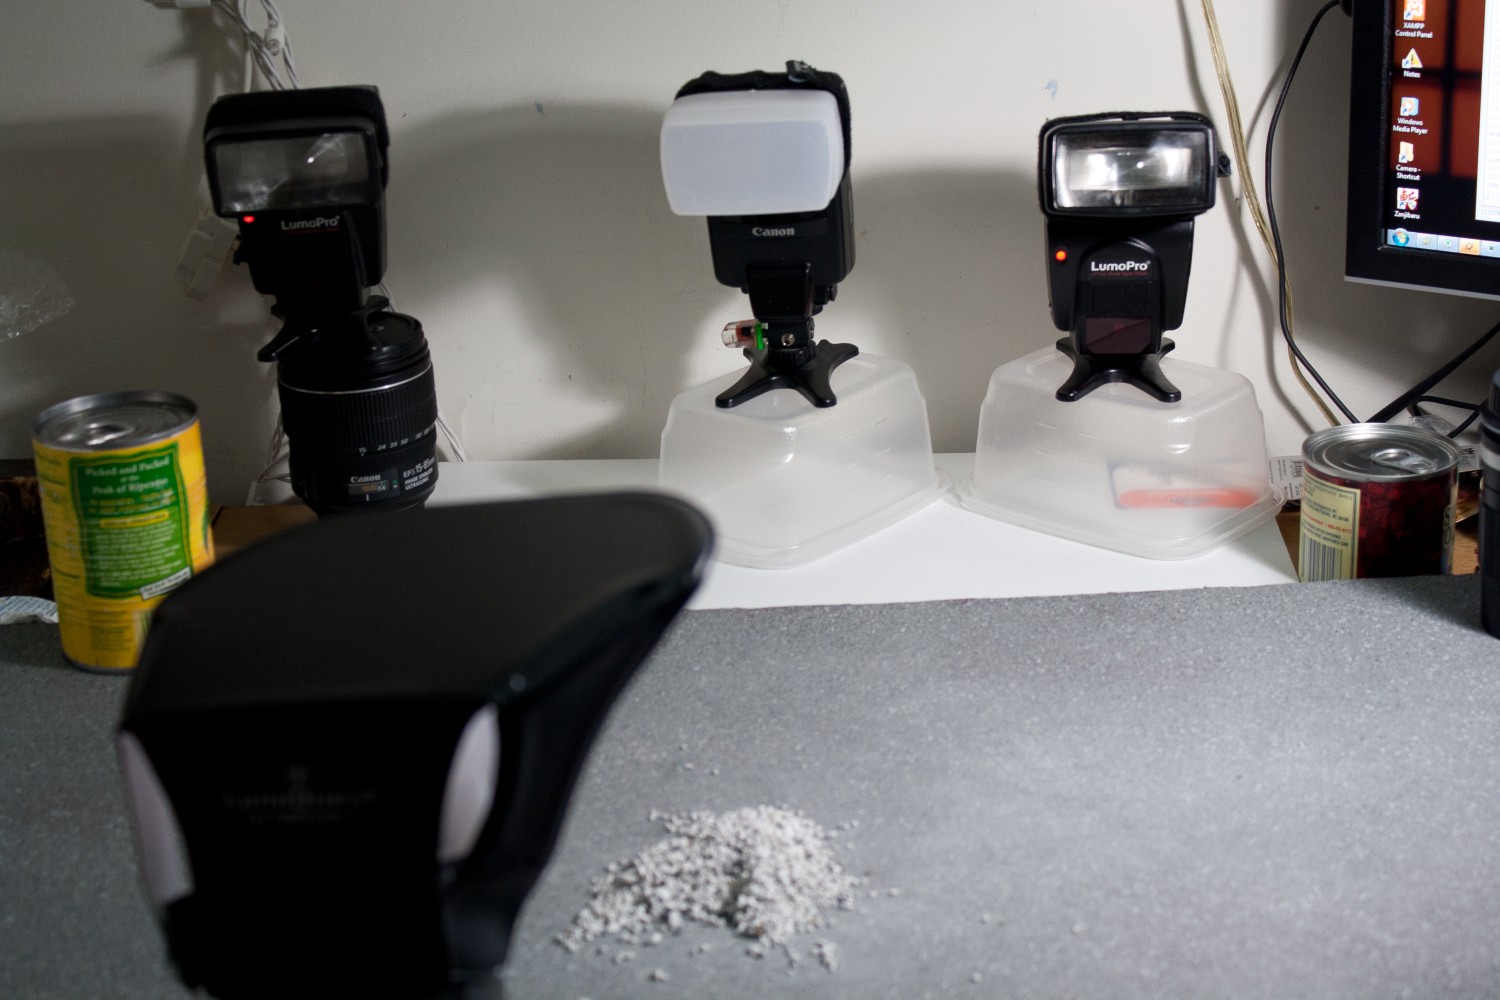
This is technically a five-light setup, though one light is basically just triggering the other lights, three lights are just illuminating the background and the key light isn’t actually a powered light at all. There are two flash units visible in the picture; a 580EX II hanging sideways on the left with an UltraSoft modifier attached to it, and a YN-560 hanging overhead on a tentacle-like Manfrotto Flex Arm with a small snoot wrapped around the head. There are three flash units behind the backdrop, firing through the windows. Those windows are covered with toilet paper, which conceals the flashes behind them and diffuses the incoming light.
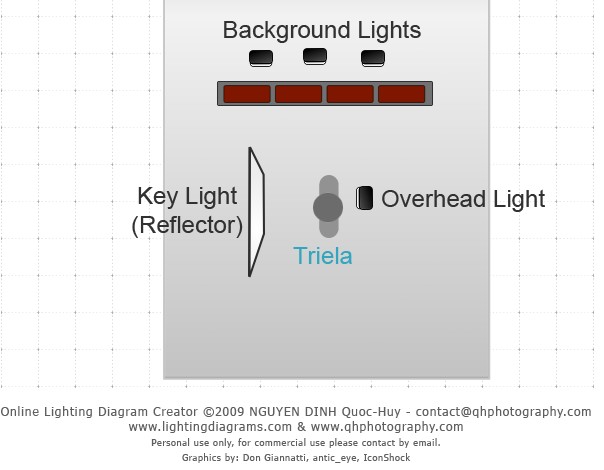
Here is the lighting diagram. Note that the 580EX II is not displayed here. I originally tried to light this scene with the 580EX II as the main light. It was firing right into Triela’s face, but I did not like the result:
Throwing the light at Triela’s face produces a conspicuous and very ugly glare spot on Triela’s eye. Maybe I could remove that during post-processing, but I’m not sure if I can. It’d probably be easier to just adjust my lighting setup, which is what I did. Also, note how different this picture looks with the tighter framing and Triela’s face positioned closer to the center of the image.
Instead of using the 580EX II as the key light, I placed a reflector in front of Triela, and this reflector now becomes the key. In this case, I think the reflector is a printed invoice from a Hobby Search order, which I’m leaning against a roll of toilet paper (always handy inside and outside of the bathroom). The 580EX II is now set to its minimum power setting of 1/128 and at an aperture of f/10 with a dome diffuser and a bounce modifier attached, it’s contributing no light to the scene; all it’s doing now is triggering the other lights. I shifted the overhead flash, which I intended to use as a hair light, so that it is now striking Triela at an angle. The light skims Triela’s head, giving a hard, high-contrast look, and then bounces off the reflector back to her face, softening considerably in the process. Now there’s a combination of hard and soft light – hard along the back of her bangs and her crossed arms, soft across her face and the lower part of her coat.
I like the final picture a lot, but I wish I’d stepped back a bit more and given more space in front of her. I also wish I’d done a better job building the background, which is crooked in a number of places. I also wish that I’d noticed that one of the lights wasn’t firing for about half the shots I took.
Note the soft, cushy, backside-friendly texture of the left window. Looking at the images on the camera’s LCD (I’m an inveterate chimper), I thought something was wrong but did not realize it until I had already taken a ton of shots.
It turned out I had the left-most flash set to on-camera mode so the optical slave sensor could not trigger the unit. Oops. Incidentally, I probably could have used just one light here if I had turned it around and bounced the light off the wall, but there wasn’t much space for the light to expand so I figured I’d just use three.
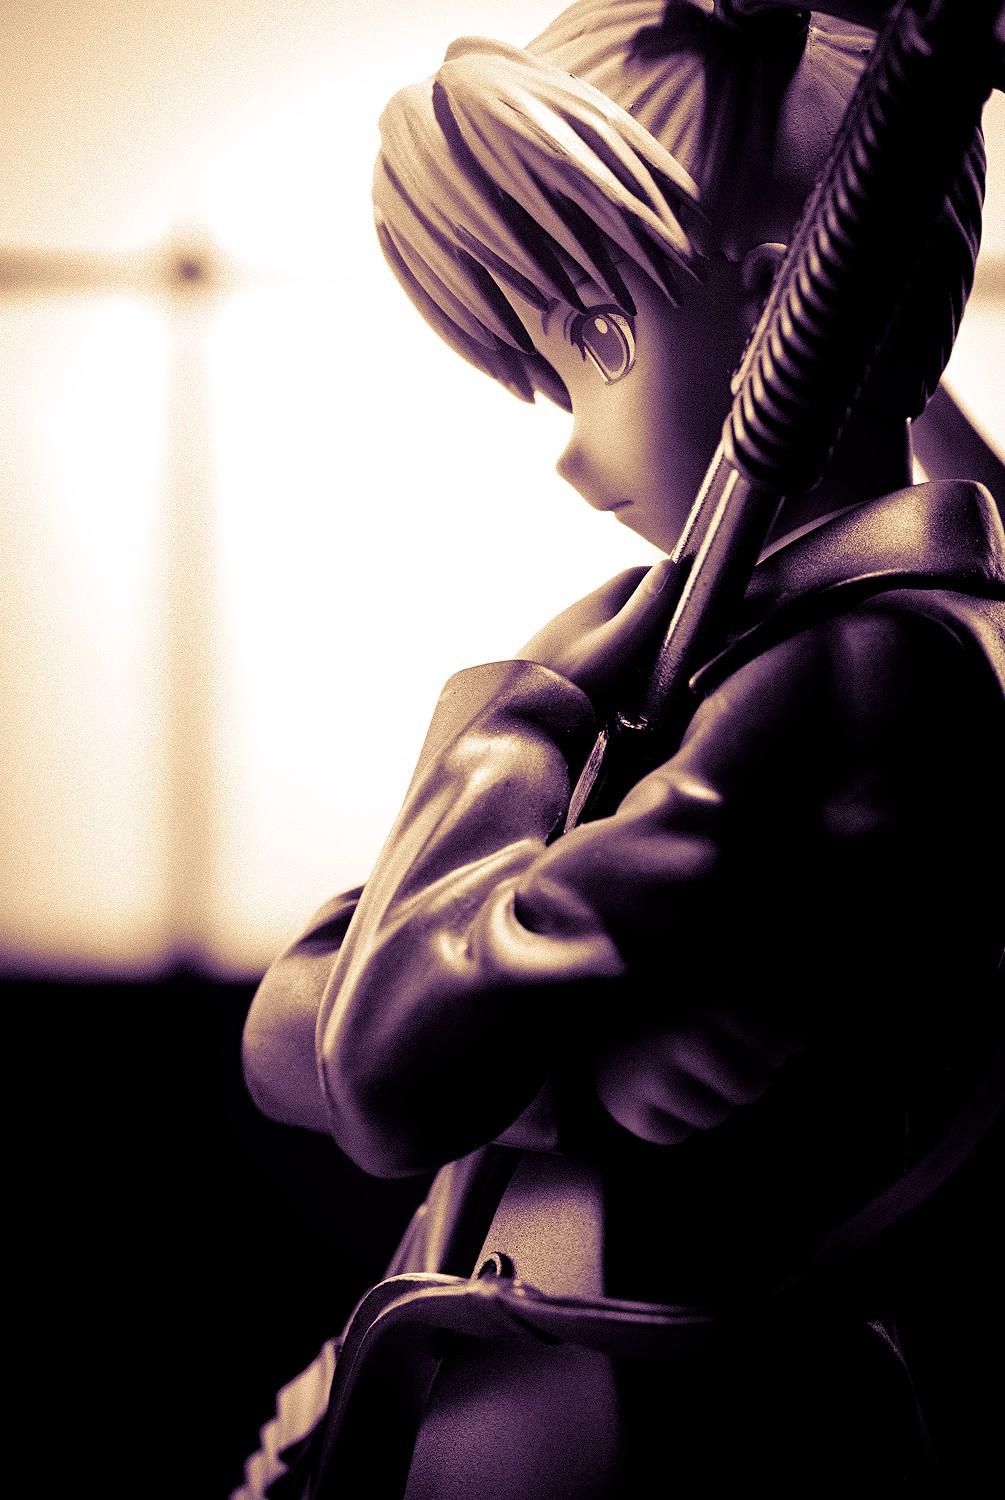
I don’t experiment much with black and white photography. I don’t think figures are great subjects for black and white; human faces have numerous shapes and textures that can be dramatically emphasized by removing color, but anime figure faces are comparatively flat and featureless. Nonetheless, I like how this duotone rendition of the picture turned out. I got this idea – okay, I ripped off this idea – from David DuChemin’s Lightroom book, which I recently bought and found to be very helpful in experimenting with Lightroom, which I also recently bought. Experimenting with color – or the lack thereof – is something I’m interested in trying, so this is something I may be doing more of in the future.
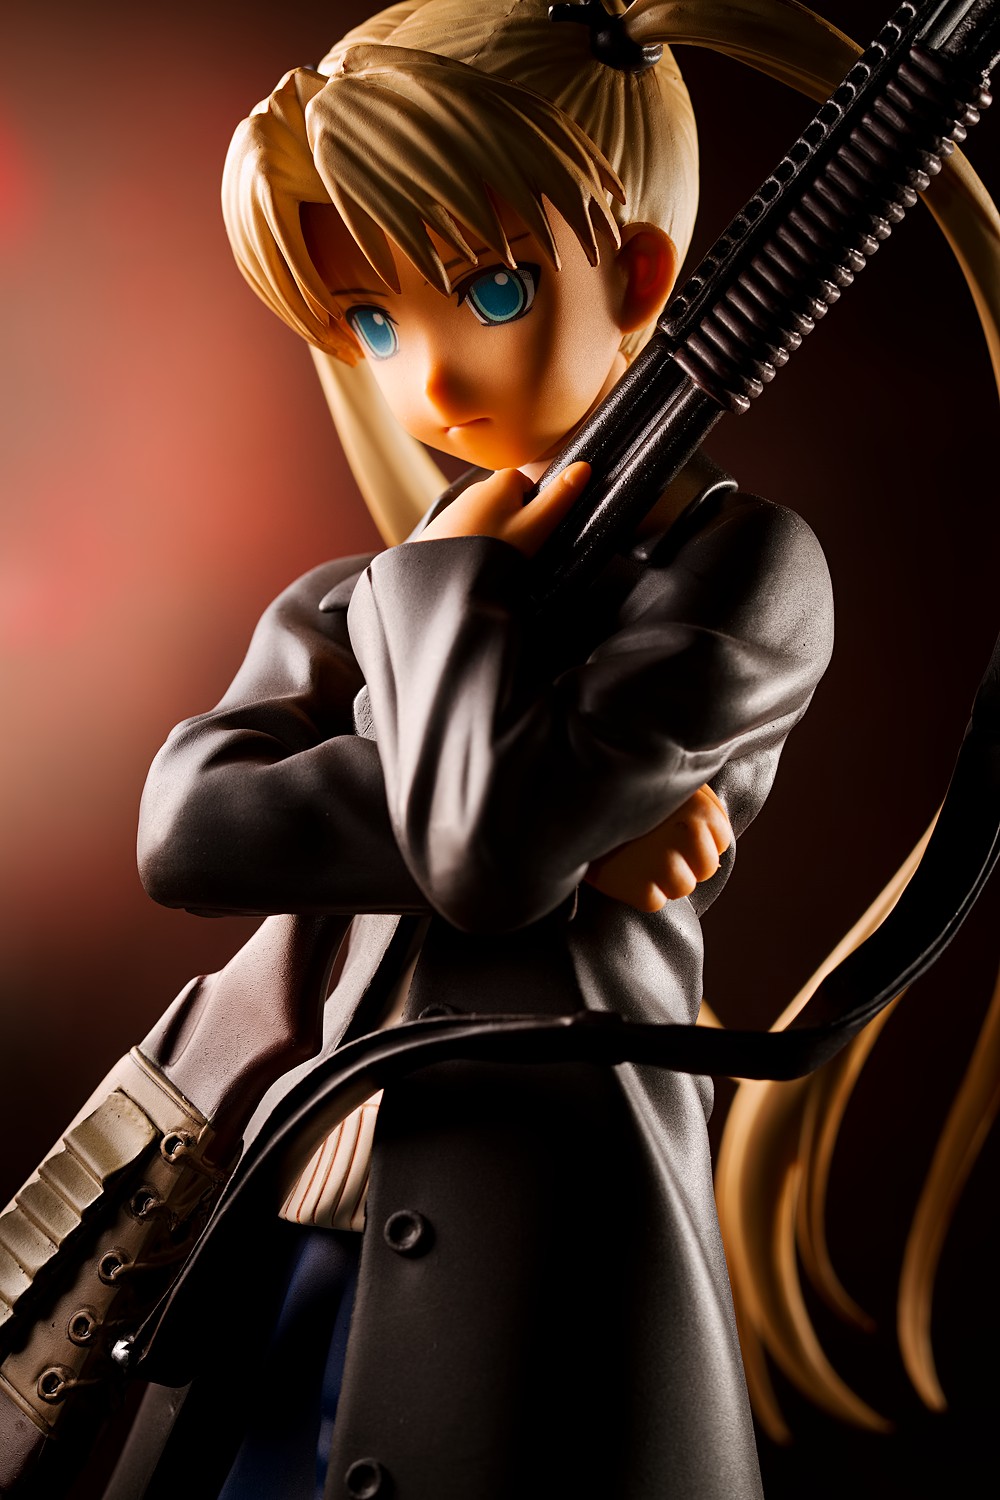
This is the second shot I will talk about, and I like this shot a lot as well. Triela’s melancholy mood is still evident, but what I like most is the visual contrast, particularly how her gun divides the frame diagonally into brighter and darker halves. I probably could’ve killed the rim light to present a more somber tone, and I wish I’d thought of that at the time, but I didn’t. On the plus side, the rim light does separate Triela from the background in dramatic fashion, which isn’t an unappealing look.

Here is how the setup looks. I won’t bother with a lighting diagram, since it’s more or less a straightforward setup. The key light is the YN-560 balanced on my wallet on the left. It’s got an UltraSoft bounce modifier attached and is positioned very close, just out of the frame. The rim light is positioned to the right and slightly behind Triela. It’s got a snoot with no diffusion, which will deliver a harder light. The background light is difficult to see; it’s behind the YN-560 on the left and is pointed directly at the background, where the big glare spot is quite obvious.
The key light is positioned behind Triela, lighting up her right cheek. This type of lighting – where the light source illuminates the far side of a face – is called short lighting. I’ve done very little deliberate experimentation with this type of lighting, but I like how it looks here. By lighting the far side of Triela’s face, the shadows fall towards the camera and create interest and drama.
The opposite of short lighting is called broad lighting. Broad lighting is where the light illuminates the side of the face closest to the camera – in this case, the left side of Triela’s face, where you can tell where the key light is placed by the ugly shadow cast by her gun that falls along her cheek and ear. In terms of comparing both styles, this isn’t a fair trial; this image was rejected for usage in the review, I haven’t applied my usual rigor of post-processing to it, and the shotgun makes it difficult to use this technique with Triela facing the left side of the frame. However, I think it is instructive for demonstrating how one can emphasize a mood and generate tension just by shifting a light around. For example, here is another picture with the key light shifted to hit Triela more or less straight on:

Note how the drama diminishes in the second image; the heavy shadows are lost, and so is some of the depth in the image. Notice how the ammunition holder on her gun’s stock loses a lot of its implied three-dimensionality in this image compared to the short-lit one. On the plus side, it’s easier to see the details of the figure, even if some of the visual interest is lost. I don’t think this is a bad image, but as I rejected this one and used the short-lit one, I like the image with the pronounced shadows better. Also, this second image lacks the rim light, and now that I study both pictures, I think I’m glad I kept it.


I…want her now more than I did before. And I’m not one for still statues.
You should get her! It’s a great figure.
Where do you get most of the raw materials for your diorama & background scenes set-ups? (many of your diorama are really amazing I have to say). I’ve always wanted to make some cool diorama settings for my figures but have no idea where to start from. Any suggestion would be great!
I usually go to an arts and crafts store; there’s an A.C. Moore and Michael’s near where I work, and I get most of my stuff from there. This backdrop here was just a piece of white foamboard with some painted bamboo sticks and toilet paper to make the windows. I also get a lot of stuff from Lowe’s; Lowe’s is one of my favorite stores now.
I definitely like that 02.jpg shot with the stare. The composition is great and the eyes staring off to the distance tells an interesting story. I think I tend to do a lot of my photos using the rule of thirds, maybe a little too much sometimes.
The lighting setup you have here worked out really well too, hell, all your photos as of late have some really excellent lighting. =)
I disagree with the B&W comment about the figures though, I think a lot of figures out there have great contour/pose fit for low key and silhouette photos. That is unless you’re specifically talking about the faces. ^_^’
Keep the great photos comin’!!
I did not even hear about the rule of thirds until maybe about half a year ago, but it makes a lot of sense to me, although I don’t stick to it too often since all I shoot are figures. I really want to take my camera outside more often but I live amid stereotypical suburban sprawl and I don’t think photographing a strip mall would be much fun.
I might be changing my mind with black and white, particularly with respect to duotone stuff, which I guess isn’t strictly B&W but maintains much of the same effect, I think. In fact, I’ve been looking around for a film camera, since I’ve heard black and white film isn’t too difficult to develop at home. I think it might be fun to take some shots that way.
I can’t remember but what camera are you using currently?
I’ve got a 7D.
Nice! I really like the virtual focus screen on the 7D and the amount of focal points it has. =)
Yeah, those are two of my favorite aspects of the camera; I really liked my little Rebel (apart from the stuck pixels it now has) but when I decided I wanted a new camera, I went to Best Buy, played with a 50D, and was blown away by how much bigger and brighter the viewfinder was. I also really love the 7D’s autofocus system; I never got great results with my older camera’s autofocus system, which is why I always focused manually in Live View. I’m pretty sure if I went back to using the Rebel, nobody would notice a drop in image quality, but I definitely enjoy using the 7D more.
That’s what I like to see, canned fruit and toilet paper being essential ingredients to good lighting. Really tickles my use whatever is available sensibilities.
Do you shoot these breakdown shots of the lighting set while you’re shooting the figure or do you go back and recreate them for the breadown?
The can of sliced pears is a stalwart companion. It’s been in just about every photo shoot since the start of this site. I sometimes think it’s time to send it to a well-earned and delicious retirement but it expired a couple of years ago and I’m afraid to open the can now.
I typically shoot them while I’m shooting, if I look at the LCD and see a shot that I like. I often forget to do so, though, and I have to shoot some of the setup shots later. Like the shot up there with the three background flashes, I think I shot that one as an afterthought after I was dismantling the set.
Another great shot breakdown article. I’ve been struggling a bit getting the faces the way I want them and your approach to Triela is definitely something I will be exploring in the future. Personally I do think that “simple” figures make the best objects for portraying emotion. While I say simple, they obviously have to be well-crafted and not resemble Davy Jones.
Calling yourself lazy made me chuckle a bit, taking the time to create these great atmospheres (even with the help of canned fruit and toilet paper) is admirable. I love when people use props, to a certain extent. I’d take a proper lit figure on a white background over a poorly lit one in a pile of rainbow-colored ponies any day of week. Fortunately, you excel at both.
I said in the intro to the post that I like figures which convey emotion because they are easier to photograph but Triela actually took me a really long time to shoot. I think I had hoped to wrap things up in two hours but it took me three, and a lot of that was just experimenting with different angles and setups because many of the ideas I had wanted to use did not turn out so well. When I was culling the photos, I was surprised to notice that many of the shots I wanted to use were short-lit, since that is not a style I’ve used much (and in fact, I’ve often avoided using it since I didn’t understand it very well).
I enjoy making props but man, they do take some time to build, sometimes. I’ve had some figures in my review queue for months. I’ve had gangsta lean Saber on my shelf for nearly two years now, and I want to shoot these Sengoku Rance figures already. I have backdrop ideas in my head, I can see the pictures in my mind, I’m just too lazy to spend the time actually building them.
Awesome photos as always, I always admire the amount of effort you put in to setup the proper background :3
Thanks! I do like it when I have a good background to shoot a figure on; I think even just a small prop or something to break up the backdrop can add a lot to a figure picture. (Admittedly, it can also take away a lot, too.)
Now I can imagine better how you’ve achieved this great looking lighting for Triela.
I was actually surprised to see and hear about how many flashes you have :D.
Your props are nice as always and I like how you’ve showed us the way you keep things in place with the wallet, a can and so on. I guess this Manifrotto arm could be helpful for me, in different aspects, maybe I could keep my round reflectors in place with it.
I sort of collect flashes XD I’m actually thinking about buying another one. I seldom use more than three or four but sometimes I want more light for an idea.
The Manfrotto Flex Arm is fantastic, though the Magic Arm is even better. It’s much more expensive, though. I think it’s worth it since I love being able to position the light exactly where I want it; prior to getting it, I just used a little tabletop tripod and it was always a hassle trying to get it set up.
Instead of flashes, how about some cheap strobes? You’ll get a ton more power and can plug them in since you shoot mostly at home. I see some pretty nice 250 and 300 watt strobes on Amzon for $50-70 each. Much better value than trying to match the outputs of cheap different flashes. You can get a set of four of these strobes forvthe cost of a standard canon speedlite.
Also, love the background you built. Love that kind of DIY stuff.
They’d probably be cool to use, but I don’t have any room to put C stands and booms and stuff. Though I wish I did since light placement is always a big problem for me (which is why I got the Manfrotto stuff; it was expensive as hell but it works way better than the little table tripods I used to use). I though even monolights were way out of budget but I was surprised to see that you can get an Alien Bees unit for like half the cost of a high-end Canon or Nikon flash.
Hmm how about continuous lights? There are some LED sets that are small that could fit your set up. You could instantly see how the lighting would look right before your eyes.
I used to use continuous lights all the time, in the form of desk lamps with CFL bulbs. I was happy to ditch those, though, since they took up way too much room on my desk and I always had to use them with a tripod. I think that’s one of the biggest advantages I get with flashes is not needing a tripod; it’s a lot easier to frame stuff when you don’t have to fiddle with a ballhead (or worse, the flimsy-ass pan-tilt head that came with the awful Best Buy-brand tripod I used to use). I recently looked through my old pictures and was kinda appalled to see how seldom I varied distance and angle.
The flex arm you have in shot 3, which model is that, and what screws does it have? I’m looking for one with just a regular (1/4th?) screw. Female to go on my spare tripod, and male end to attach a light to, but from what I’ve found googling those manfrotto flex they have some sort of other size female end which renders them useless to me. 🙁 I suppose gaffertape is always an option…
It is the Manfrotto 237HD, the Heavy Duty Flex Arm. Yeah, it comes with a 3/8″ screw on the end, which is sort of annoying. The Magic Arm also has a 3/8″ screw which was a big problem for me, because I wanted to put a mini-ballhead on it and the ballhead I had only had a 1/4″ socket. I had thought that finding a 3/8″ male to 1/4″ male threaded adapter would be easy but to my amazement, almost nobody seems to make such a thing. I went to a local camera store and I got a 3/8″ to 5/8″ adapter and a 5/8″ to 1/4″ adapter, and that let me install the ballhead, albeit in a very ass-backwards manner.
The Flex Arm (and Magic Arm) can also be used with a super clamp, and I think that’s how they’re really meant to be used. The super clamp – at least, the one Manfrotto makes, though I think every manufacturer’s super clamps are basically the same – has a socket that one end of the Flex Arm drops right into (you can see it in this video). You lock the Flex Arm into the clamp and then you can place the clamp almost anywhere – though I wouldn’t advise clamping it to expensive furniture, since overtightening the clamp will definitely damage it.
Hm, I simply want a flex type arm I can put on one of my spare tripods, so I want a regular 1/4th female base and male tip, basically to extend my tripod and make it flexible (primarily for overhead lighting). I hadn’t thought about it the other way. Something that needs more investigation, evidently.
You still might be able to do something like this, if you clamp the Flex Arm to the tripod leg. Or if you clamp it to something heavy that you could place on your desk or table. It might be cheaper to improvise something out of hardware supplies, though.