Back when I talked about photographing Gotou Matabei, I talked about trying to establish a mood. That’s not an approach I take for every figure, though. Quite often, I’m just trying to make them look pretty. Such is the case with Orchid Seed’s Super Sonico. She’s dressed provocatively but has a surprised, perhaps even timid expression, and I didn’t have any great ideas for photographing her until I bought David Hobby’s Lighting in Layers DVD set. One of his shoots positioned the model in front of three tall, rectangular panels, and I really liked the geometry and texture of the backdrop. I decided that a 1/7 scale version would work pretty well for me, too.
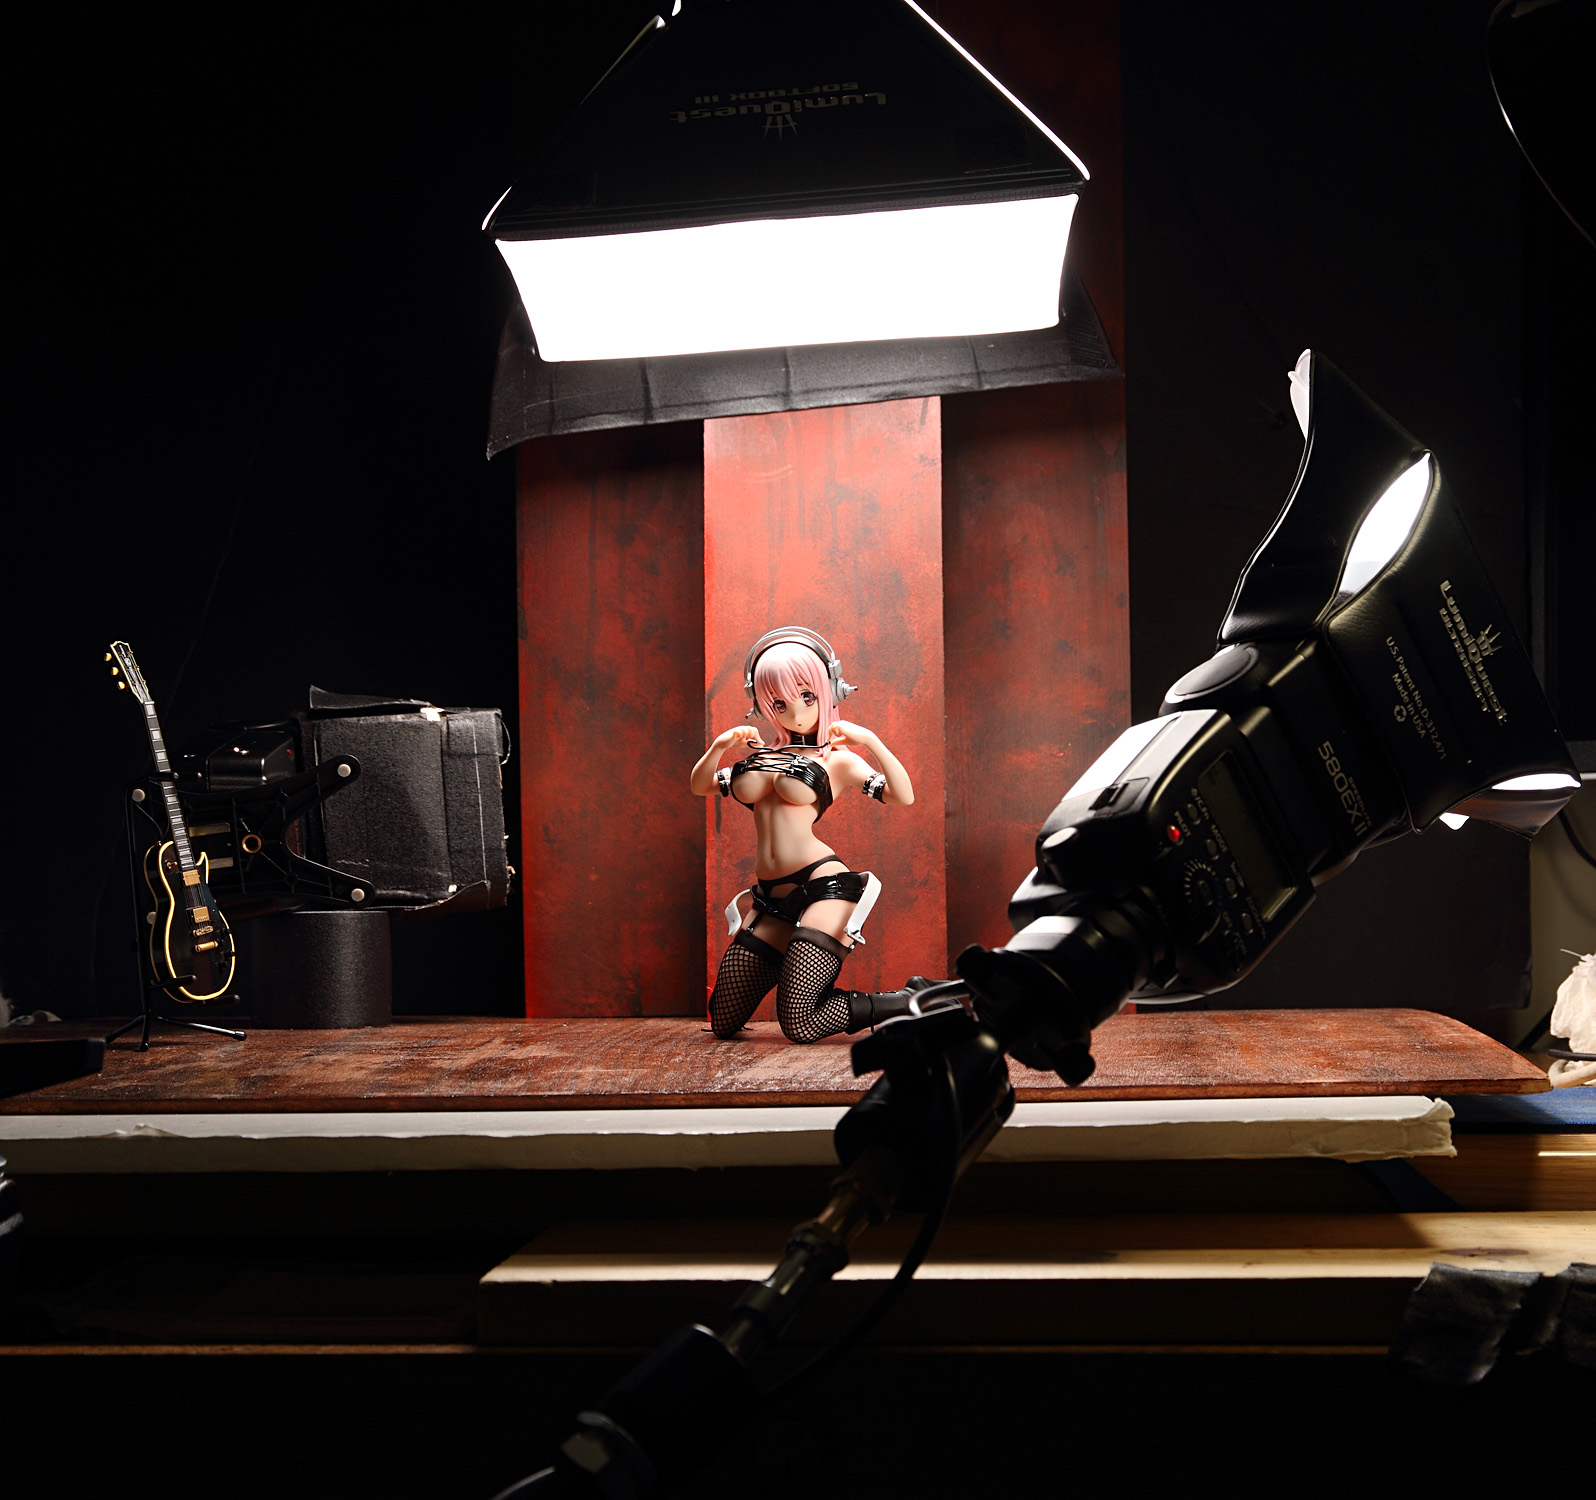
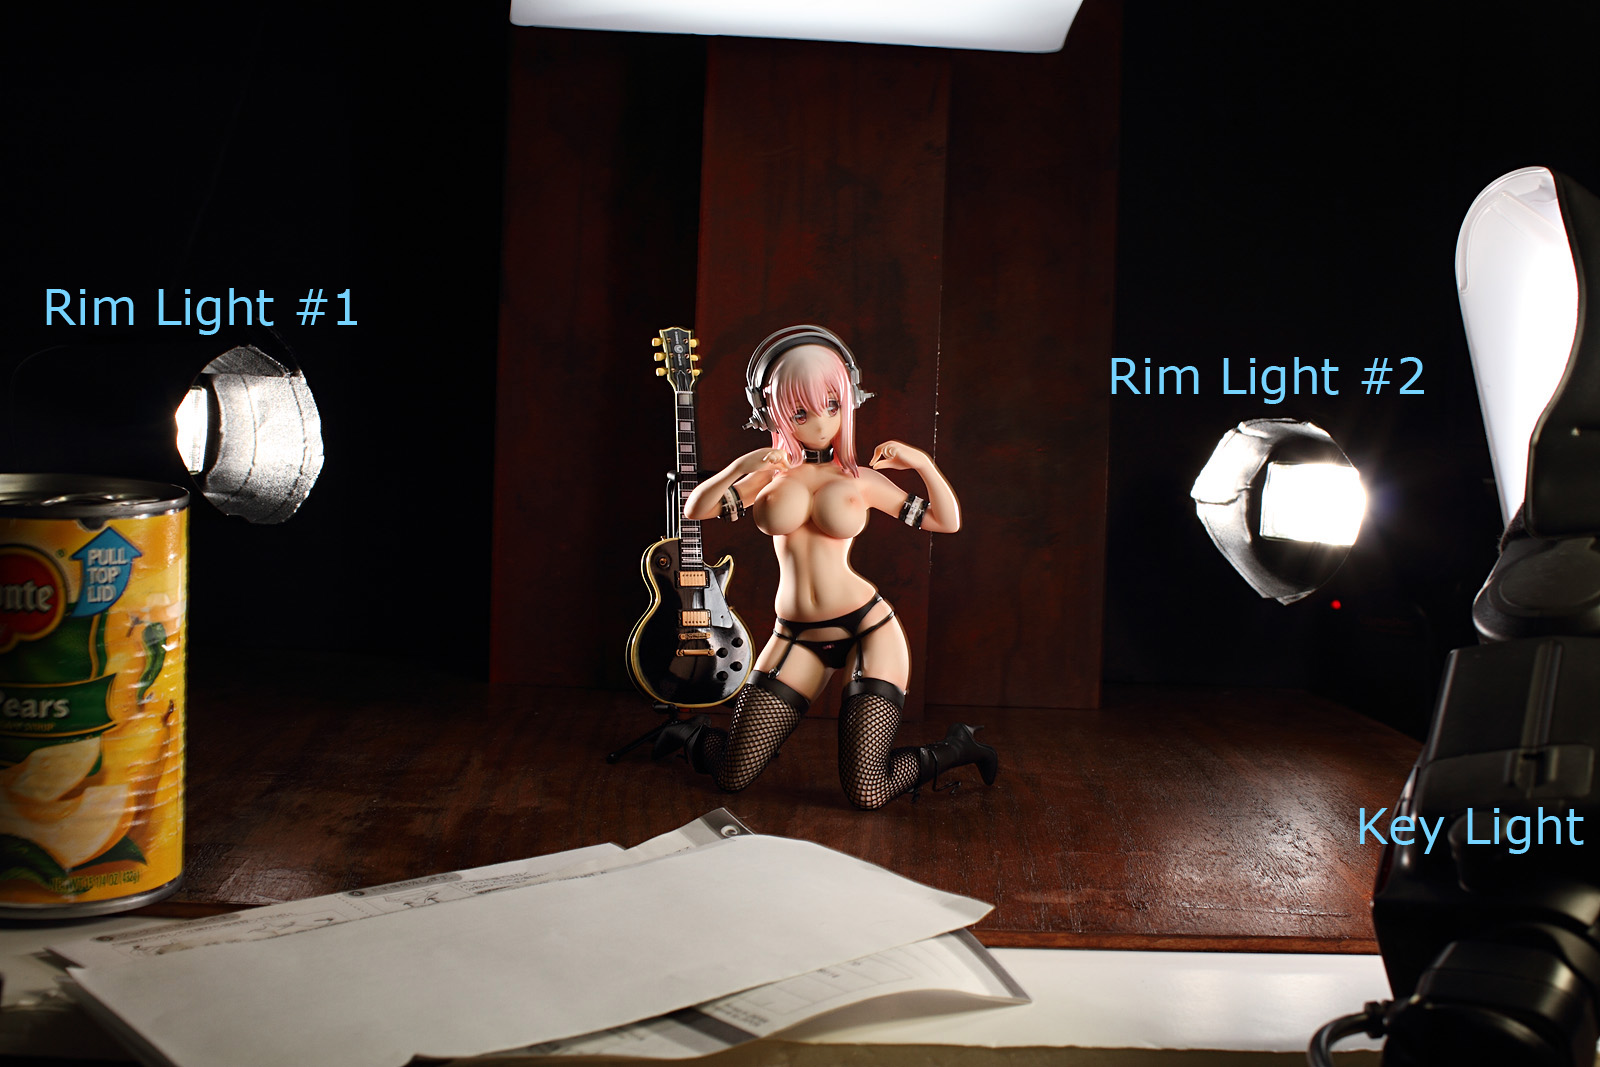
This is the basic setup for the shoot; the floor is a wood panel, the same one that served as the wall for the Matabei shoot. The backdrop panels are painted in haphazard manner with layers of red and black paint to give them a more interesting look. There are actually three of them, two standing behind the front, center-positioned panel. I could’ve just gotten one big panel to serve as the rearmost part of the backdrop but that would’ve cost more money so I didn’t even think about that.
I planned to shoot three groups of pictures – one with Sonico fully dressed, one with Sonico minus her jacket, and one with Sonico fully cast off – and I wanted to make them visually distinct. Looking through my older posts, sometimes I see a couple of pictures that look very similar and I think to myself, “Why did I include two pictures that look so much alike?” And then I realize that the figure is clothed in one picture and has her breasts hanging out in the other.
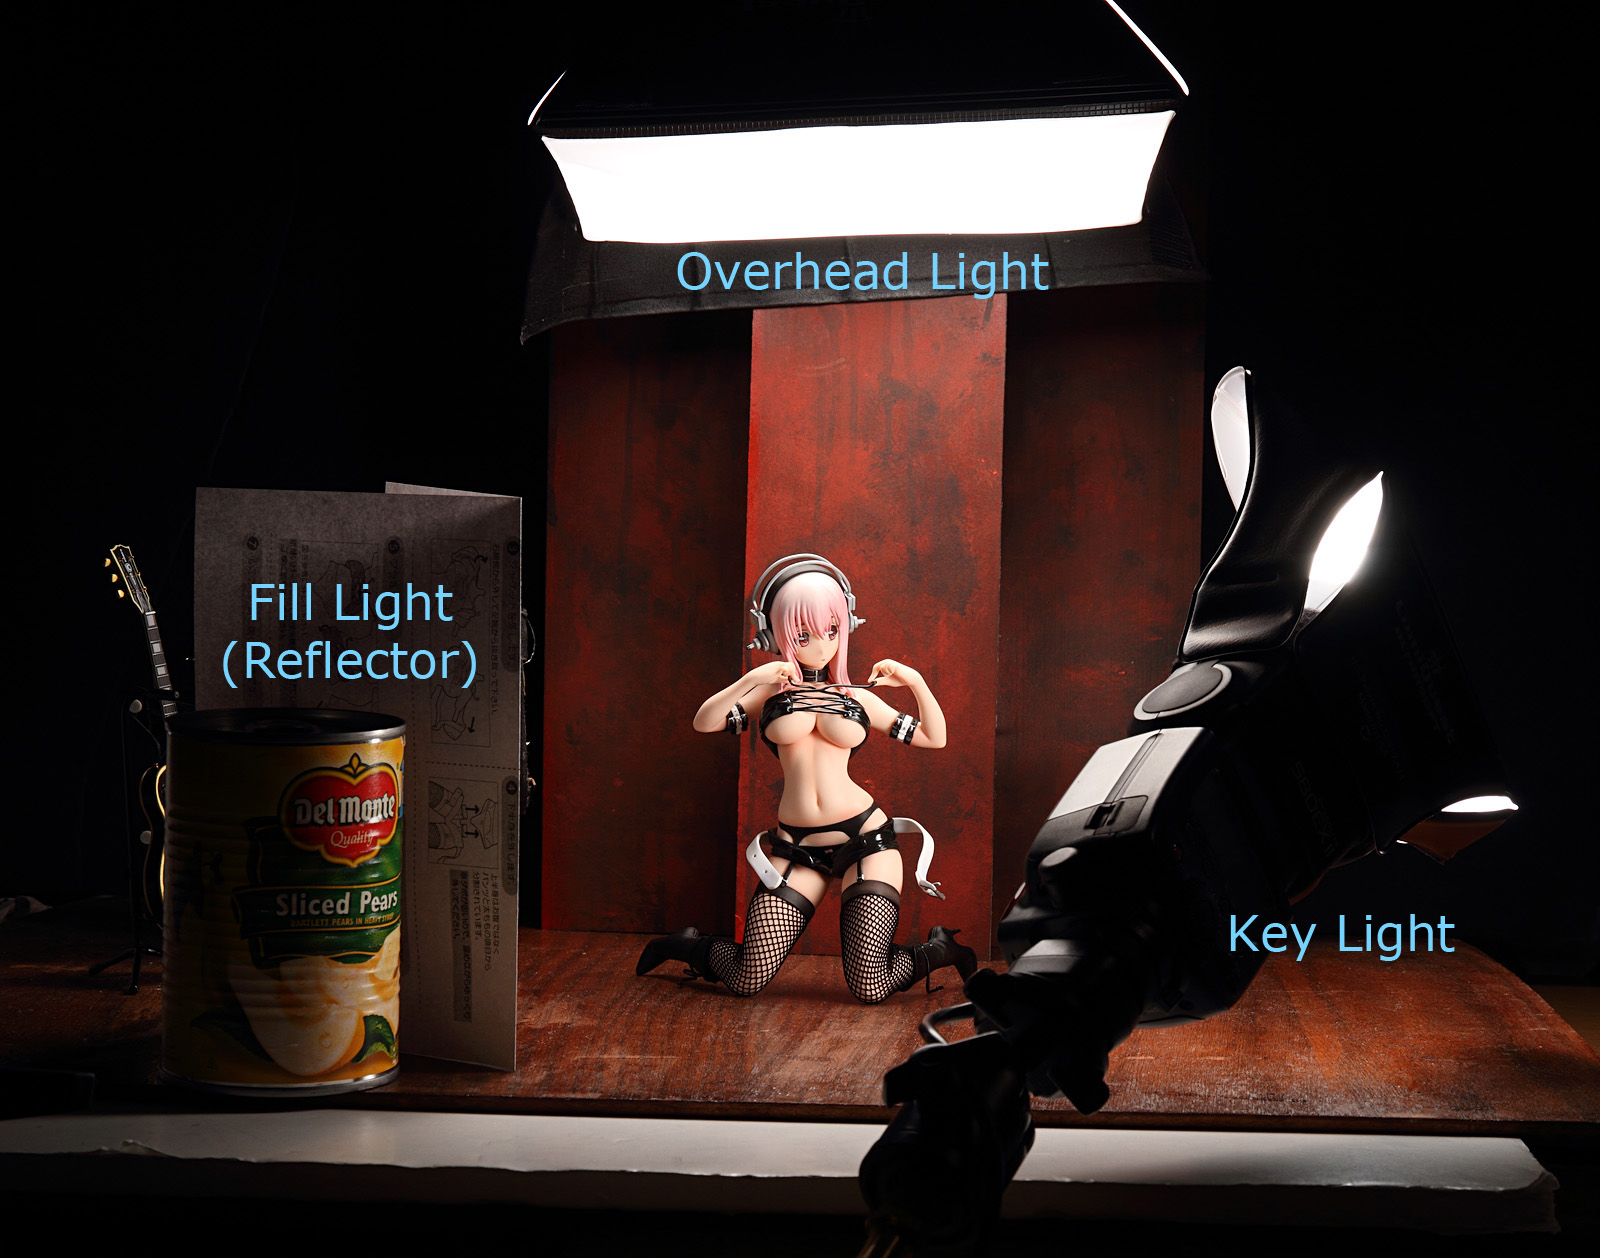
I’m pretty lazy though. I didn’t prepare an alternate background, so I’ll just differentiate the shots by changing up the lighting. First, here’s the basic setup for Sonico while fully-dressed. She’s not fully-dressed in this shot because I forgot to take one while I was shooting that set, and I barely remembered to take this shot before I wrapped things up:
This is a three light setup. The key light is positioned on that peculiar contraption in the foreground. That thing is called a Manfrotto Magic Arm and it’s something that I acquired very recently. One of the drawbacks of flash units versus desk lamps is that they’re a little more difficult to position them where you want them. Desk lamps typically come with flexible necks that make it easy to get the light where you want it, but flashes don’t have anything like that, which is why I like the Magic Arm; it mimics the neck of a desk lamp, albeit at a much higher price. The key light has a snoot wrapped around it to constrain its spread. The overhead light has a Softbox III to give it wider spread and a softer look; basically I didn’t want a big highlight on the background or the reflection of the flash head on the floor. The third light has a grid spot fitted to it and is positioned to the left; it’s firing across the backdrop, behind the the wood panel in the middle but in front of the two in the background. The frontmost panel casts a pretty dark shadow on the rear panel, obscuring the paint that I spent so long (about fifteen minutes) painting, so I want to use a low-powered, directional light just to brighten it up a bit.
I’m not very happy with the result. The snoot gives too much of a spotlight effect, darkening her legs so the fishnet detail can barely be seen. The guitar also looks strange, with the headstock and neck lit well but with the body fading into shadow. I try to use a variety of lighting setups and I keep a mental record of what works and what doesn’t, and this definitely goes into the doesn’t-work category. However, maybe it could work on a different figure or for a different background, so I’ll also keep that in mind. On the plus side, I do like how the overhead light looks, so that will stay.
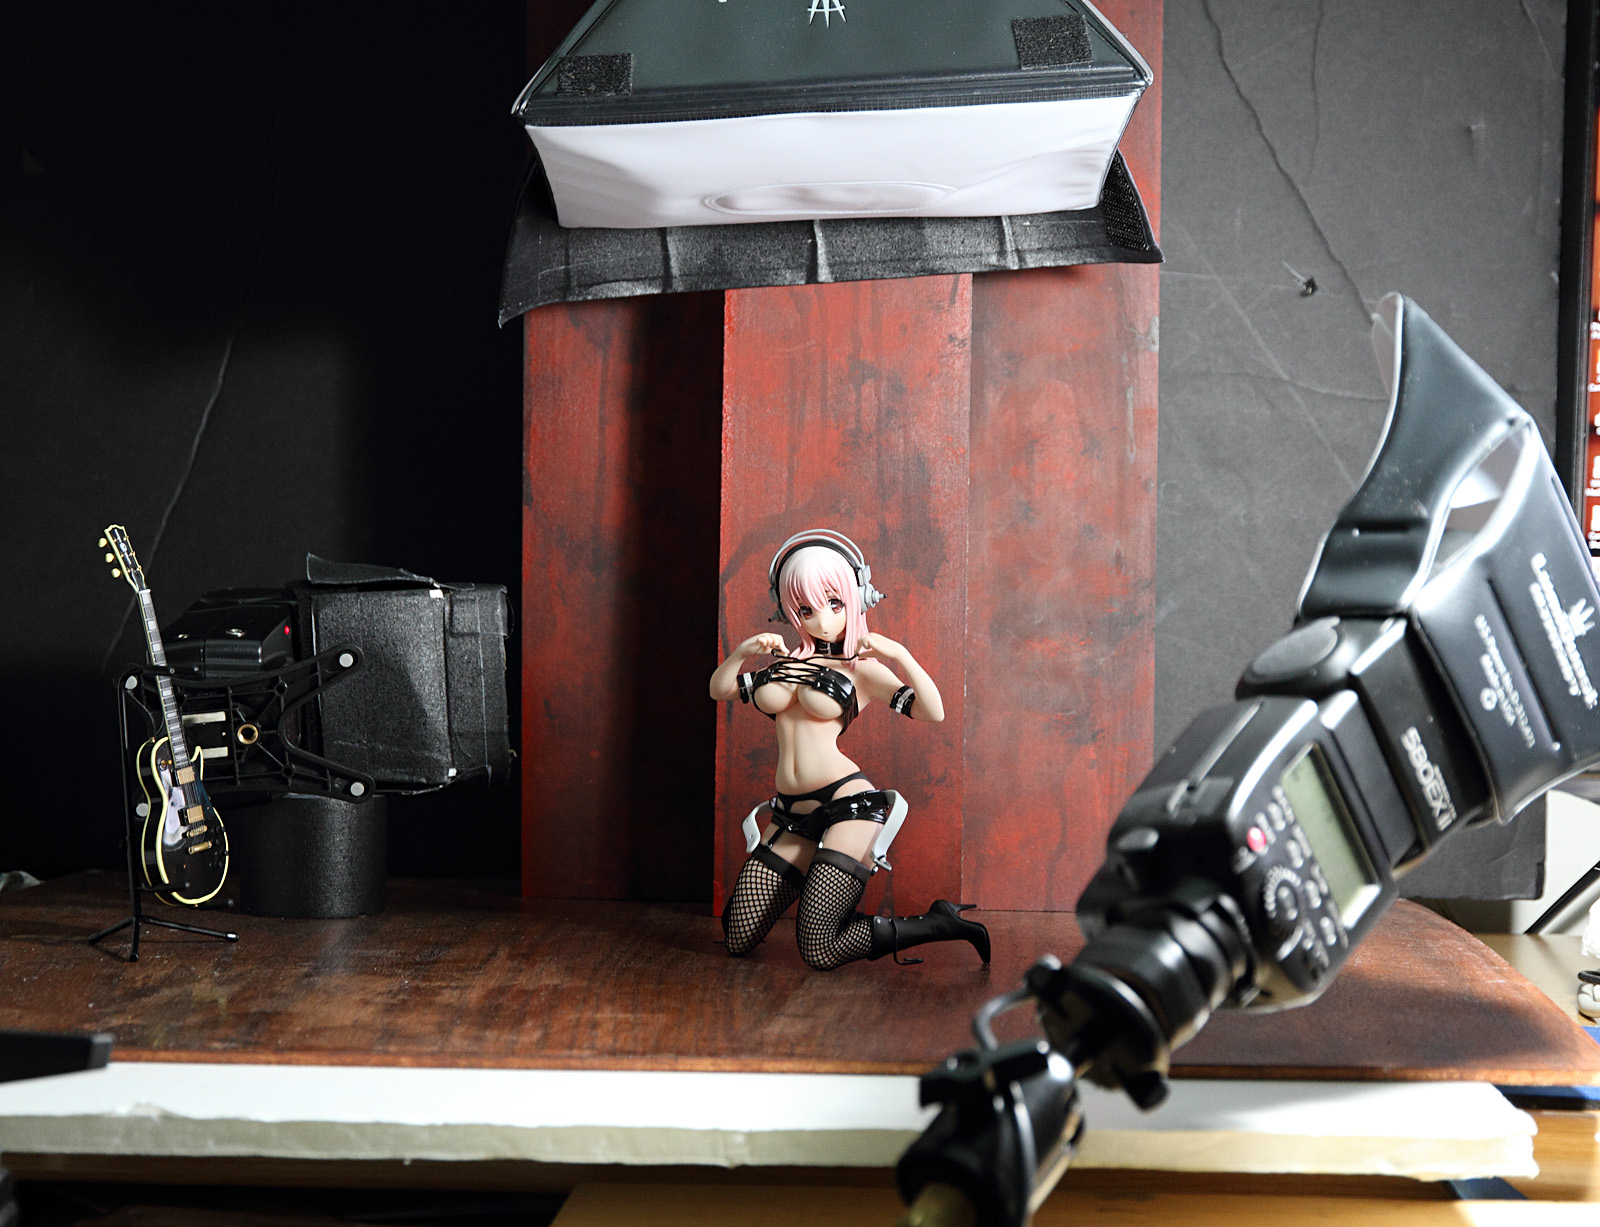
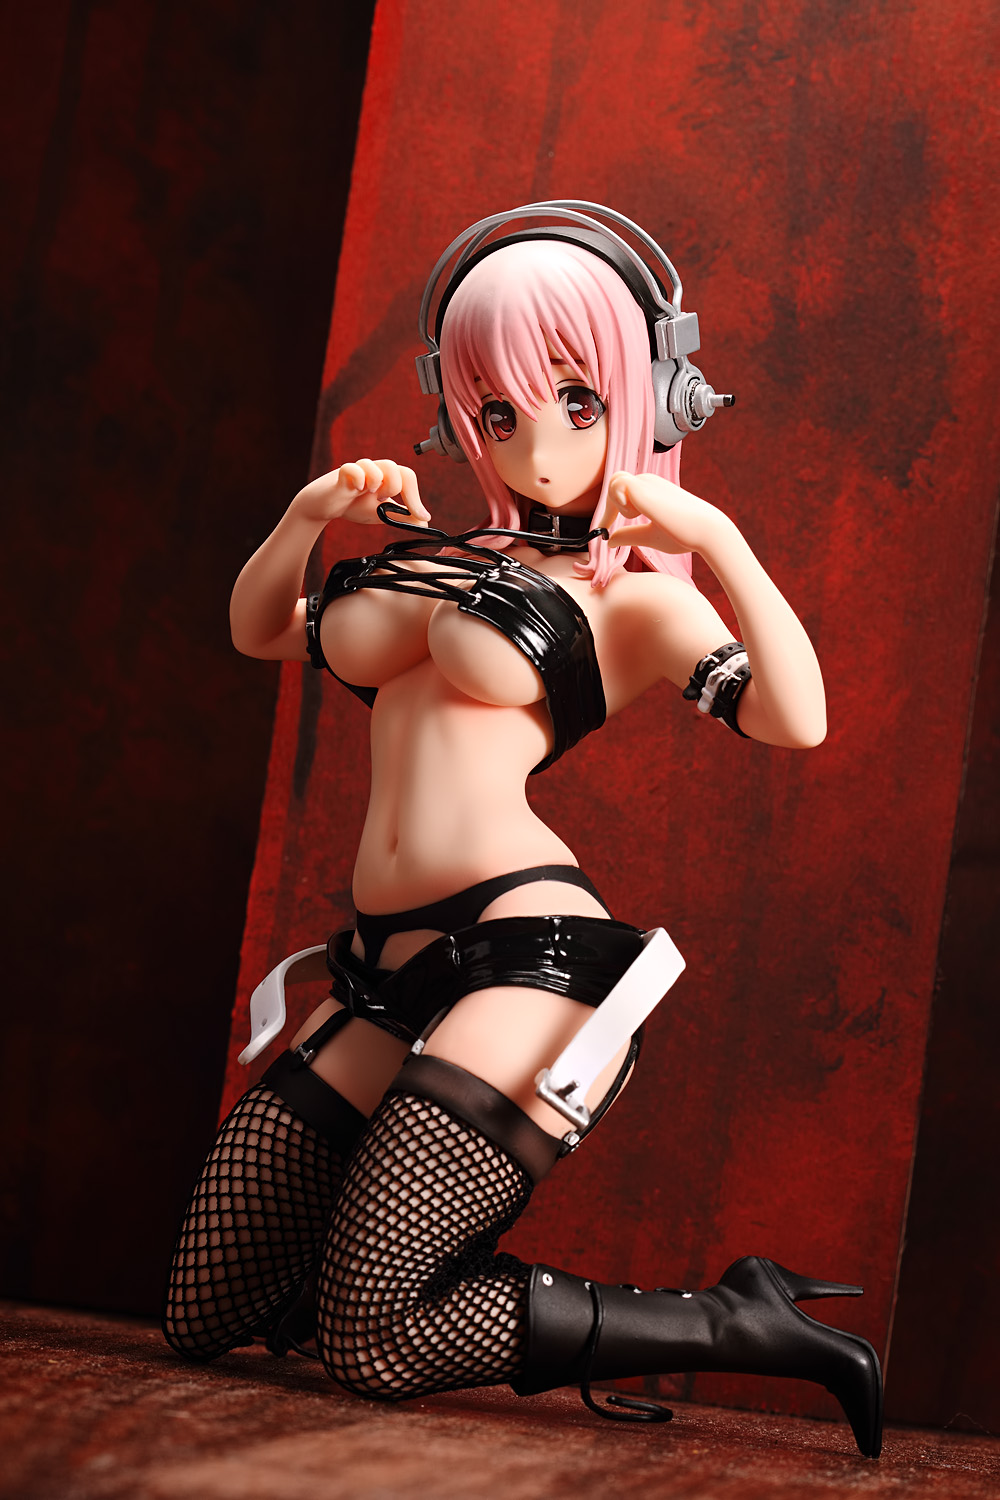
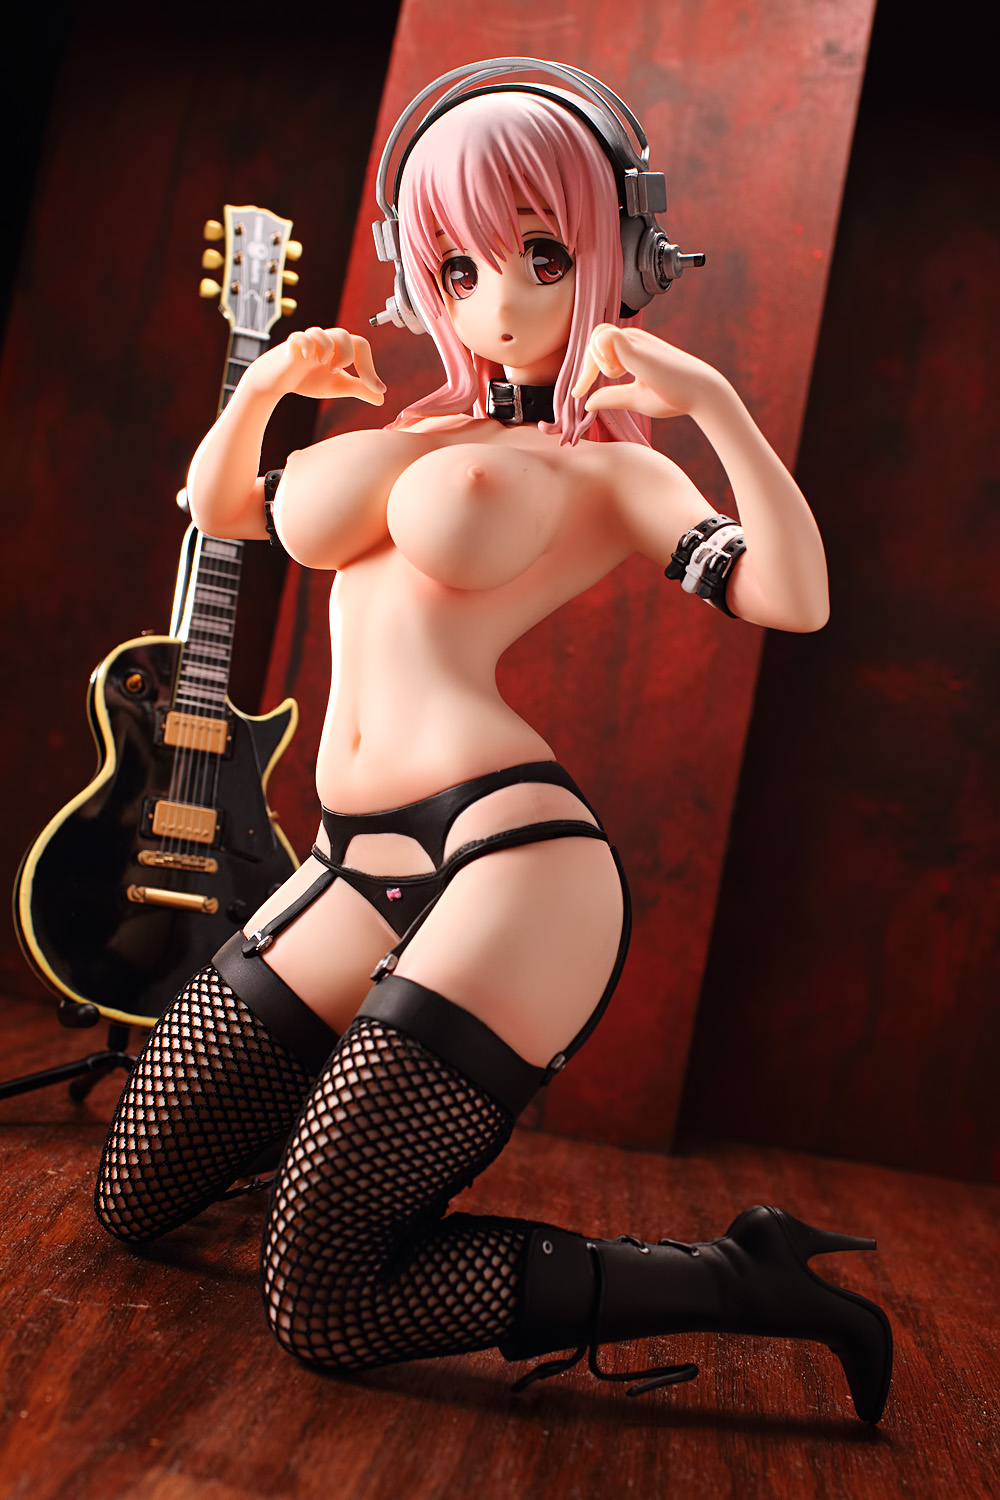
Next, here is Sonico without her jacket:
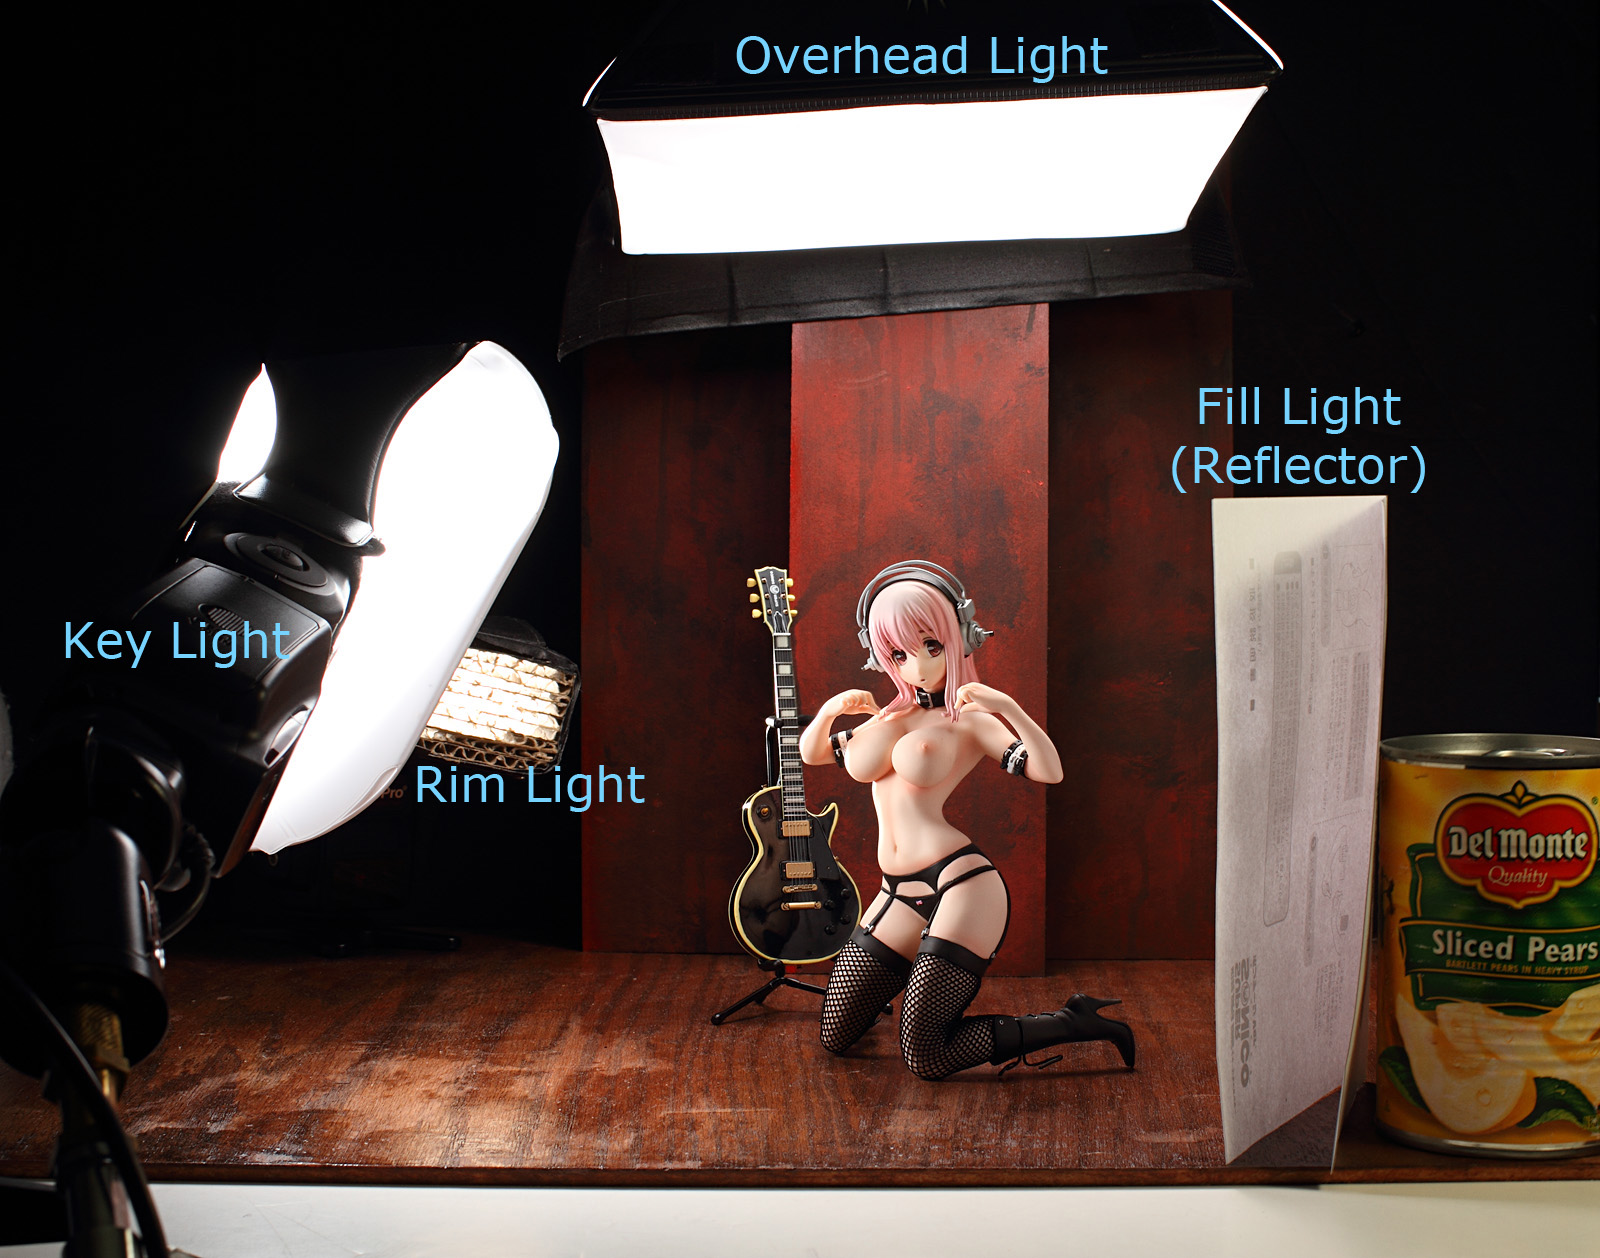
The overhead light and the background light that is firing sideways are still there. The two new things are an LumiQuest Ultrasoft modifier on the key light and a reflector that serves as a fill light.
I picked up the Ultrasoft a while back because I wanted a modifier that doesn’t take up a lot of space. A softbox protrudes from the front of the flash head and takes up a considerable amount of room but the Ultrasoft is meant to stand vertically with the flash tilted at 90 degrees. However, I often try to control light spill from the key light and the Ultrasoft isn’t quite as good for that as a softbox is. That property actually works for what I’m trying to do here, though; I want the background to be visible so the spill doesn’t bother me at all. In fact, I’m shooting at f/11 to bring out the background details, which is about as narrow as I like to use since diffraction effects start becoming visible if I stop down much further.
Incidentally, I sometimes see people shoot figure pictures wide open to minimize depth of field and maximize bokeh visibility, and I often don’t think that that’s a good decision. Bokeh is like Auto-Tune for pictures; it can be a good thing, but more often it’s used to mask problems or general cluelessness. Take a look at my Nadeko pictures for an example of such.
Anyway, back on topic. I typically don’t use a fill light in my pictures because I like deep, dramatic shadows. However, that sort of thing doesn’t work too well for Sonico, so I’ve placed a fill reflector against my beloved, always-useful can of sliced pears. Astute observers may recognize the “fill light” as being Sonico’s instruction sheet.
Here’s what Sonico looks like without the fill light. The right side of her body is darkened, and the area around her crotch is particularly shadowed. I like the images with fill better, and it’s something I’ll have to remember to use in the future – when appropriate, of course.
For Sonico’s topless shots, I switched to a 35mm lens to exaggerate the distance between the figure and the background. In the previous pictures, the background looms large and Sonico looks as if she’s positioned very close to them. Now, the wood panels look skinny and further away, even though Sonico’s position hasn’t changed very much.
I’ve still got the Ultrasoft on the key light and the Softbox III on the overhead light. One thing you might notice is that the overhead light has a flag along its bottom edge to cut down on some of the spill on the background. I do not actually remember what I was trying to accomplish with that; I suppose I was trying to darken up the background just a bit compared to the figure. I’m not sure if that flag is actually doing anything.
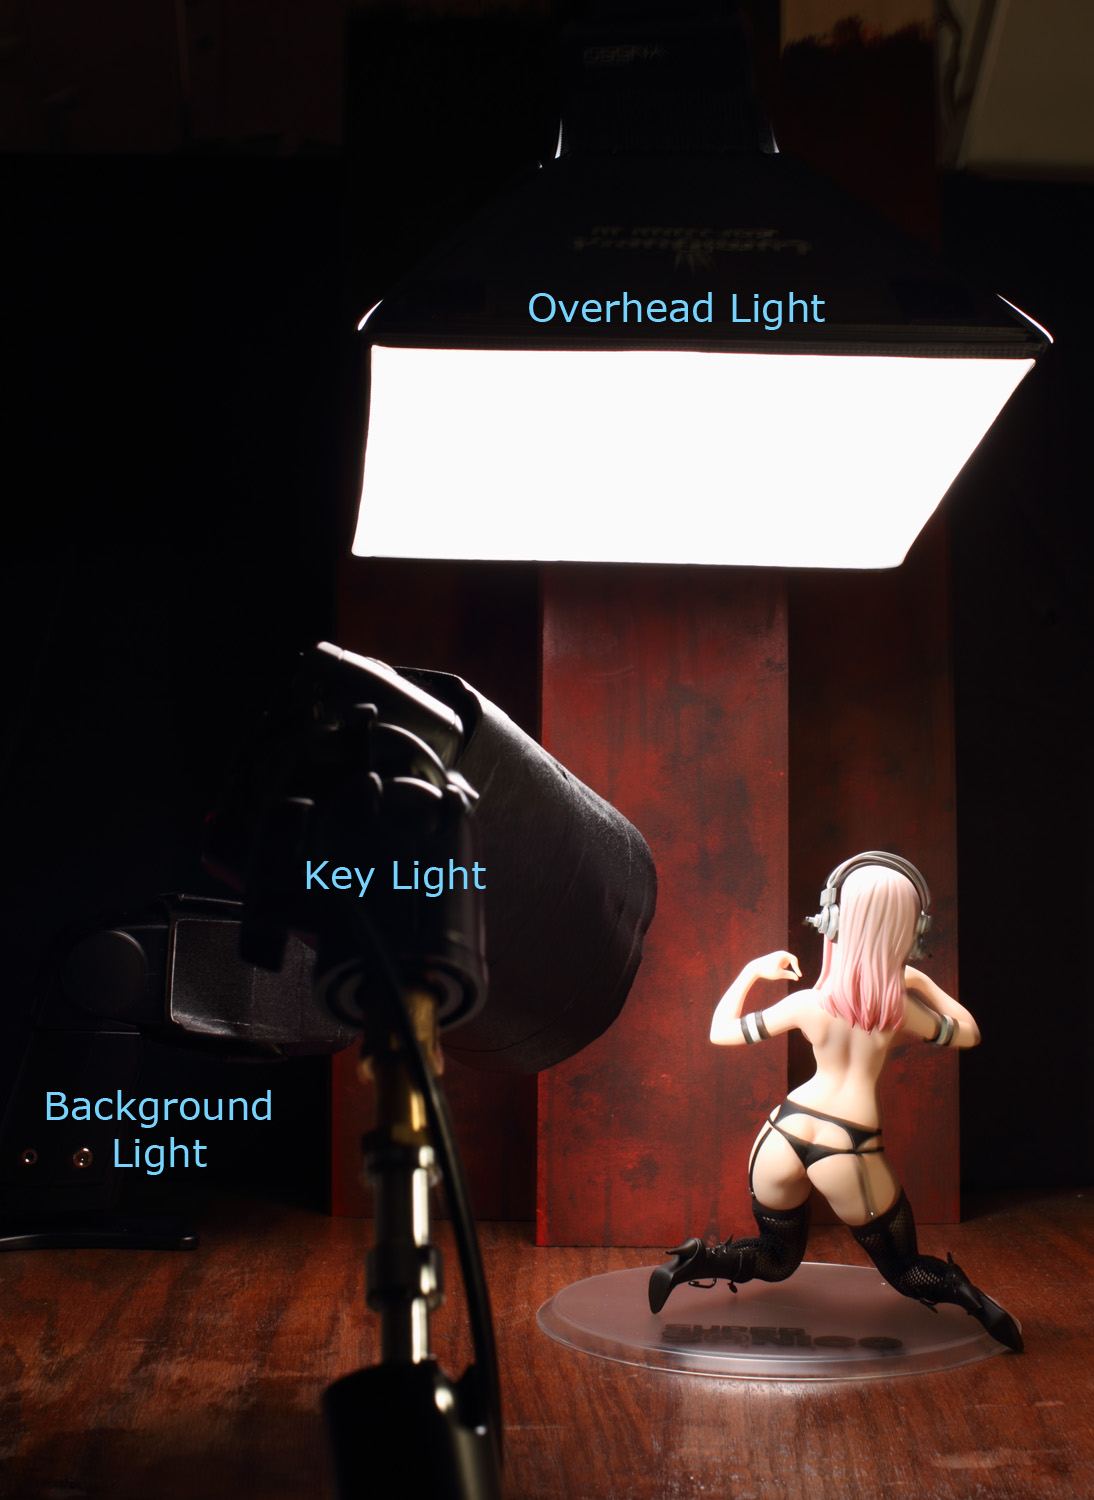
The main difference here is that I’ve taken the third light off the background and now it’s serving as a rim light.
The rim light puts a faint outline on Sonico’s right side, but it’s not very noticeable. I decided that I wanted something more dramatic, something that will separate the cast-off shots from the clothed shots.
I kill the overhead light and remove the fill reflector, and place two flashes with snoots behind Sonico and flanking her left and right. I’m using the white pieces of paper as gobos for the flashes to stop them from flaring into the lens; laying there in front of Sonico, they might reflect light up at her, which isn’t what I want. These rim lights will outline her body with hard light.
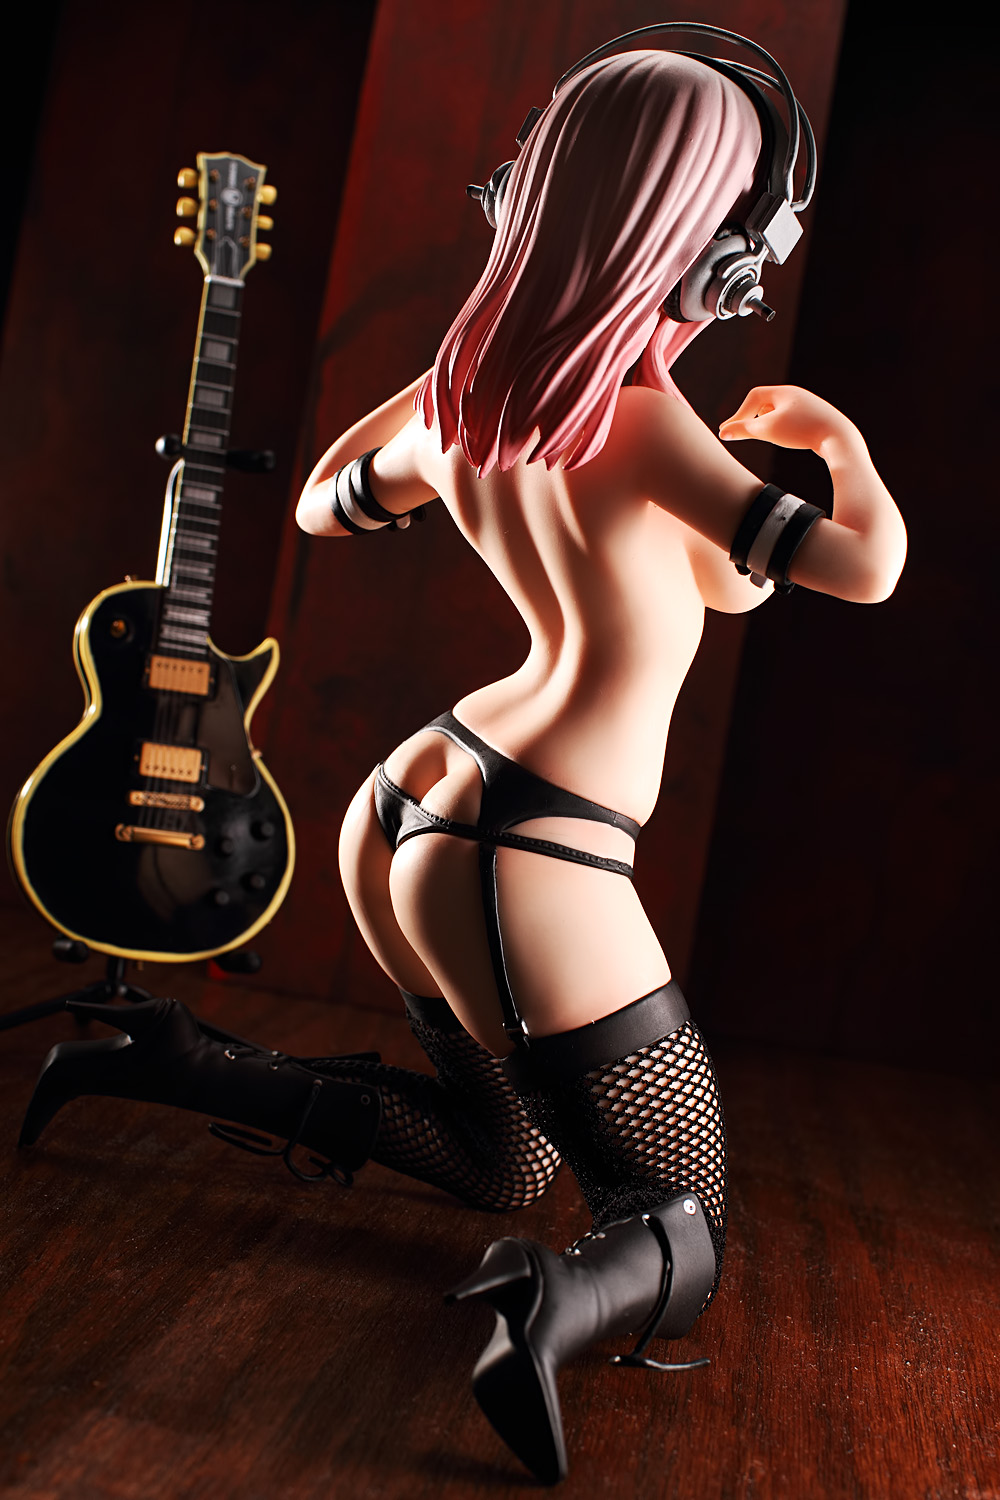
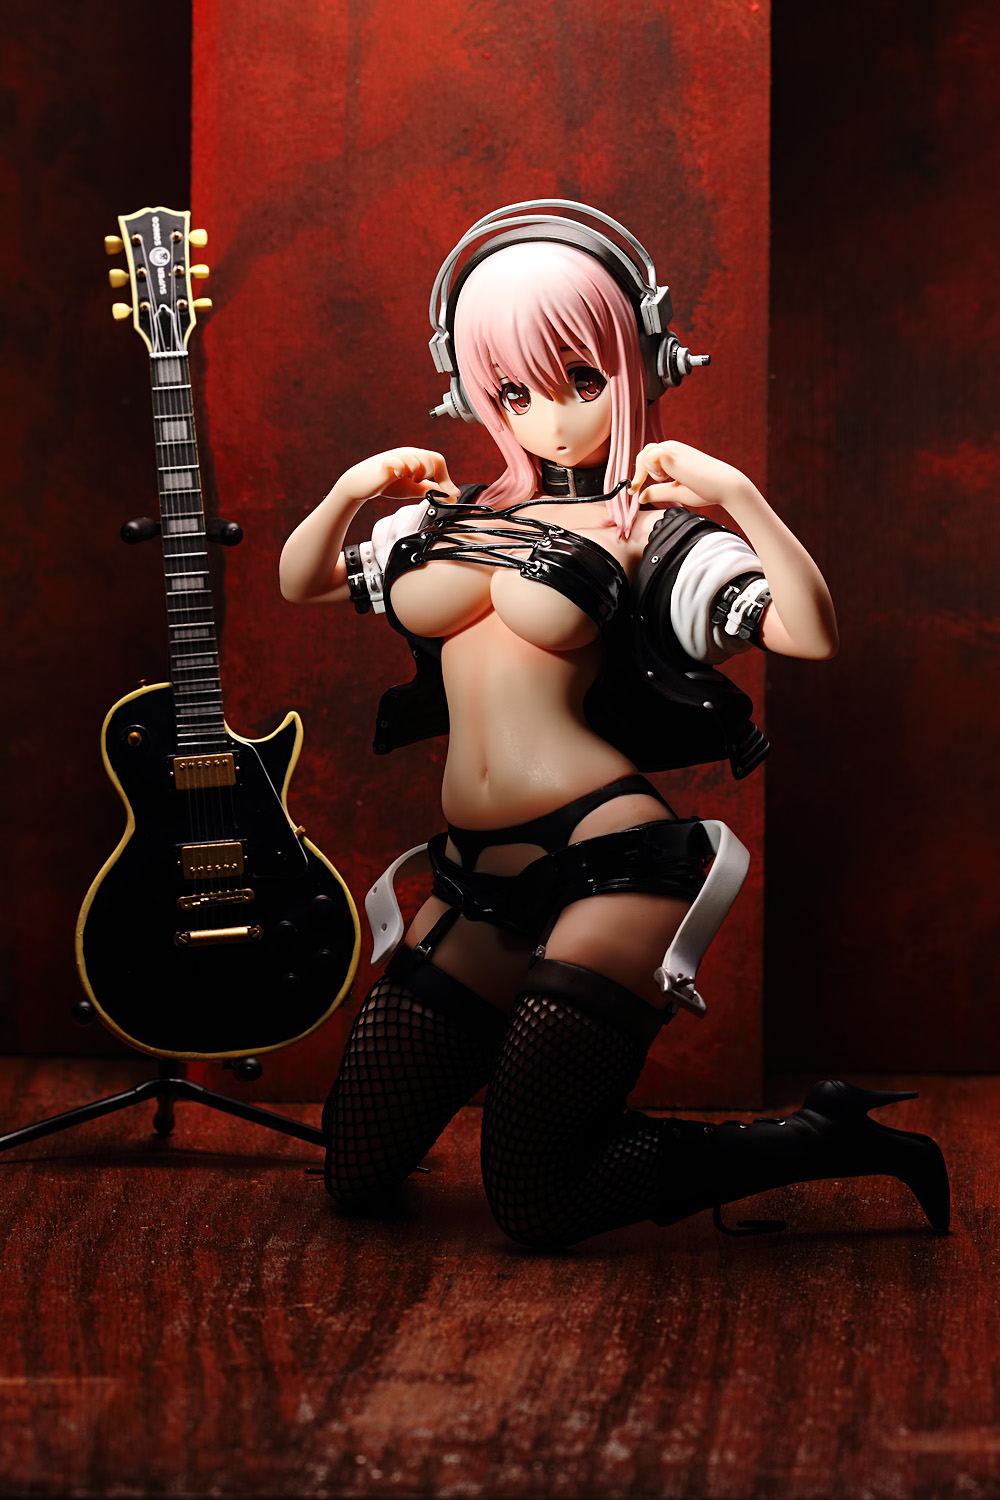
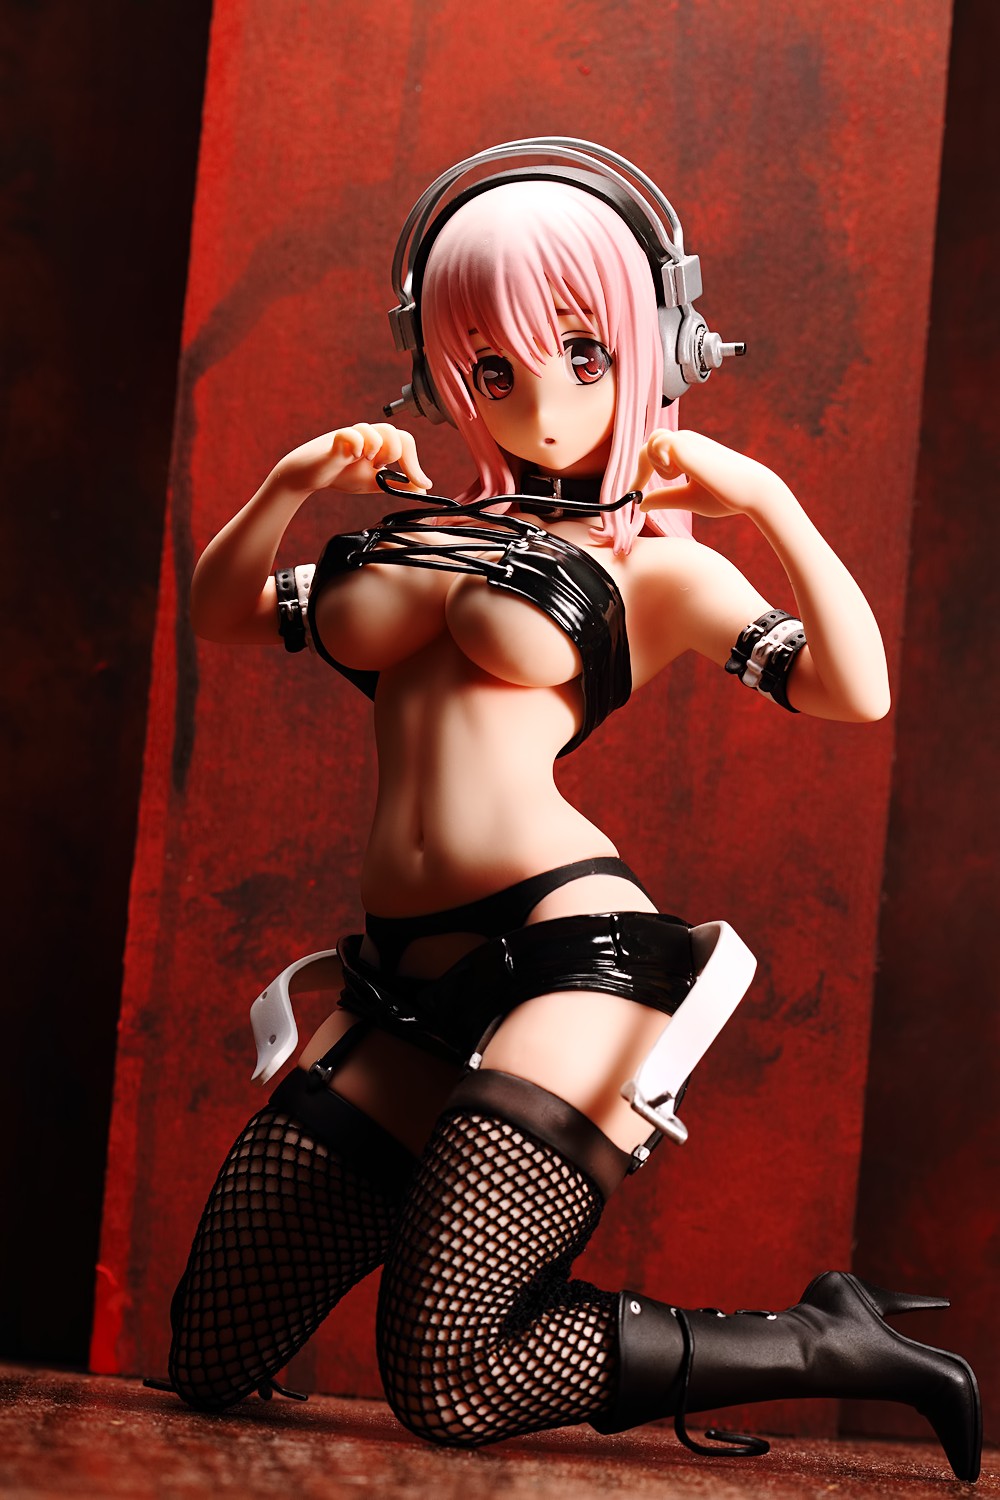
Just like this. The hard light gives her a sculptural look, highlighting the contours of her body. If I’m trying to highlight body lines or muscle, I like to use hard light, because they will bring those out. I tried to do that with my Darth Talon review.
I try to do different things when I do a photo shoot just to see what will happen. I like some of the things I tried to do here and I don’t like some of the other things. Even the things that didn’t work out were worthwhile though, because I learned something from them, and that perhaps has more value to me than the shots that came out okay.


I have so much to learn about lighting if I want to take shots a fraction as good as yours. ;.;
I do verily appreciate these breakdowns as they help me see how you do it, and for me to get my head around it somewhat. I’ll probably read over it several times and still not quite “get” certain aspects, but I hope you continue doing these (and pop in to IRC even if you don’t like kemonomimis) to give pointers. I have a shipment of figures enroute at the moment I will try to get some good pictures of, though still lack any possible staging materials like yours.
Seeing this relatively simple staging gives me some vague hopes, but still seems like a lot of time and effort. You really are dedicated to this… for which we are all appreciative, even if it fills me with despair over never being able to come close to such results myself.
Practice is the best teacher. And failure. Lots and lots of failure. Assuming success just leads to complacency but recognizing failure leads to improvement.
While I like making backdrops, I’ve been feeling very lazy recently and I’m trying to think of ways to economize on the necessary time to build them. This is one of those attempts; I’m pretty happy with how it looks and I’d like to experiment a bit more with arranging stuff geometrically. I have a few figures that I really want to photograph and have wanted to photograph for over a year but the backdrops I’m thinking of are so complicated that I haven’t even attempted to build them yet.
I can deal with kemonomimis XD Not that I know what that means, exactly, but I know what “mimi” means, at least. Actually, it’s certain political beliefs that drive me off. They actually kinda make me want to murder people, and since I don’t really want to kill anybody (well, besides a few people), I think I should stay away.
Oh, yeah, political “debate” happens, particularly when it comes to one person who is a diehard nazi red republican. She’s generally the only one who brings up politics, and usually just as a rant about some news she read on Fox.
Most of us don’t care about politics, particularly American politics since we’re largely not American and their system means little to us. But I understand the loathing, it gets a bit much for all of us at times, which is generally why we go silent or make snide comments.
Anyway, yeah, I can understand about backdrops. I’d love to do all sorts of scenes with many of my figures, but since I lack the liquid funds to just buy premade sets or have them made, and I’m incapable of building anything near the standards I desire, I just stick to plain colours. It’s dull, which is largely why I don’t bother shooting at all. Haven’t taken a single picture in weeks, though I will when my latest shipment arrives. Also nendo playsets should be here soon… that may be fun.
Yeah, I generally keep my politics to myself (aside from the Obama doll I feature every now and then, but that’s much more for comedic effect than to make a statement). I find it repugnant when people just arbitrarily throw around their political views, particularly when they are wildly misinformed.
I kinda like the more exotic backdrops I use, but simple backdrops have merit all of their own, I think. They allow the figure to take the focus rather than having the background overwhelm the impact of the image. Plus, I think being able to make a figure look good regardless of the background is an important skill to develop. I’ve got a ton of pictures that I don’t show to people, but the practice was still crucial to giving me an understanding of how to light a figure. It didn’t matter that the background was my computer keyboard and some figures that I have on my desk; the important thing was getting that practice.
Nice behind the scenes look. Lol Del Monte sliced pears :D. Is that just used to hold the paper (fill light reflector I guess) thing?
The way you positioned some things, like the key light, and took the picture made the behind the scenes look like a real photo shoot. Pretty cool.
But what’s with the censoring? Are they becoming the newer SFW articles? I know if you click on the picture, it shows the non-censored shot though.
Yeah, I use the can of foodstuffs to hold stuff up, or weigh things down, or to boost things up. It’s a reflector stand, a flash stand, a counterweight, a backdrop support, and emergency rations. It’s amazing.
I plan to keep the shot breakdown posts ostensibly work-safe, unless the figure is completely NSFW to start with. My rule for flagging a post NSFW is exposed nipples, genitalia, or completely uncovered buttocks; if anyone wants to see the uncensored thumbnails, they can go to the actual figure review, since the reviews will never be censored.
It’s always fun to see what kind of materials you find for your photos. I can never seem to find the right backdrop or set that I envisioned in my head. lol
Really like your posts on Matabei and Sonico, it’s an interesting read to see what kind of setups other people use for their photos. It’s kinda like looking at another house and wondering what it’s like on the inside. Or maybe it’s just me? ^_^’
The red background was a really good choice, helps contrast the black and allows her pink hair to stand out. Very nicely done and shot – the “no-fill” and “sonico-12” are my favourite, I tend to like figure pics with more dramatic shadows that show off the figure’s body. 🙂
Yeah, I love big scary shadows and lots of contrast. I think contrast was the first slider tool I learned how to use in Photoshop, and it’s kinda just stuck with me over the years.
It’s pretty tough sometimes, thinking of a backdrop and then trying to make it happen. I’ve got all these ideas for sets but a lot of them are beyond my abilities or means to construct, and I’ve got a number of figures that I can’t think of anything to do with. Unfortunately, a few of those figures are in the review queue right now. I need to come up with a few good stock backdrops that I can reuse with a bit of redressing.
Very interesting documentation of you setup~ I am trying to do one for my DDs but it’s been taken me longer than I like haha. Sometimes I like contrasting shadows too, it really give some depth to the picture; but other times I just like evenly lit pictures. I am planning to migrate away from my continuous lighting to a multiple flash setup but I only have one main flash at this point and haven’t procured all the equipment. Looking forward to Nikon’s new releases later this month 🙂
Flashes are a ton of fun. And they don’t take up much space and I don’t have to worry about wires draping all over the place.
What are you attaching your overhead light to? And how much space do you have for your studio? I had a couple of ideas for building backdrops, but I think I’m going to need to hijack one of the other rooms in my house.
It’s hanging off of a Justin Clamp, which is clipped to a shelf that’s right over my desk. It’s a really handy thing, albeit really, really expensive for what it does.
I’ve got, hmm … maybe two feet by three feet? I don’t have much room at all, which makes using wide angle lenses really problematic.
I really love these shots and background. Thank you for taking the time for explaining how you did this. I hope to one day have photos as nice as yours on our site. We really need to take more time and money to invest in making good looking background and scenes like these ones!
I’m glad you liked this post. I’m hoping to do more stuff in this vein, since not many people talk about how to take figure pictures. Back when I started, I found super rats’s posts on lighting to be very useful, but if I see a photography-related post on a figure blog, it’s usually about what gear someone bought or what gear someone wants. Gear is great, I love gear, but I want to try to shift the focus more towards how to take pictures rather than collecting gear.