
Even after shooting something like 20,000 figure photographs these last couple of years, photography still has a way of surprising me, and I thought it would be interesting to document how I take certain shots. This is the first post in an occasional series of articles in which I’ll describe what I was aiming for in a particular photo, what I think of it after I’m done, and what I could have done differently.
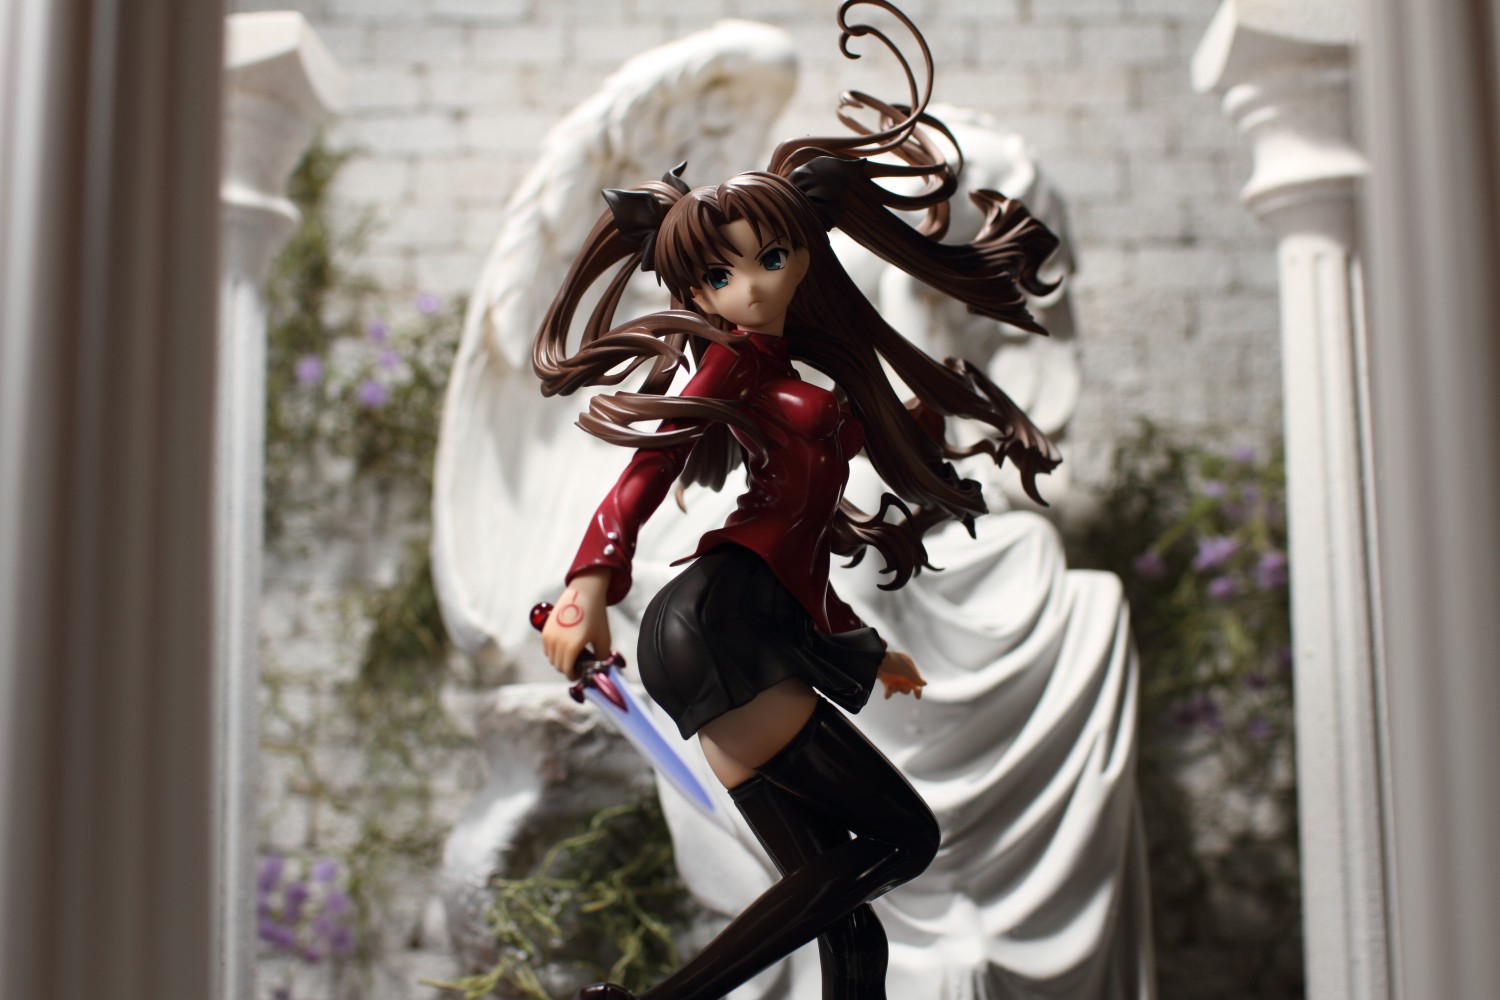
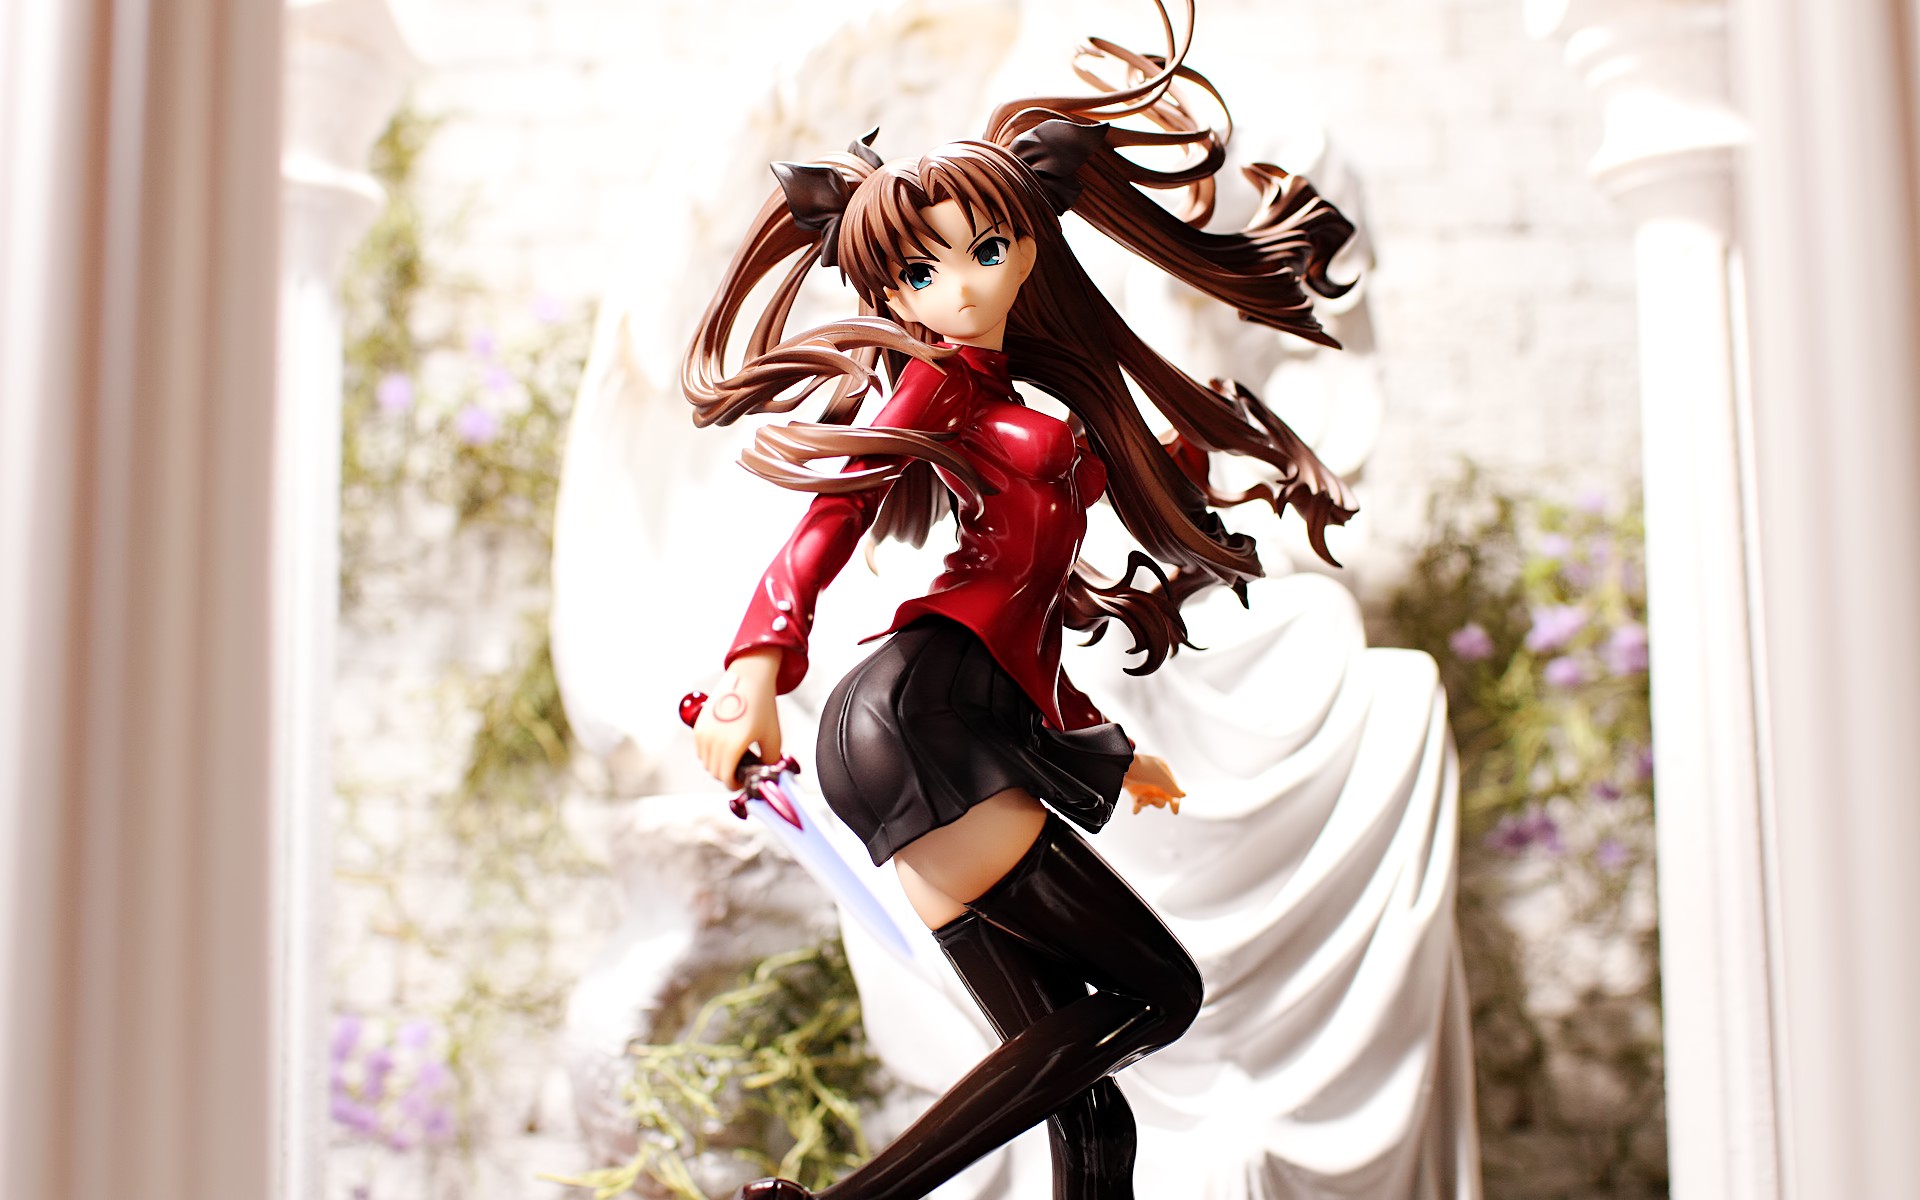
I like how the image above turned out, and I’ve gotten some nice compliments about it. The funny thing is, I did not intend to use it in my Rin review. In fact, it wasn’t a serious picture at all and I initially felt that the composition was so hopeless that I didn’t bother taking any more shots in this vein. It wasn’t until after I took the shots into DPP that I saw I could do something with it. Why did I dislike this shot so much? Why, because it originally looked like this:
Oh my.
There’s a good reason why the photo is so dark. The first thing I do when I photograph a figure is to get my lights worked out by shooting a series of test shots while varying the aperture on my camera and the power, distance, and position of the lights. The shot above is a simple two-light deal, with the lights set in the following position:
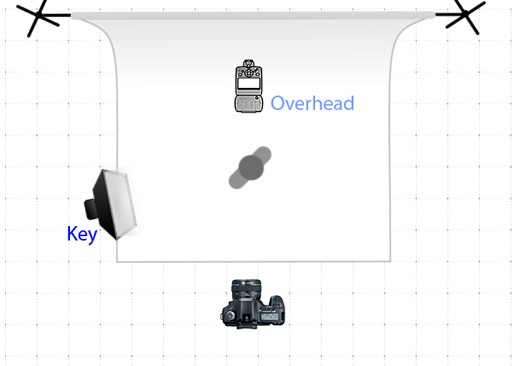
The key light is set to camera left, firing through a LumiQuest Softbox III. It’s a small softbox but because it is relatively large compared to a figure, it gives a very nice, soft light, as you can see from the shadows on Rin’s face. The second light is mounted on a Justin Clamp overhead, firing straight down through a dome diffuser. The purpose of dome diffusers is sometimes misunderstood; they don’t soften the light by any appreciable degree. Rather, they scatter light in every direction forward of the flash head. The nice thing about this light is that it illuminates the entire background while putting a little more light above and behind the angel statue, giving it more of a divine look, like light shining down from heaven.
Not that you can tell that from the original image, however. That picture was actually the very first shot I took during the session and I obviously did not get the lights in even the right ballpark. Fortunately, DPP includes an easy way to correct exposure.
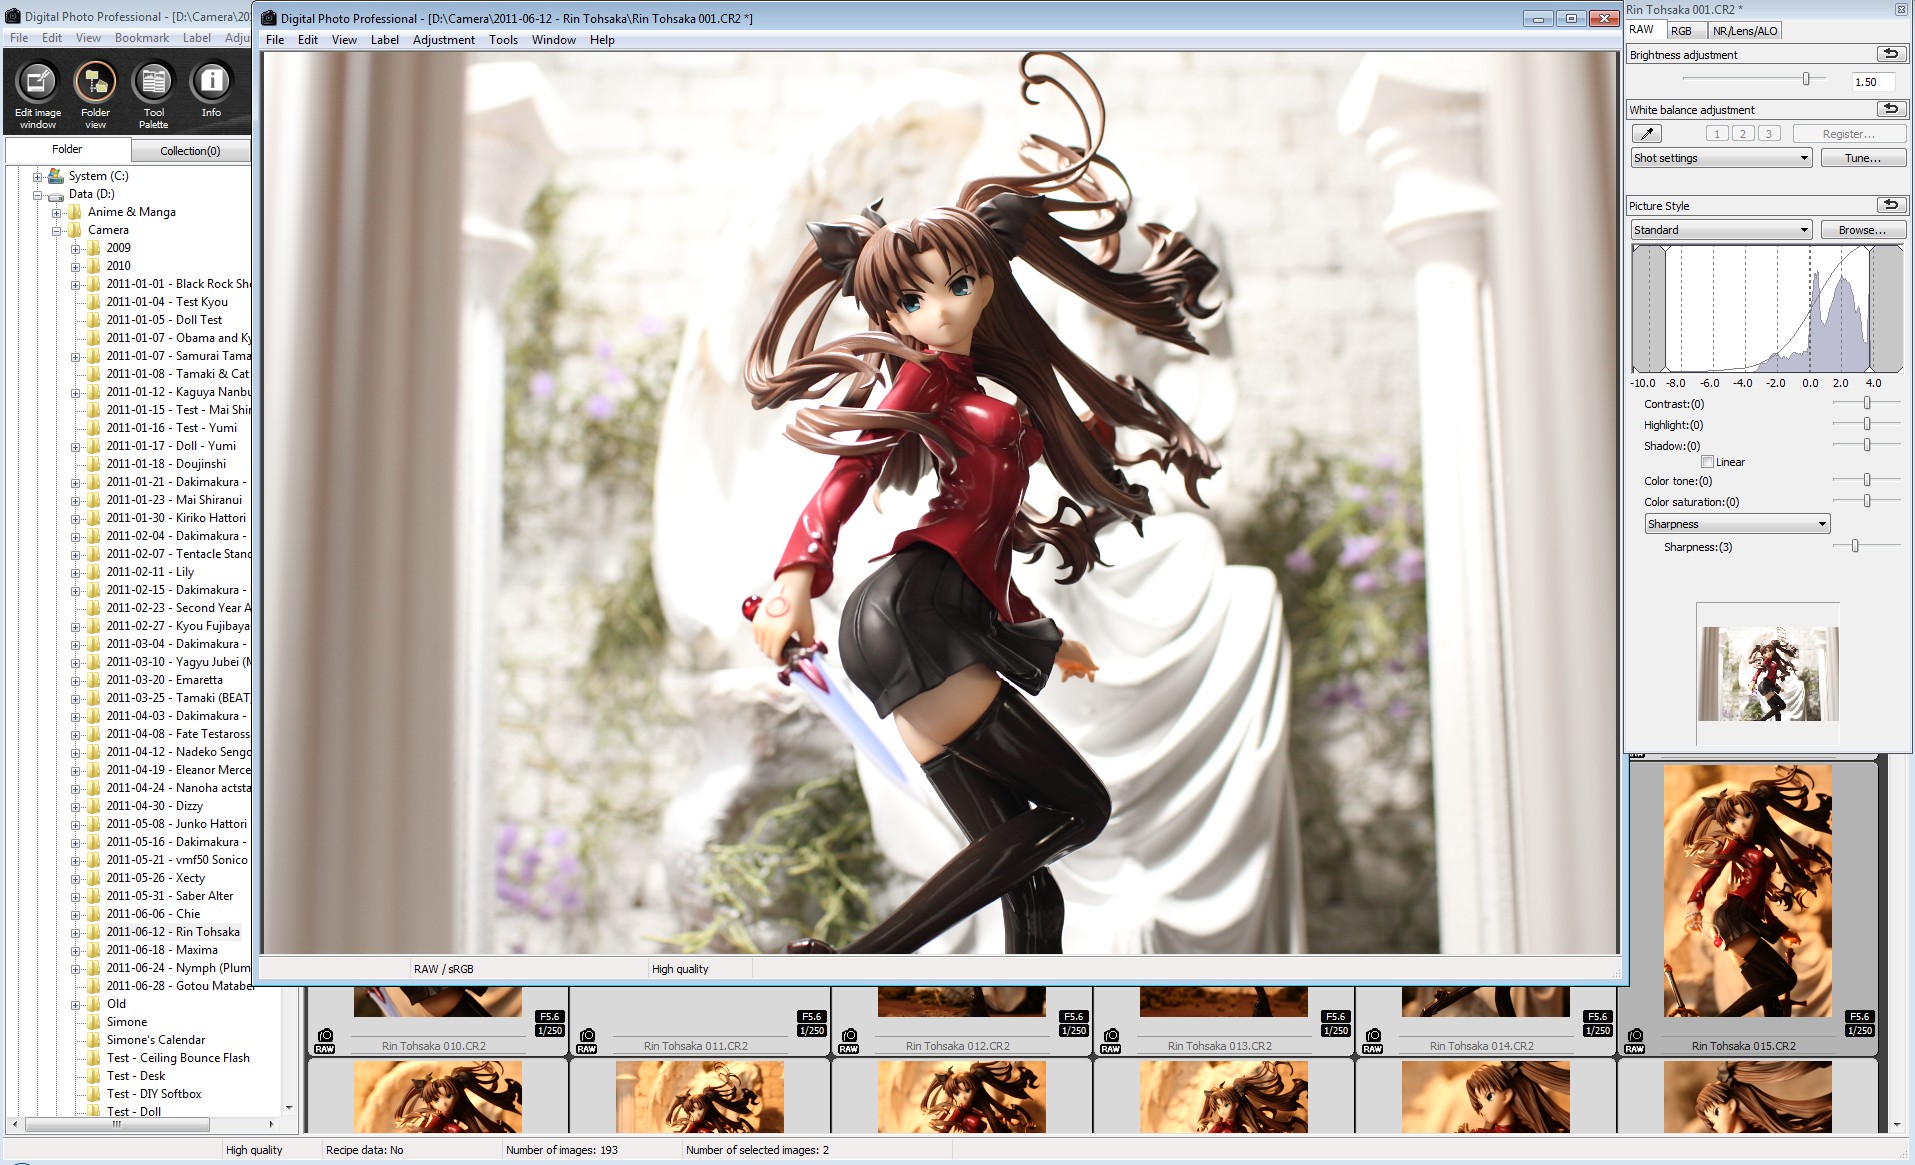
This is the image with the exposure increased by one and a half stops and it’s looking much more usable now. The histogram is screaming that I’m blowing out the whites but that’s okay. This is one of the reasons I really like shooting in RAW format and wish I’d switched over earlier from shooting JPEGs. Yeah, it’s not too hard to get a similar result with the curves tool in Photoshop, but this is a lot easier and doesn’t run the risk of messing up specific tone ranges.
I generally only do exposure, white balance, and lens distortion adjustments in DPP; I do the rest of my post-processing in Photoshop. I didn’t do a whole lot to the image; I did a curves adjustment to increase contrast, brightened the image, increased saturation, and increased red balance in the highlights. I’m not sure whether that last step was a good idea; I always do it because I think it gives figures a more pleasing skin tone, but since it’s a global adjustment, it also affects all other bright areas, which is why the image has a noticeable reddish tint. It doesn’t really bother me much, to be honest; I reprocessed the image later on, masking out the background so I could adjust Rin’s skin tone without affecting the backdrop but I did not like the results all that much. I think the red tone gives the image a warm, welcoming feel that emphasizes Rin’s heroic pose. Without it, the image is cold and sterile.
I was trying to give the image a solemn feel, and I think the lighting does a decent job of getting close to that effect. However, that huge-ass knife in Rin’s hand does not help establish that mood at all, and I really wish I’d swapped it out for her magical jewels. I didn’t plan on using this picture so I didn’t even think about that, and since I didn’t like the composition of this shot, I didn’t do a follow-up from this angle. However, I did take one more shot with the backdrop elements in place, and maybe that provides the best explanation for why I had no confidence in the setup:
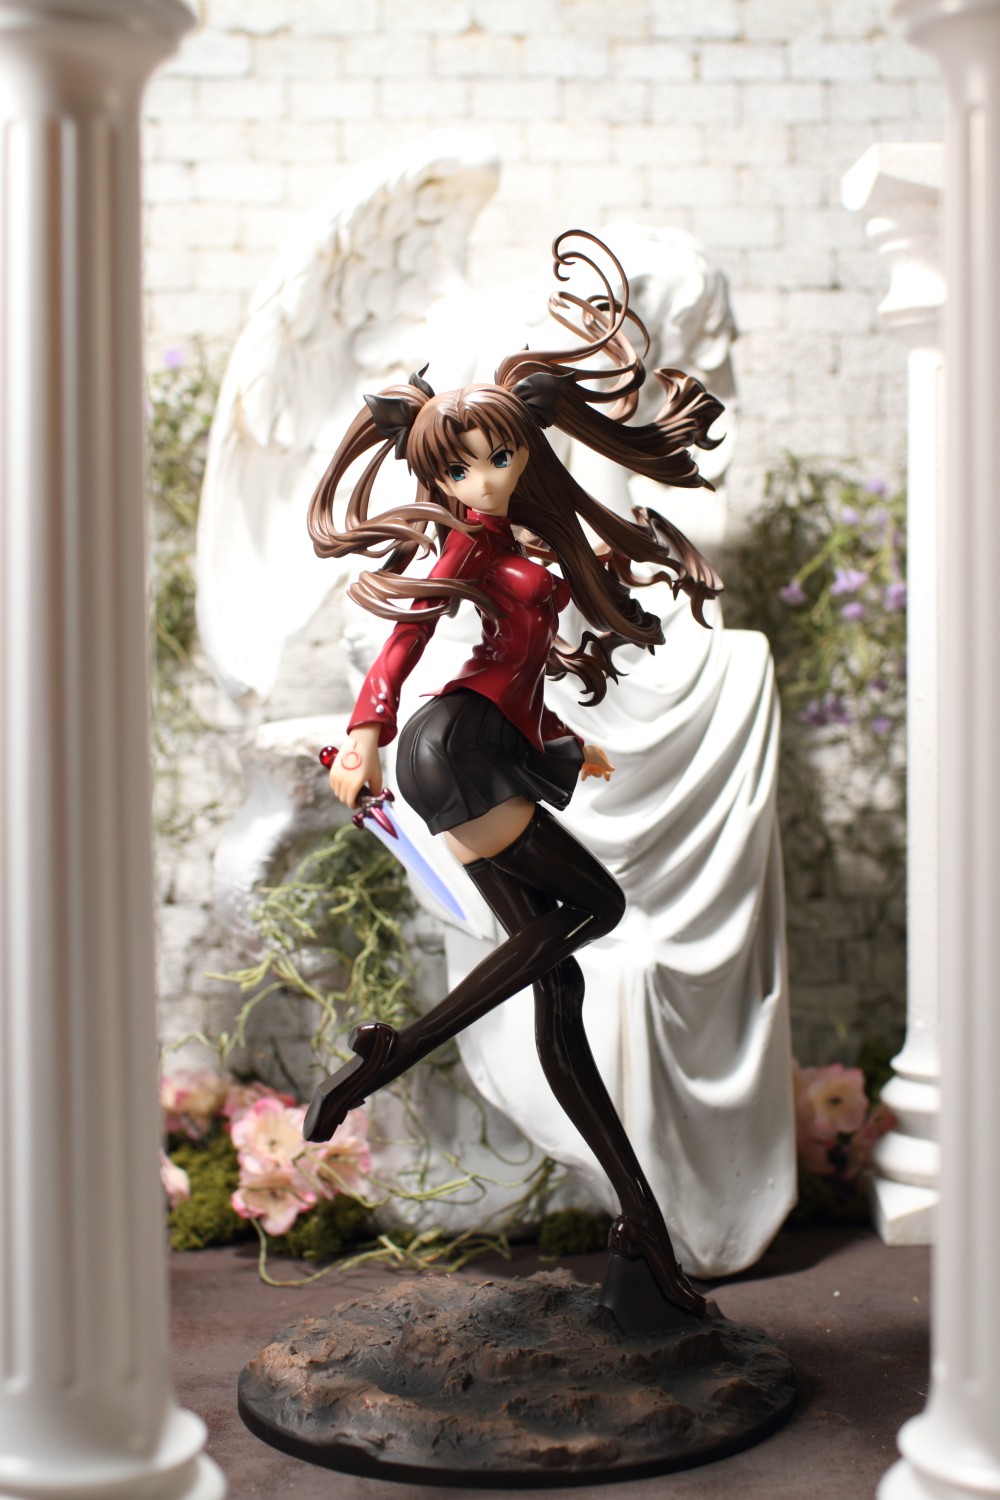
Look how cramped this shot looks. The composition does not work at all in portrait orientation. The shot is too tall. The flowers piled at the base of the statue are distracting. The figure’s base doesn’t blend in well with the floor. Any mood that might be conveyed is obliterated by the claustrophobic feel of the photo.
The composition of the first photo gets around these problems. Because the shot was taken from a low angle, the floor cannot be seen. Not only does this get rid of the flowers, it also makes it difficult to judge how far Rin is from the background, whereas it’s very easy to see in the portrait shot. The landscape orientation gives the elements of the shot some room to breathe and also allows adherence to the rule of thirds (which isn’t really a rule, but I don’t know enough about composition to feel comfortable with deviating from it), with the columns taking up the left and right sides of the frame and with Rin taking up the middle third. Also, the photo was shot with a 35mm lens pushed in very close; this exaggerates the distance between foreground and background elements, making the front pillars seem further from Rin than they really are. Admittedly, 35mm isn’t a wide-angle lens on an APS-C camera – actually, it’s right in that nebulous area between normal and short telephoto – and I wish I’d tried out a wider lens to see how that changes the look and feel of the shot.
I didn’t like the shot very much at first, but I like it quite a bit now. However, it’s still not quite perfect. One thing that really bothers me is how one of the flowers on the right side of the wall is drooping. A couple of minutes in Photoshop can fix that, though:
There we go. Now I think I can say I’m pretty satisfied with the shot, even though it originally was nothing more than a power test. It’s funny how things work out like that.


Great post, man. It was really interesting to get into your head a little and hear about what you think works and what doesn’t in your shots and why. The technical stuff was also really interesting to me, now that I’ve begun to actually learn more about equipment. I’d love to see more posts like this. In fact, I bet a step-by-step walkthrough video of this would be really popular! If only you would lend your voice to the world, which I am sure is sweeter than honey. =P
It could be! My voice is indeed sweeter than an angel’s breast milk but unfortunately, while I have a ton of expensive photographic and computer equipment around me on top of thousands of dollars worth of plastic figures, I’m somehow lacking a working microphone. Such a shame, that.
Pretty much all digital cameras have a microphone built in to them for their movie modes, even if it’s just a mono button, it’s sufficient for voice. You have no excuse. ^^;
Ha, yes I do! He does this podcast thing which is combined with video. Unfortunately I have no working mic so I cannot participate in such a thing. Unless he actually meant he wanted me to film the video, in which case the answer is hellllllllllllllll no. Nobody wants to see me or my body parts in front of a camera.
You can edit talk bubbles into the video if you’re microphone shy =)
hehehe jk
I was thinking more of you simply record setting up a shot, showing us as you put together the scene and set up lighting and such, and simply talking through it. The mic built in to a camera will pick up voice just fine while you work. No need to actually show yourself in the video (maybe wear gloves even so we can’t see your hands as you set up the scene). ^^;
But, video stuff aside, I would be keenly interested to see you do more of these sort of articles, and explain why you chose what props and lighting, maybe even give us some detail about camera settings (it may be possible to extract exif data from your photos, but I’m too lazy for that, would rather see a blerb about it).
As a novice photographer struggling to learn my SLR and how different settings drastically alter the outcome of shots, I’d very much like to understand how you manage such excellent photos.
I could do that, and maybe I might incorporate video in the future but right now, I don’t plan to do so. I’m really camera-shy and I loathe speaking into electronic devices. It’s likely I’ll cover those sorts of topics in a written article, though, perhaps sooner rather than later.
Funny thing, I like that picture so much it’s now the wallpaper for my Droid 8)
p.s. my previous wallpaper was of Yamamoto 56 from none other than your gallery 8)
Cool, thanks for that, I’m always happy to know people like my stuff XD
I set Matabei as my wallpaper =). You should put watermarks on your pictures though. They’re usually annoying, but I think you should still have some credit for the pics in case some pics.
Not necessary huge watermarks, but barely visible ones… that might only be visible when zooming into the corner. Besides, since the WM is likely going to be in the bottom corner, it won’t be visible when the pic is set as wallpaper, as thats where the taskbar covers it up =)
Just a suggestion!
That’s something that I’ve thought a lot about in the past, and I finally decided not to do it. Sometimes it bothers me when people jack my stuff and sometimes I don’t mind it; it’s pretty much a situational thing for me. There was this one time last year where I was going to put watermarks in the corner, but when I did it really bothered me, and I’m not sure why, so I took it off. I could still change my mind on watermarking, but for now, I think I’m okay with leaving the pictures as they are.
By the way.. off course we like your stuff!
Ahh, I’ve had so many shots that I thought looked crap but when boosting the exposure just for kicks suddenly it becomes awesome. I wonder how many thousands of thrown away RAWs could have been hidden gems?
Anyways, thanks for that insight into your photographic process, I’m really looking forward to the other articles in the series. It’s great to be able to see the original untouched photo and hear the lighting setup and thought that went into it and then hear the post-processing techniques to make it into the final picture. Although, I’ve been staring at that original picture and I still can’t find that drooping flower!
I have quite a few pictures that could’ve been saved had I shot them in RAW because the white balance is all wrong. I could easily fix that in DPP or Lightroom but since they’re JPEGs, there’s no way to save them short of doing massive work in Photoshop, and I’m not sure they can be salvaged even then.
Here’s the drooping flower. Man, it really bugged me. The other flowers are sagging as well, but they don’t bother me as much as the one conspicuous one.
Awesome man! I have a D3100 on the way, and I am going to need some pointers! Btw, any chance of this shot in a 1920 x 1200 res for a wallpaper? They literally look that good?
And what’s your take on the NFL situation? :p
It is 1920×1200! Unless you want that shot right above with the arrow pointing towards the drooping flower. I can certainly provide that picture at wallpaper resolution 😀
Uhh, man, you know, I was actually more into last year’s NBA season than I was into football, so I’m really hoping they figure it out and don’t cancel next year. It sounds like the NFLPA and owners are closer to a deal, so I’m guessing they play the full 16 game schedule. I’m still wondering what the Redskins are gonna be doing at quarterback. I thought the 49ers had a pretty bad situation there but the Redskins are even worse off. Are they really going with Rex and Beck?
Really appreciate this post. I love reading about how photographers go about their craft in general, so this was a nice intersection of interests.
I think you could make this a regular feature of your reviews, assuming you had the time. You had a post a while back about your various foibles while building sets and setting up shots, which was also a fascinating read. I’d love it if you did more like this. For my own reviews, I try to write a little about the photographic setup, but I always forget to take pictures of it before putting all my stuff away.
I might do something like that; not as part of the main review but as a follow-up post a bit later. That lets me space out posts a bit more and I won’t have to scramble for filler post ideas.
I do enjoy reading your photographic process in your posts. I know a lot of people just sort of go the three-point lighting route on posterboard or a patterned background or whatever for every figure photograph they take, so I’m always interested to see how things turn out when people try different setups.
Some nice skill with graphics and photography there.
Thanks!
Hey great shot! And thanks for the tutorial as well! I’ll try out your setup for my next shoot!
Thanks! I’m glad this was useful.
I am loving these shot breakdown posts.
I ought to do more of these. The thing is, I haven’t been feeling all that great about a lot of my recent shoots so I didn’t take a lot of setup shots. I wish I’d done a few more with Triela since I really like that shoot, but the other ones were either fairly straightforward or a real struggle.
learning a lot on your breakdown posts. I realized that I need time to do some experiments, memorize terms and invest some gear, oh my….